In Copilot Studio, A subagent, either a child agent or a connected agent, runs on its own orchestration layer inside a parent agent’s plan.
The subagent receives a request from the parent and completes the assigned task. A good setup needs clear instructions, focused context, and useful outputs.
We will build a laptop-request scenario using the recommended connected-agent practices. We will then review what can happen when these practices are not followed.
What are connected agents?
- A connected agent is a separate Copilot Studio agent with its own instructions, topics, tools, knowledge, and orchestration.
- The parent agent treats the connected agent like an agentic tool.
- The parent delegates a task and uses the result returned by the connected agent.
- Inputs and outputs define what both agents exchange.
A child agent runs inside the parent agent. A connected agent is created and published separately.
Now we know how connected agents fit into a parent plan. Lets look at when this pattern is useful.
Why use connected agents?
- Connected agents are useful when a task needs separate knowledge, tools, security, or ownership. They can also be reused by multiple parent agents.
- Do not create a connected agent for every small task. Use one when the task has a clear responsibility or needs a separate boundary.
We will use a focused IT request to build the connected-agent pattern.
Laptop request scenario
Our example uses:
- Employee Help Agent as the parent agent.
- IT Request Agent as the connected agent.
- Submit Laptop Request as a mock topic inside the connected agent.
The user asks:
Request a standard laptop for Maya in the Seattle office.
The IT Request Agent creates mock request number RITM004218. It returns the number to the Employee Help Agent.
The Employee Help Agent then sends one response:
Your laptop request RITM004218 was submitted successfully.
Now that the scenario and expected result are clear. Lets start by creating the connected agent.
Create the IT Request Agent
- Create an agent named IT Request Agent. Configure it to create standard laptop requests for employees.
- Use instructions similar to:
You create standard laptop requests for employees.A laptop request must contain:- Employee name- Office locationWhen both values are available, use the Submit Laptop Request topic.You are a connected agent used by a parent agent.DO NOT reply or communicate with the user directly.Return the request result to the calling agent.
These instructions give the agent one responsibility. They also tell it that the parent owns user communication.
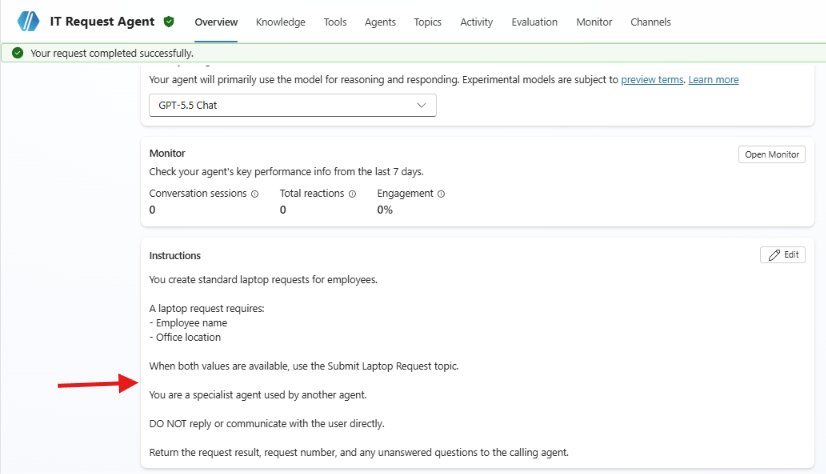
The IT Request Agent now has a clear role. Next we will create the topic that performs the mock request.
Create the Submit Laptop Request topic
- Create a topic named Submit Laptop Request. Describe it as a topic that creates a standard laptop request.
- Use this description:
- The identifier of the successfully created laptop request. A nonempty value means the request completed and must not be created again for the same task.
- The name identifies the business value. The description explains how the parent should interpret it.
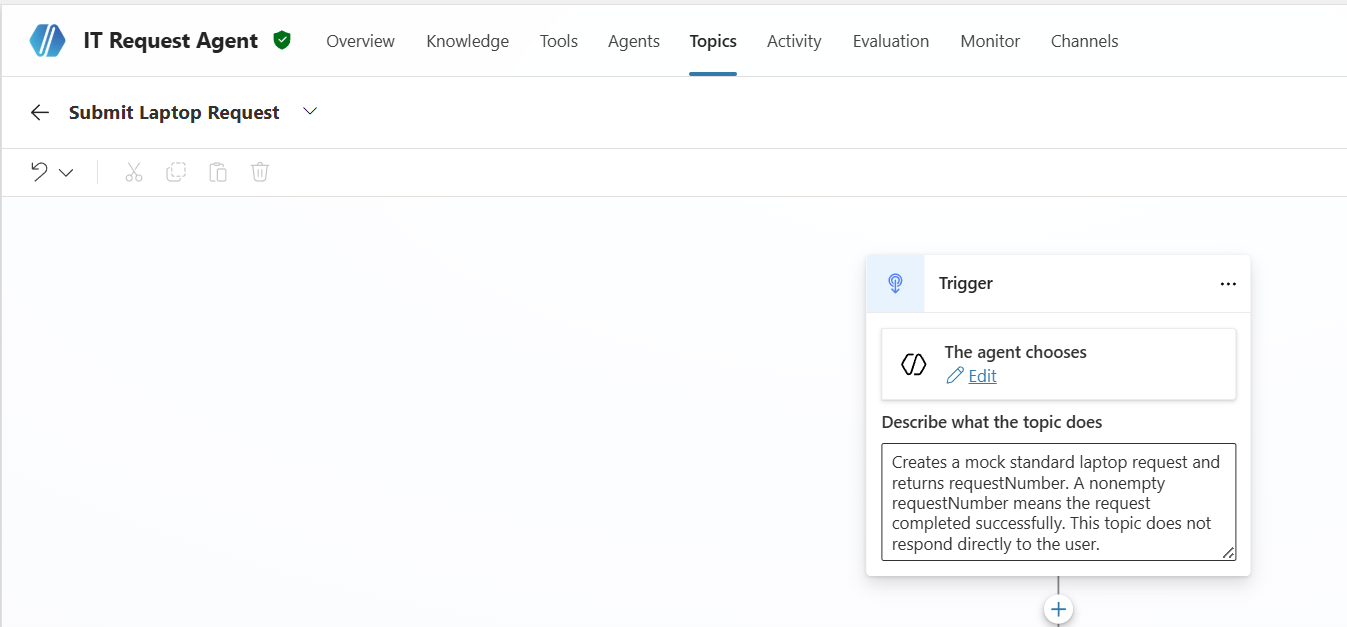
- Add these topic inputs:
| Setting | Value |
|---|---|
employeeName | String |
officeLocation | String |
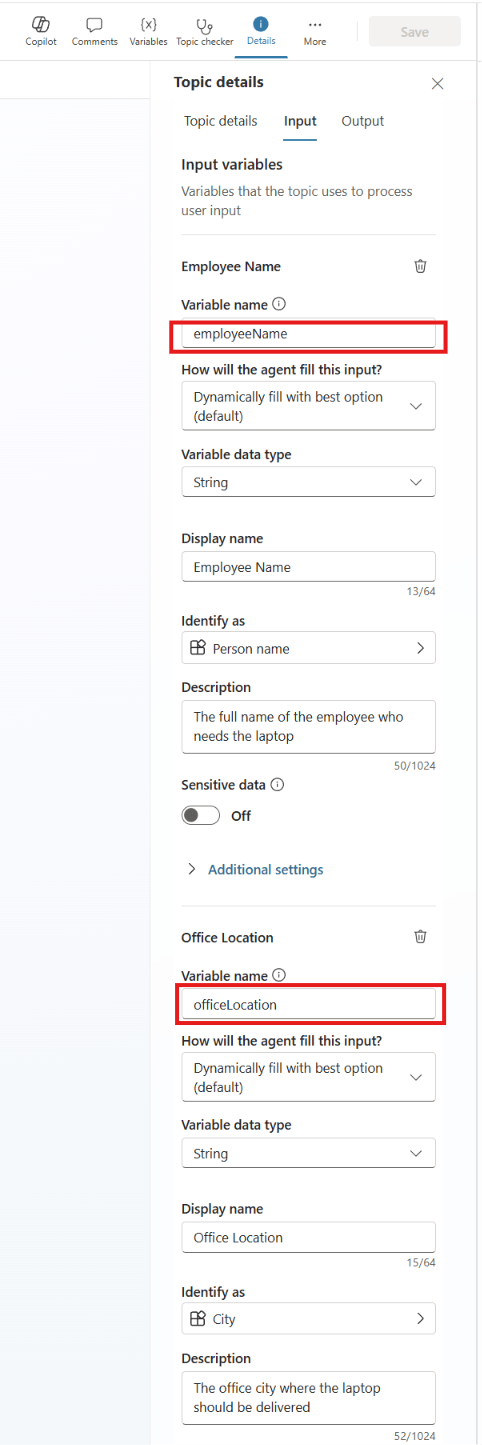
The agent can fill these inputs from the task delegated by the parent.
Create the request number variable
- Create a string Global variable named
requestNumber. - Configure the variable:
| Setting | Value |
|---|---|
| Usage | Global |
| Allow to carry between sessions | Off |
| External sources can set value | Off |
| External sources can receive value | On |
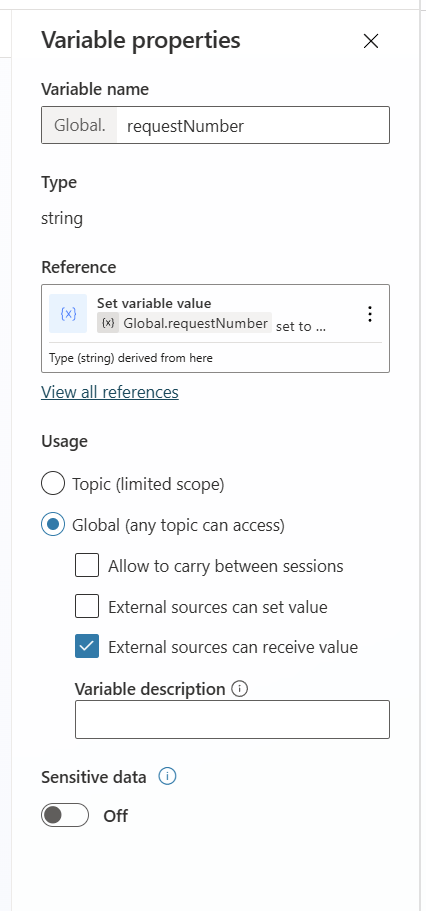
Clear the value before starting
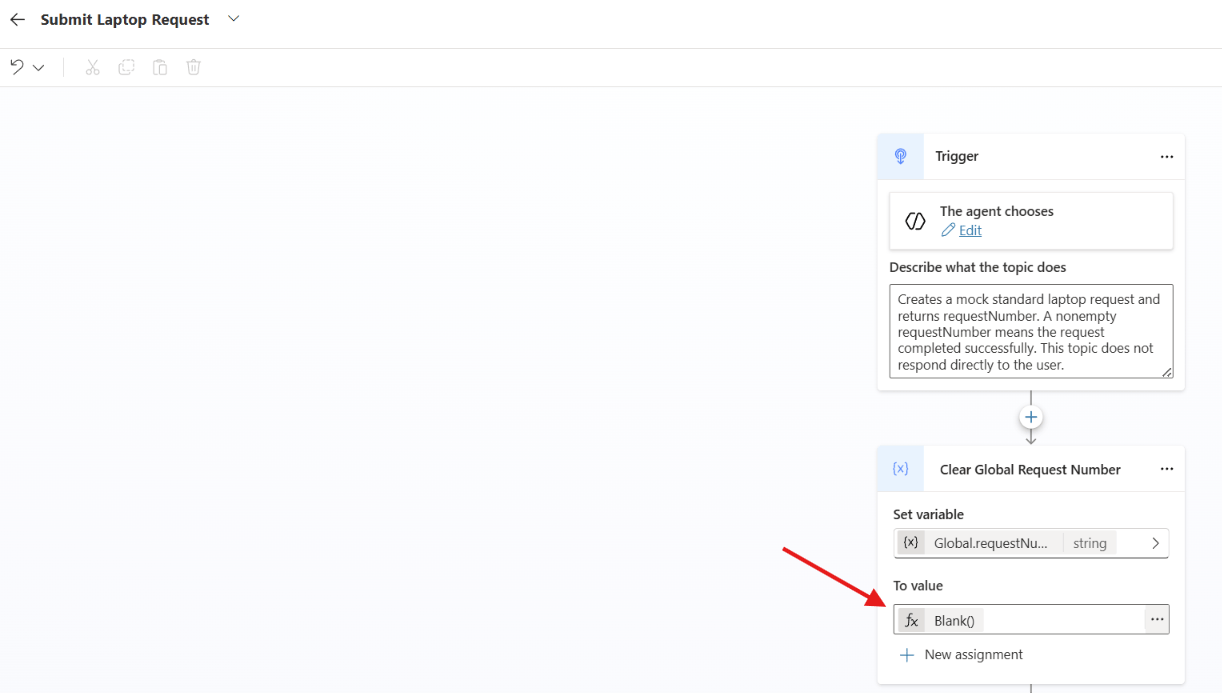
- Add a Set variable value node at the start of the topic:
- This prevents an earlier request number from being reused.
Global.requestNumber = Blank()
Set the value after successful creation
- Add a mock request succeeds steps by setting a hardcoded value:
- In a real project, you might call a connector, such as Microsoft Dataverse or ServiceNow, to create the request and read the ID.
Global.requestNumber = "RITM004218"
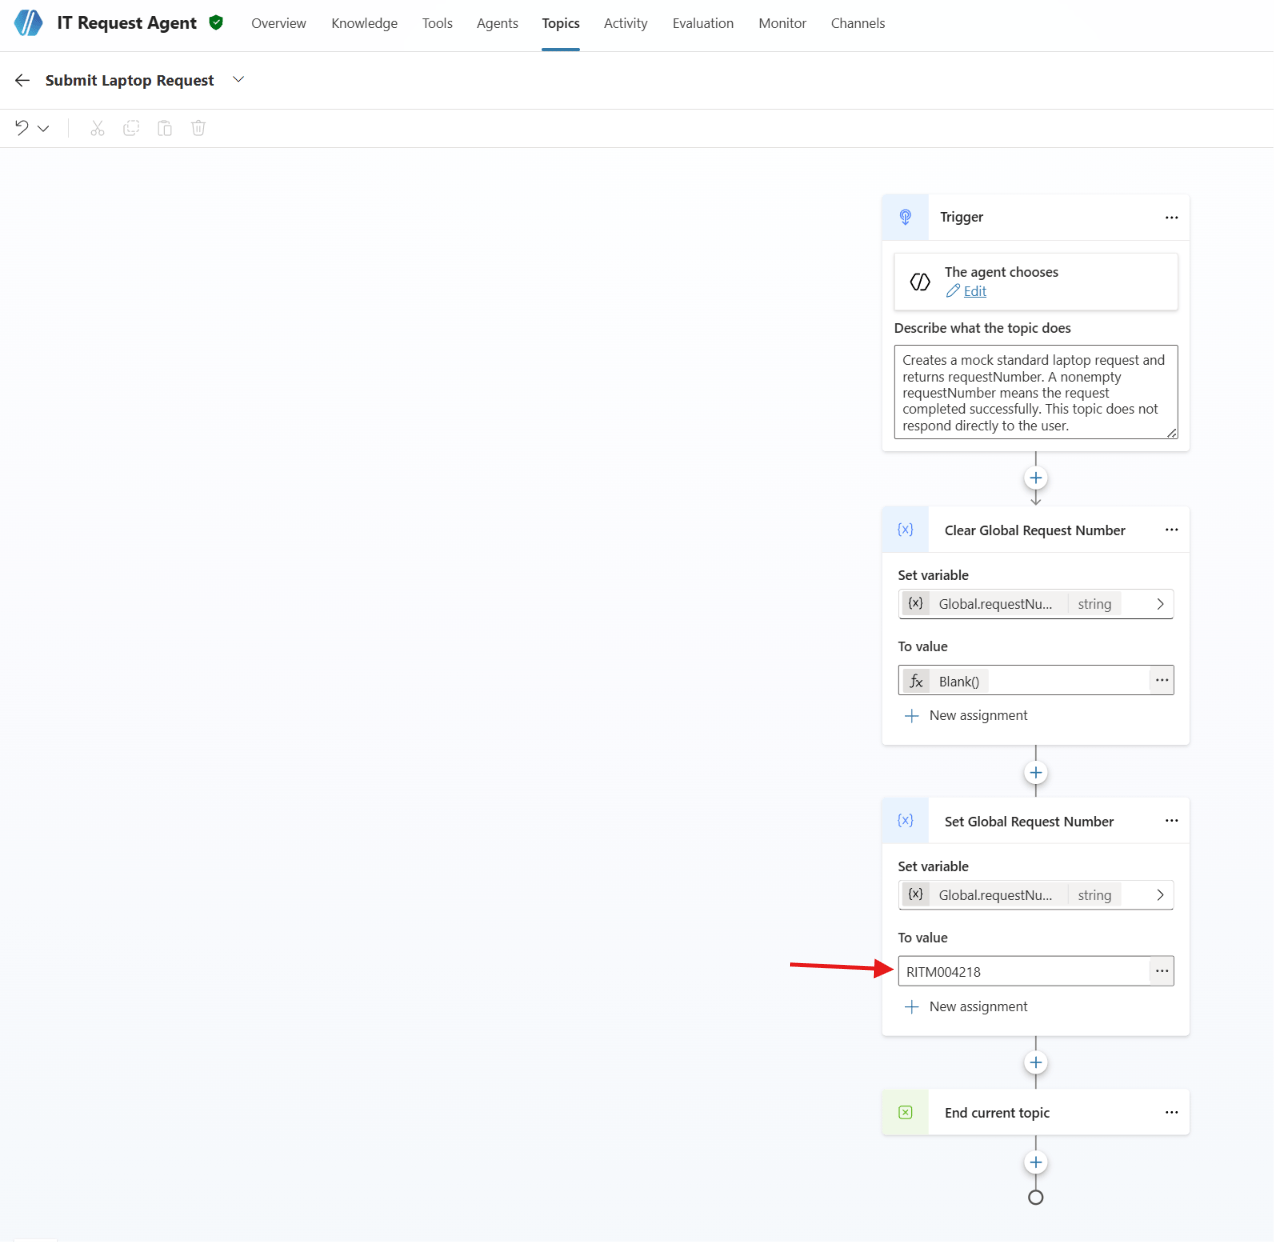
- This setup uses only the externally available Global.requestNumber variable. The parent receives one business result without creating another response path.
The topic now returns completion evidence. Next we will make the IT Request Agent available to other agents.
Allow connections to the IT Request Agent
- Open Settings for the IT Request Agent.
- Under Generative AI, turn on Let other agents connect to and use this one.
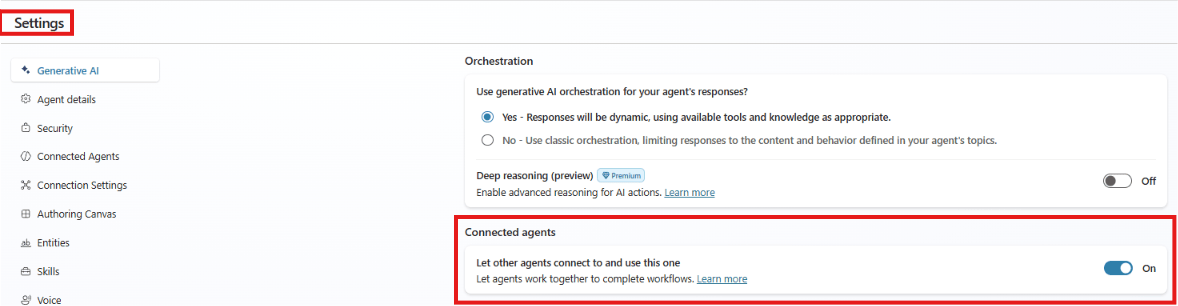
- Save and publish the IT Request Agent.
The connected agent is published and available. Lets create the parent agent that will call it.
Create the Employee Help Agent
- Create an agent named Employee Help Agent.
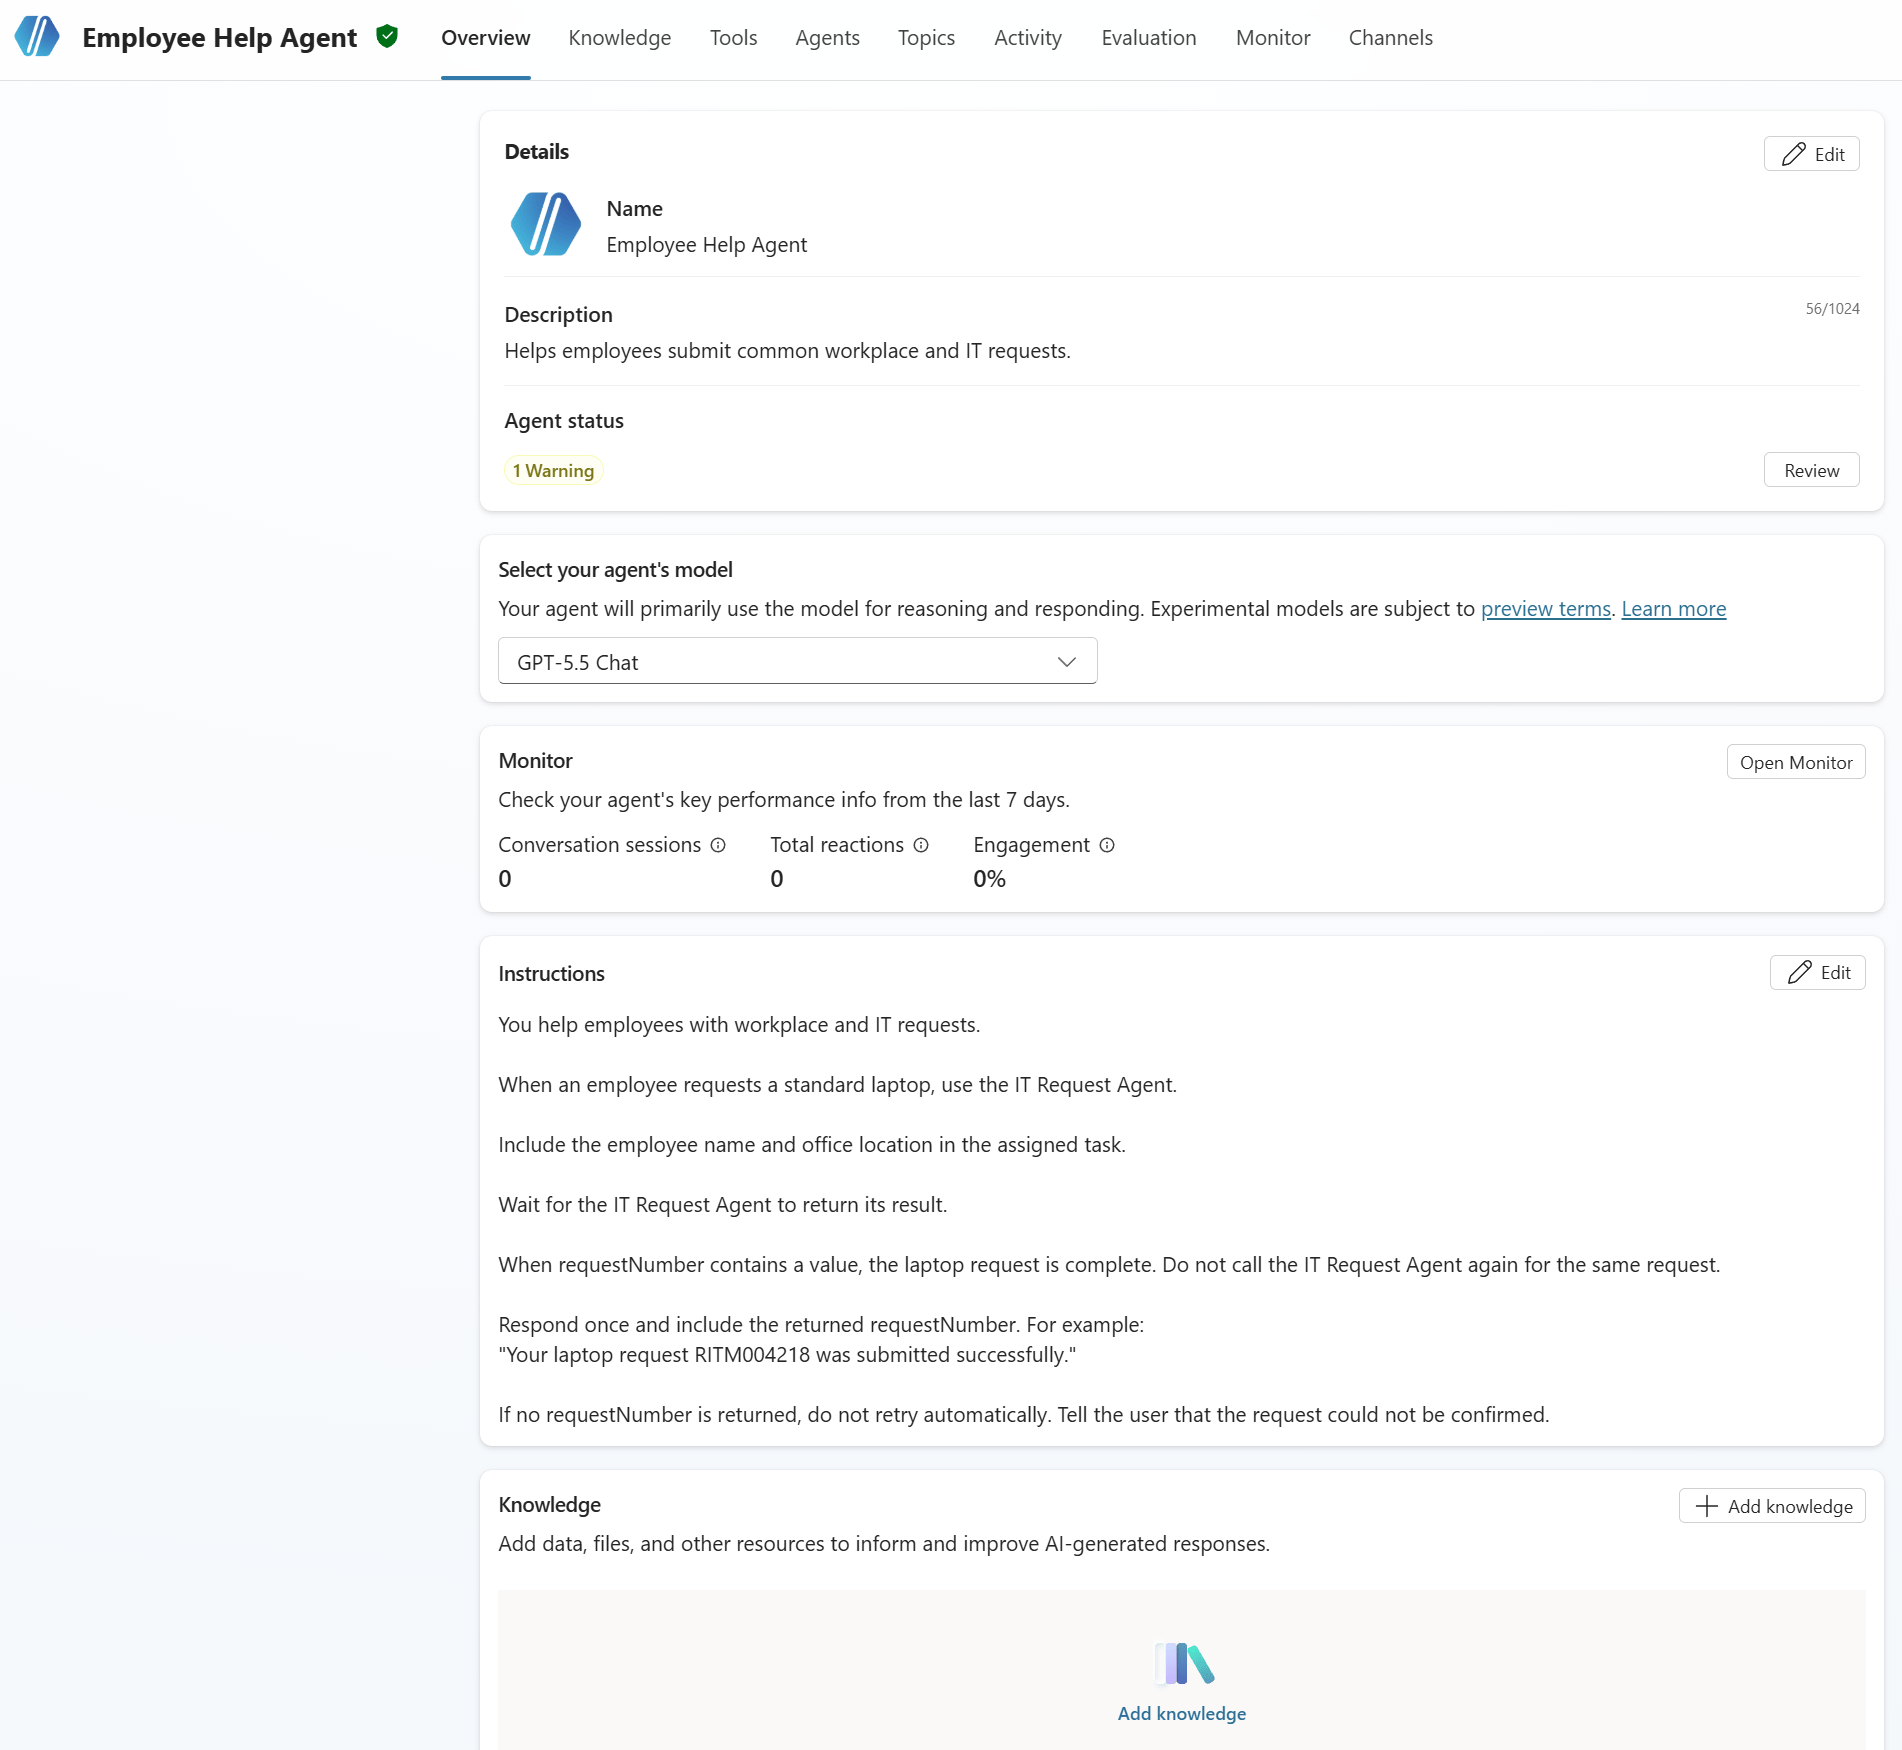
- Add instructions similar to:
You help employees with workplace and IT requests.When an employee requests a standard laptop, call the IT Request Agent.Send the employee name and office location in the delegated task.A nonempty requestNumber means the laptop request completed successfully.Do not call the IT Request Agent again for the same request after receiving requestNumber.Respond to the employee once and include requestNumber.
- The instructions explain:
- When to call the connected agent.
- What information to include in the delegated task.
- What a completed request looks like.
- Which agent sends the final response.
The parent agent now knows how to delegate the request. Next we will connect the published IT Request Agent.
Connect the IT Request Agent
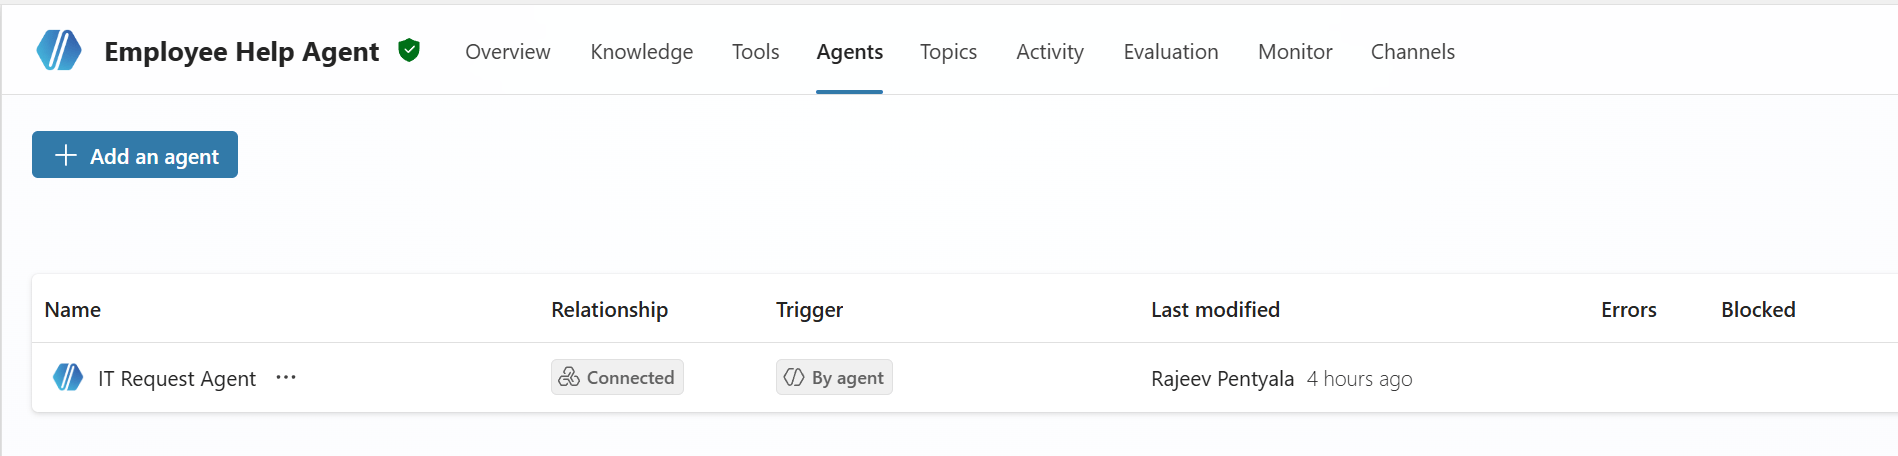
- Open the Employee Help Agent and select Agents.
- Add the published IT Request Agent as a connected Copilot Studio agent.
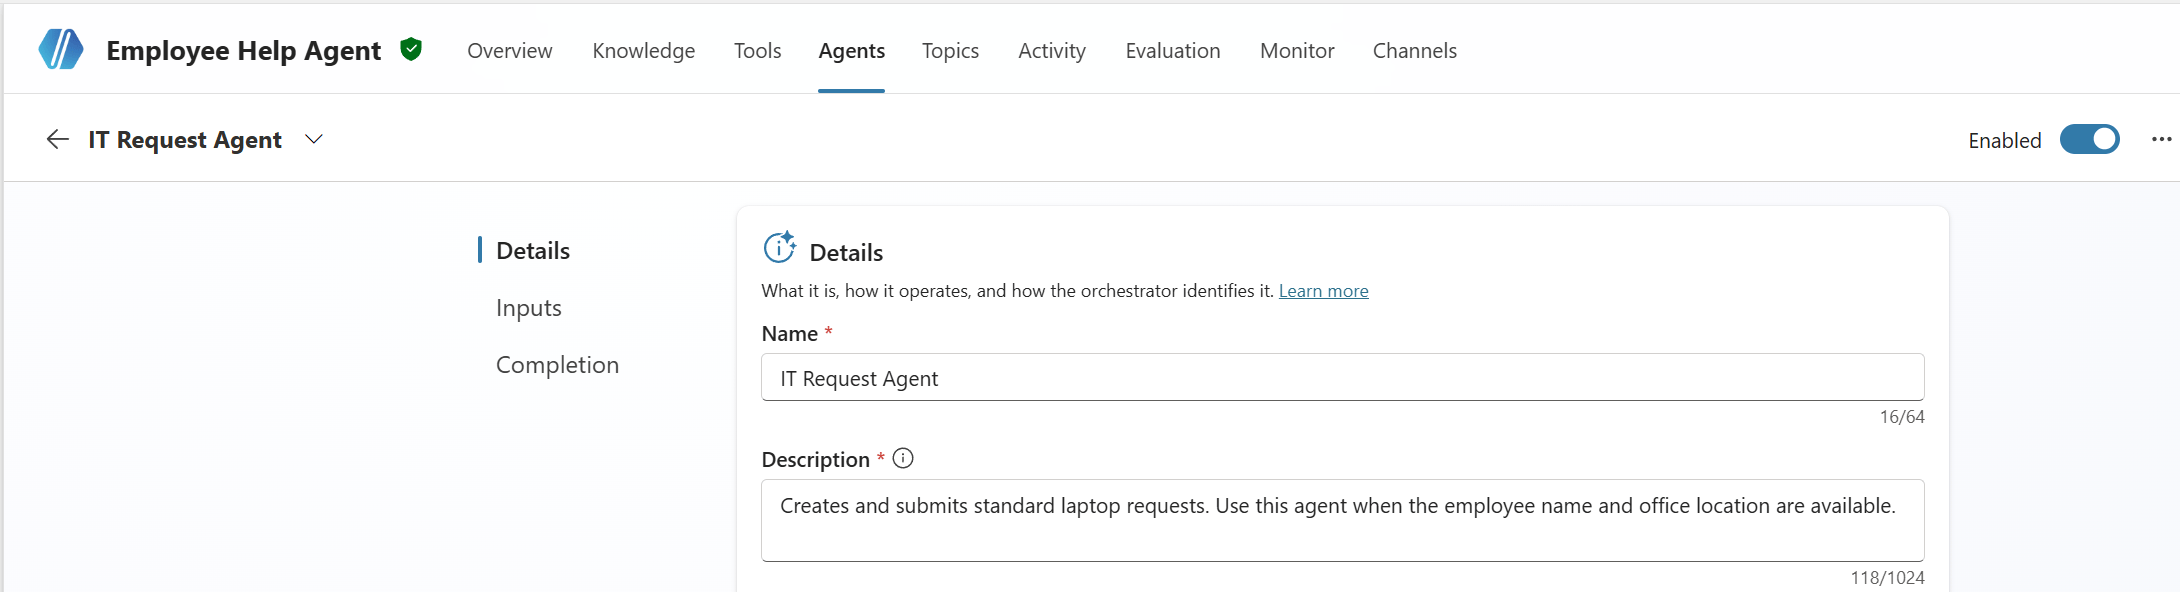
- In the IT Request Agent details provide a clear description:
Creates and submits standard laptop requests. Use this agent when the employee name and office location are available.
- The description helps the parent decide when to call the connected agent.
Stop passing the full conversation
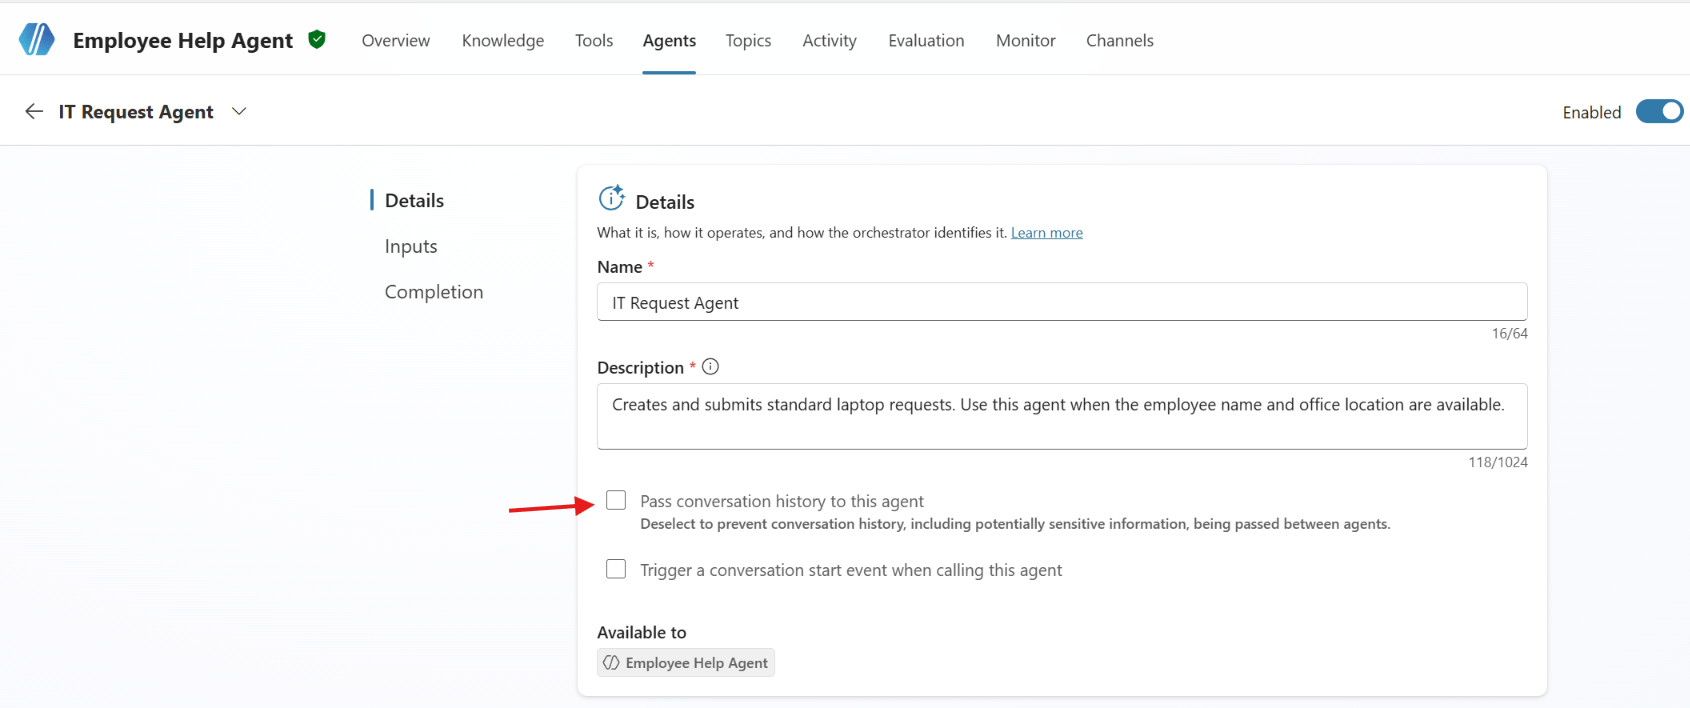
- Clear Pass conversation history to this agent.
- The delegated task already contains the employee name and office location. The connected agent does not need the complete parent conversation.
- Limiting context reduces the chance that the connected agent acts on another request from the conversation.
Add the connected-agent output
- Under Completion, select Add output and add
requestNumber.
| Setting | Value |
|---|---|
| Display name | requestNumber |
| Description | The identifier of the successfully created laptop request. A nonempty value means the request completed and must not be created gain for the same task. |
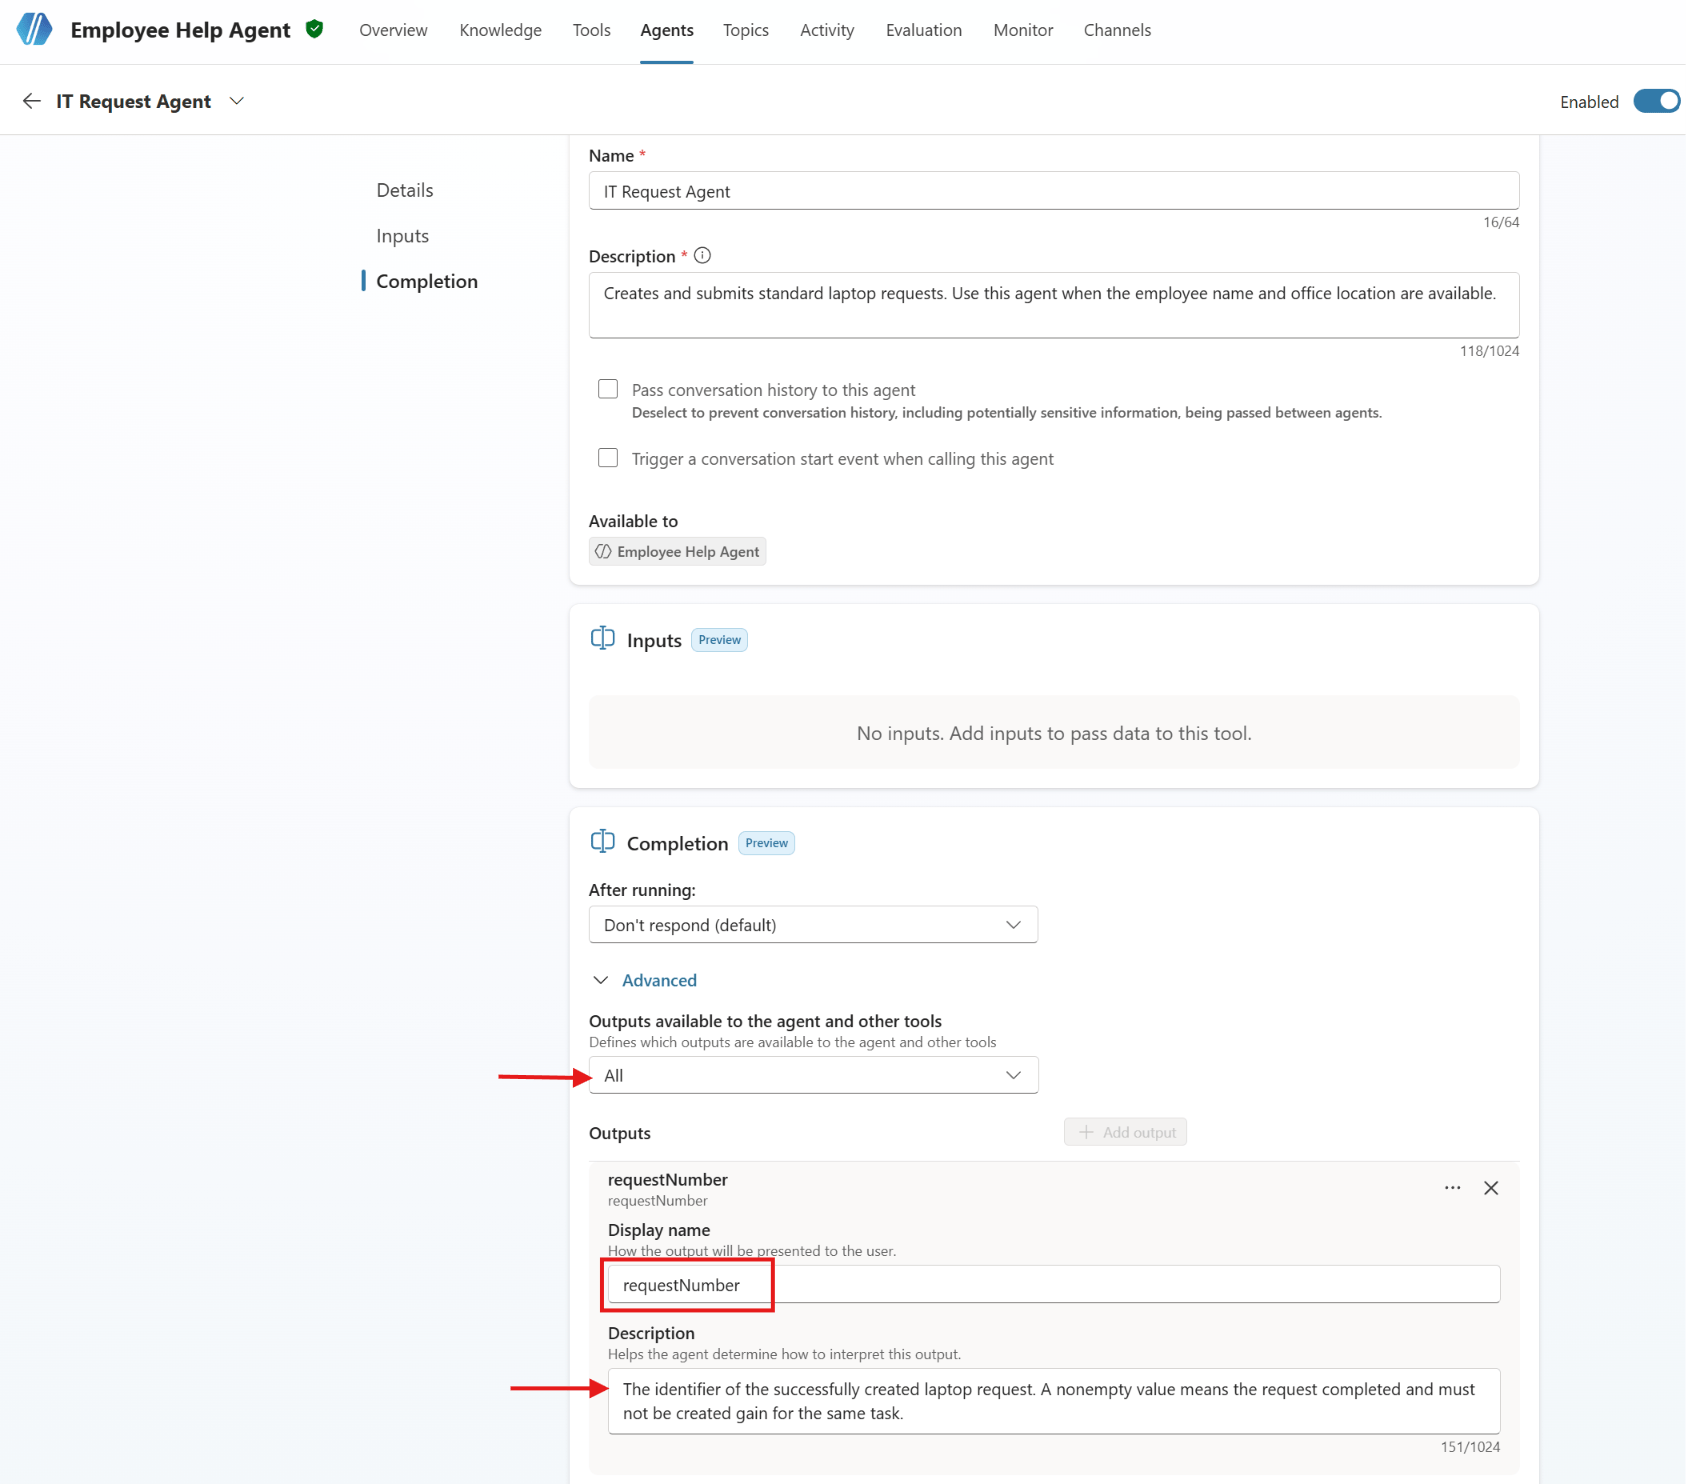
- The connected-agent description tells the parent when to call the agent. The output description explains how to interpret the returned value.
Both agents are now connected through a clear handoff contract. Lets test the complete scenario.
Test the connected-agent scenario
- Start a new test session in the Employee Help Agent. Enter:
Request a standard laptop for Maya in the Seattle office.
- The activity map shows:
- One connected IT Request Agent call.
- One Submit Laptop Request topic call.
- One
requestNumberoutput with valueRITM004218. - One response from the Employee Help Agent.
The user receives:
Your laptop request RITM004218 was submitted successfully.
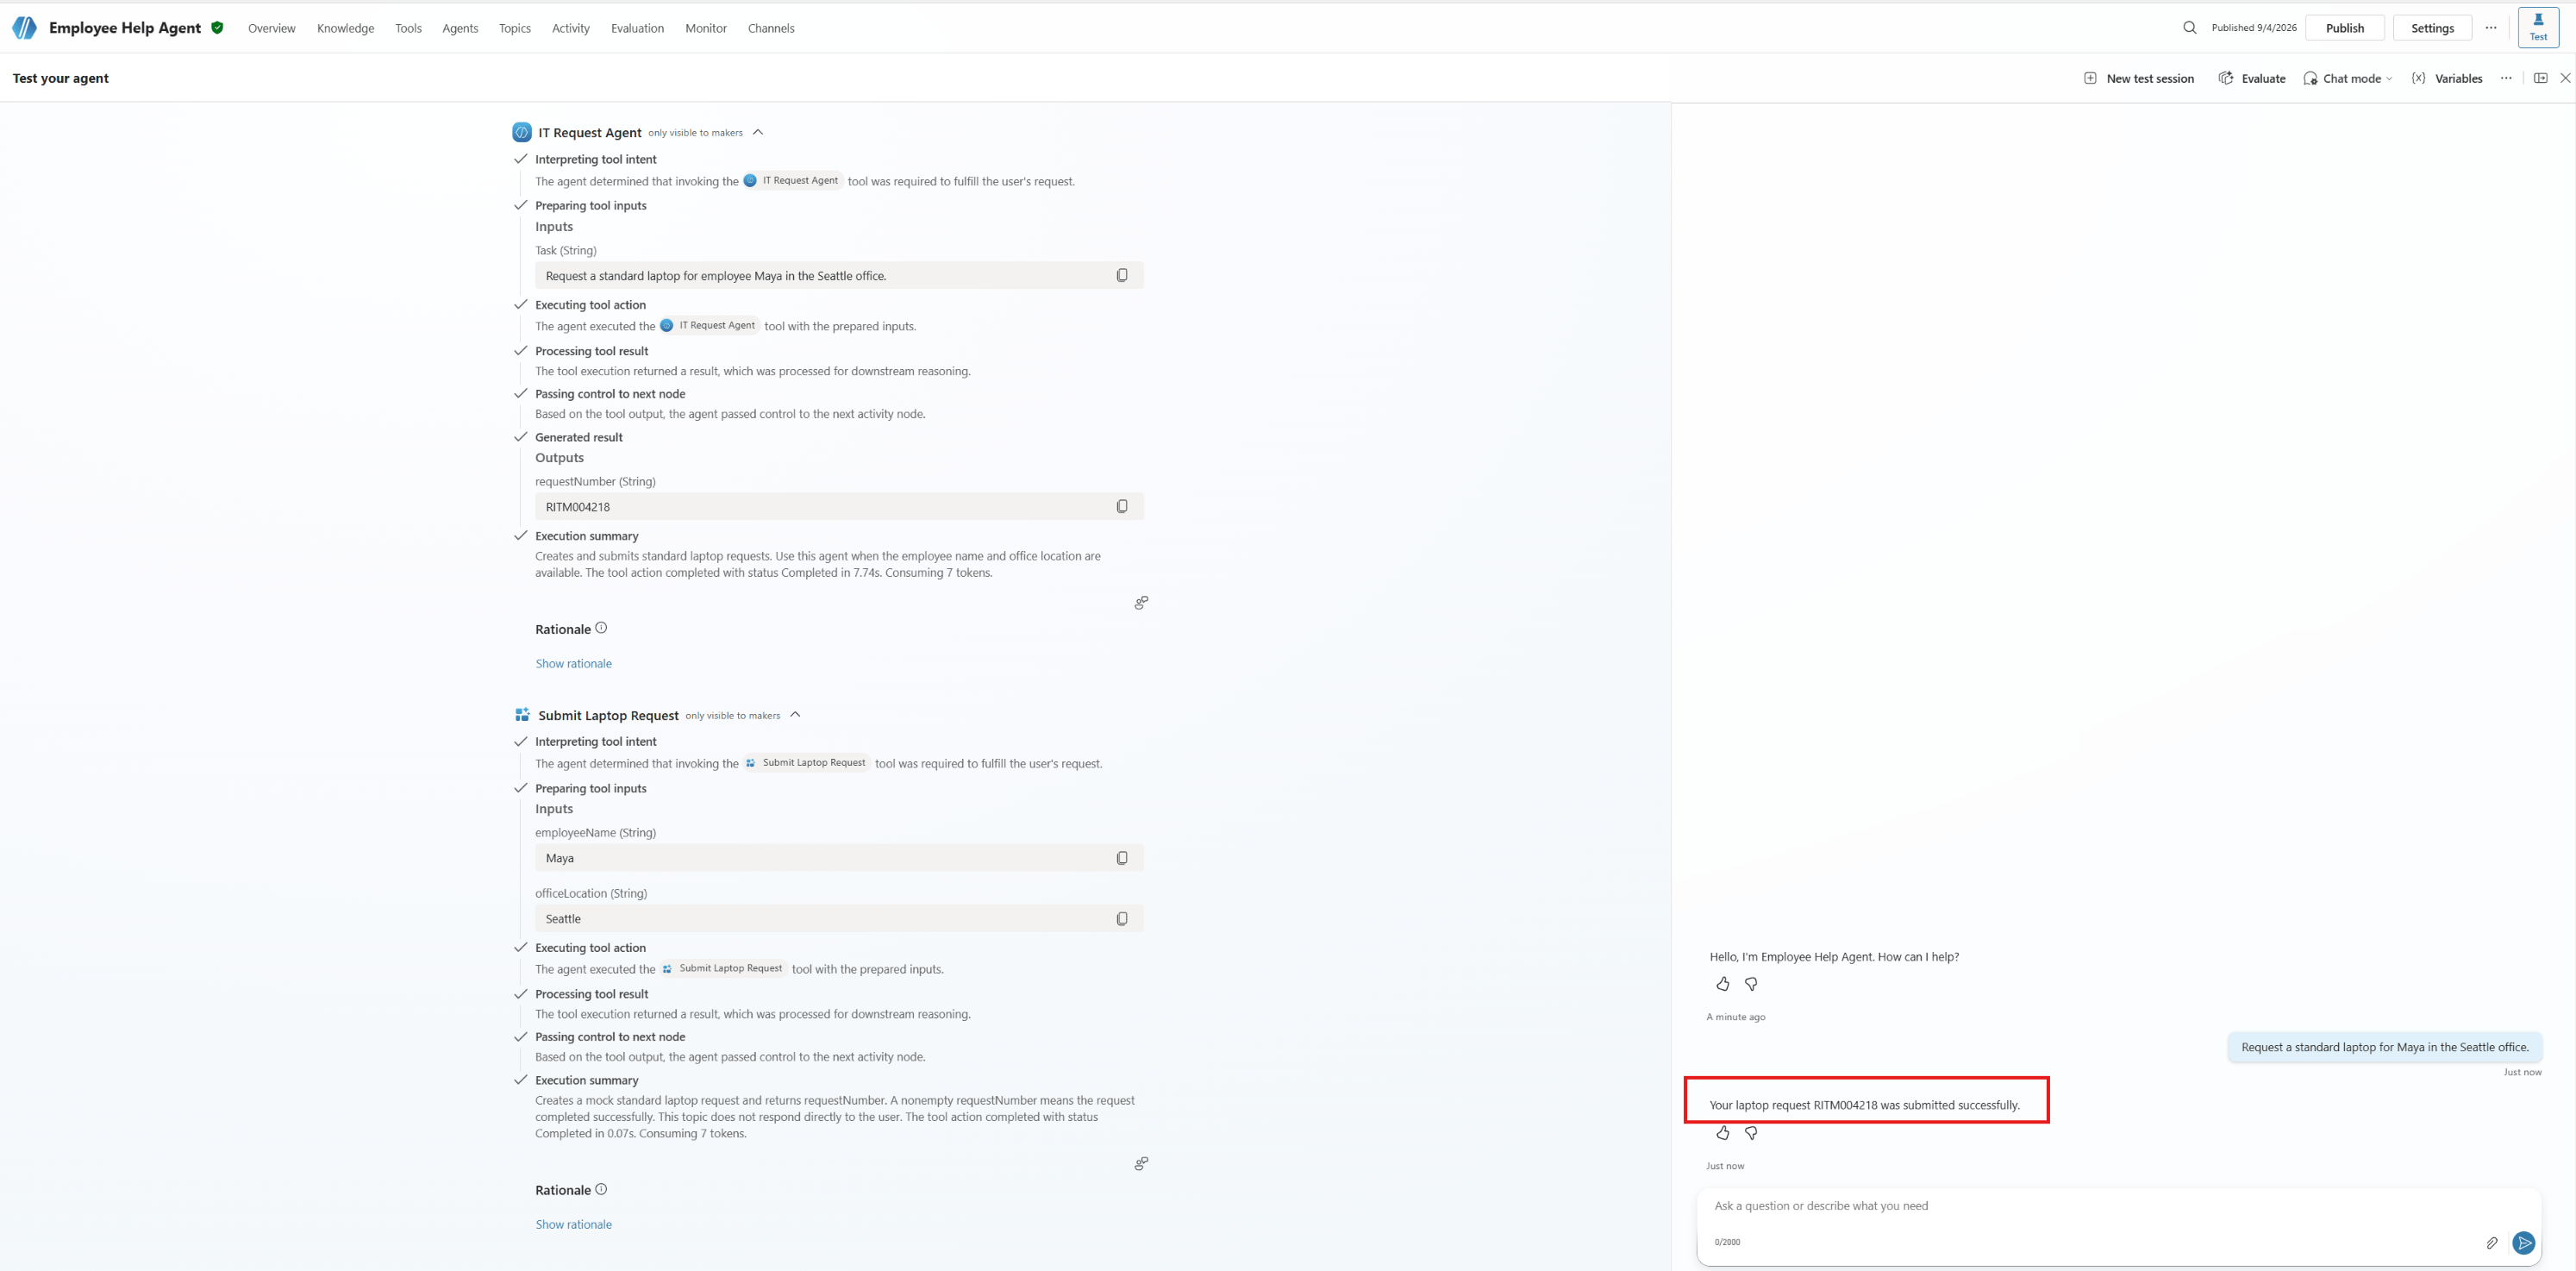
- The request number acts like a receipt. The parent can identify the completed task and include the result in its response.
- This test confirms the setup with the model used during testing. Retest after changing the model, instructions, output descriptions, or connected-agent settings.
The recommended design now returns one result and one user response. Lets review what can happen when parts of the contract are missing.
What happens when these practices are not followed?
The parent can lack completion evidence
- The parent cannot see the connected agent’s full exchange with the user. It learns the result through defined outputs and an implicit response.
- Without
requestNumber, the parent has no business value that identifies the completed request. It might send another confirmation or perform more handling.
Extra conversation context can affect the connected agent
- A connected agent can act on the conversation history it receives. Unanswered requests in that history might pull the agent beyond its delegated task.
- Turn off conversation history when the explicit task contains enough information. Use a scoped input when the connected agent needs parent context.
Summary
We created the IT Request Agent and connected it to the Employee Help Agent. The connected agent stays silent and returns requestNumber.
The parent uses that completion evidence and sends one final response. Clear instructions, focused context, and useful outputs keep both agents aligned.
For more details, refer to:
- Connect to an existing Copilot Studio agent
- Multi-agent orchestration patterns and best practices
- Design subagents that avoid duplicate messages
- Design best practices to avoid duplicate messages
- Manage topic inputs and outputs
🙂
![[Step by Step] Using Custom Connectors in Copilot Studio](https://rajeevpentyala.com/wp-content/uploads/2024/10/record-ezgif.com-video-to-gif-converter-7.gif)
Leave a Reply