Lets say you built a Power Apps Code App and want to share it with a group of users. One of the options is :
- Create a Microsoft Entra Security Group (SG) and link it to a Dataverse team.
- You then assign the required Dataverse security role and share the Code App with that team.
- App and data access now follow membership of the Entra group.
This process works fine. However administrator still needs to add and remove users manually to the SG. This becomes difficult when requests arrive often or access should expire after a set period.
This is where the Entra Access Package shines. An Access Package can manage this membership process. Users request access with a justification, and an approver reviews the requests in My Access portal. Approved users join the SG for the configured period.
In this article, let me explain how to create a Access Package.
Lets start with the security group that will receive approved users.
Prepare the Microsoft Entra Security Group
- Open the Microsoft Entra admin center.
- Select Entra ID > Groups and select the group used by the Code App.
- Confirm that the group type is Security.

The target group is ready. Next we will create the Access Package around that group.
If you don’t have Security Group (SG) , create one first and proceed with next steps.
Create the Access Package
- Open ID Governance in the Microsoft Entra admin center.
- Select Entitlement management.
- Select Access packages.
- Select New access package.

Enter the package details
- Enter a clear package name.
- Add a description that tells users what access they will receive.
- Select the required catalog.
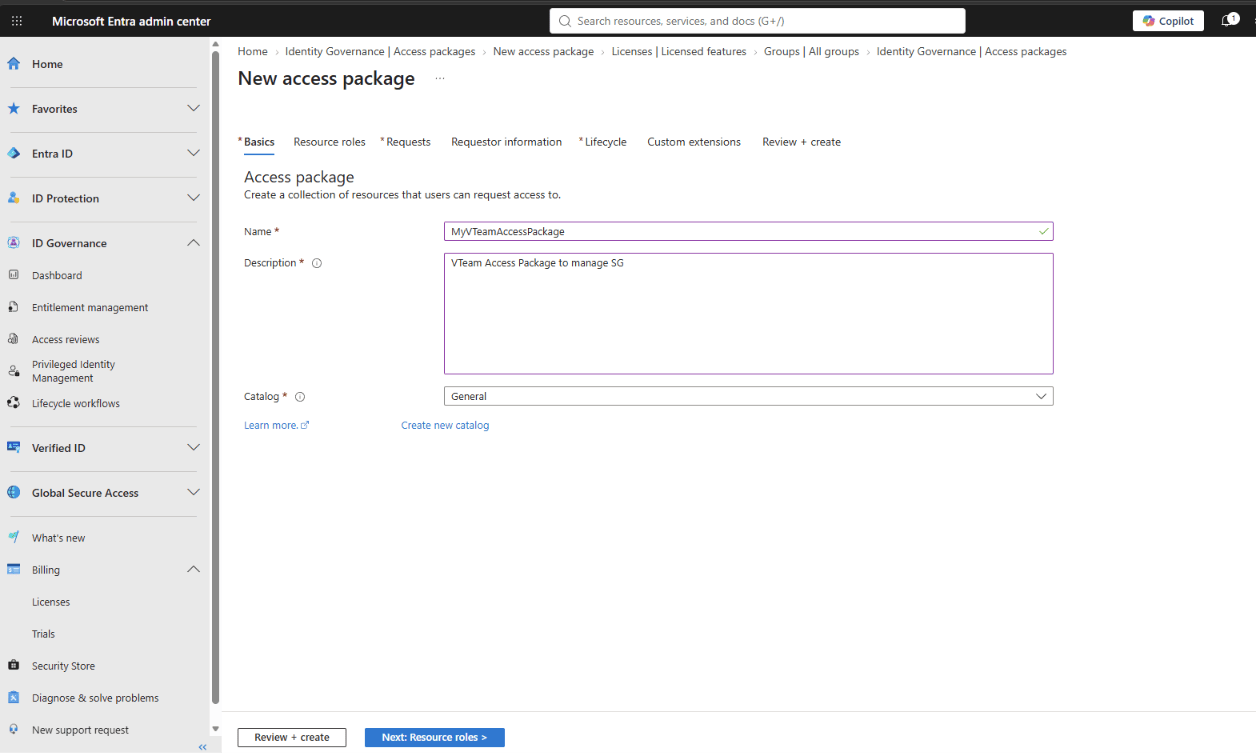
- An Access Package must belong to a catalog. The General catalog is enough for this practice setup.
Now the package has a name and catalog. Next we will add the security group as its resource.
Add the Security Group as a Resource
- Open the Resource roles tab.
- Select Groups and Teams.
- Find and select the existing Entra security group.
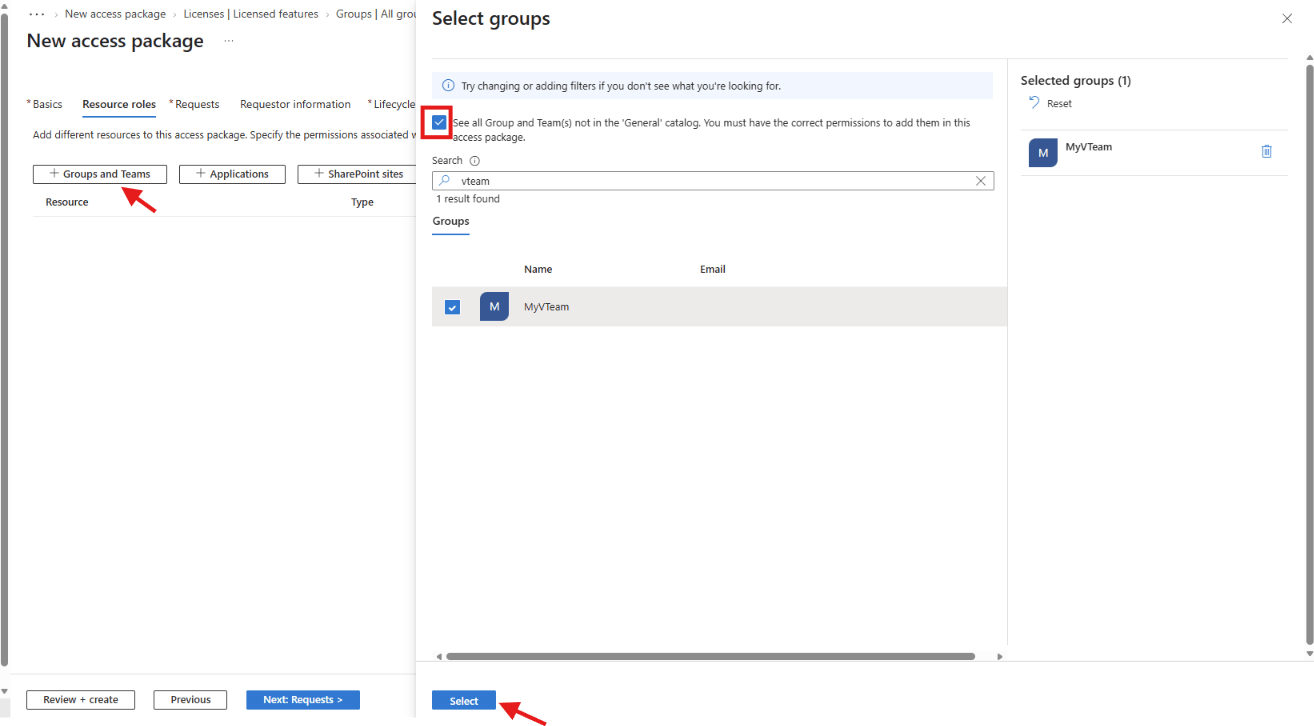
- Set the resource role to Member.

- The Member role is the key setting in this example. An approved package assignment adds the requester as a member of this group.
The group is now part of the package. Next we will decide who is allowed to request it.
Configure Who Can Request Access
- Open the Requests tab.
- Select the option for users in your directory.
- Select Specific users and groups.
- Select Add users and groups.

- The walkthrough uses JayVish as one test requester. The same policy can include multiple individual users, multiple groups, or both.
- When a group is selected here, its members become eligible to request the package.
- Use another policy when different users need different approval or expiration settings. Internal and external requesters also require separate policies.
We have defined the eligible requesters. Now lets add an approval step before group membership is granted.
Configure Approval and Justification
The earlier Specific users and groups setting defines who is eligible for the package. The settings below define who can submit requests and how they are approved.
- Under Who can request access, select Self.
- Admin remains selected because administrators can assign eligible users.
- Leave Manager and Users in your directory cleared for this example.
Configure the request and approval settings as follows:
| Setting | Value |
|---|---|
| Require requestor justification | Yes |
| Require approval | Yes |
| How many stages | 1 |
| First Approver | Choose specific approvers |
| Select approvers | Select the person or group responsible for Code App access |
| Decision must be made in how many days? | 14 |
| Require approver justification | Yes |

- Selecting Self allows JayVish to request the package for himself. The request must include a justification before it can be submitted.
- This example uses one approval stage. Any one of the selected first approvers can approve the request.
- If nobody approves within 14 days, the request is automatically denied. JayVish must submit another request if access is still needed.
Approval is configured. Next we will decide how long users can keep the assignment.
Configure the Assignment Lifecycle
- Open the Lifecycle tab.
- Choose when Access Package assignments expire.
- Allow users to request an extension if required.
- Require approval for extensions if the access owner must review them.
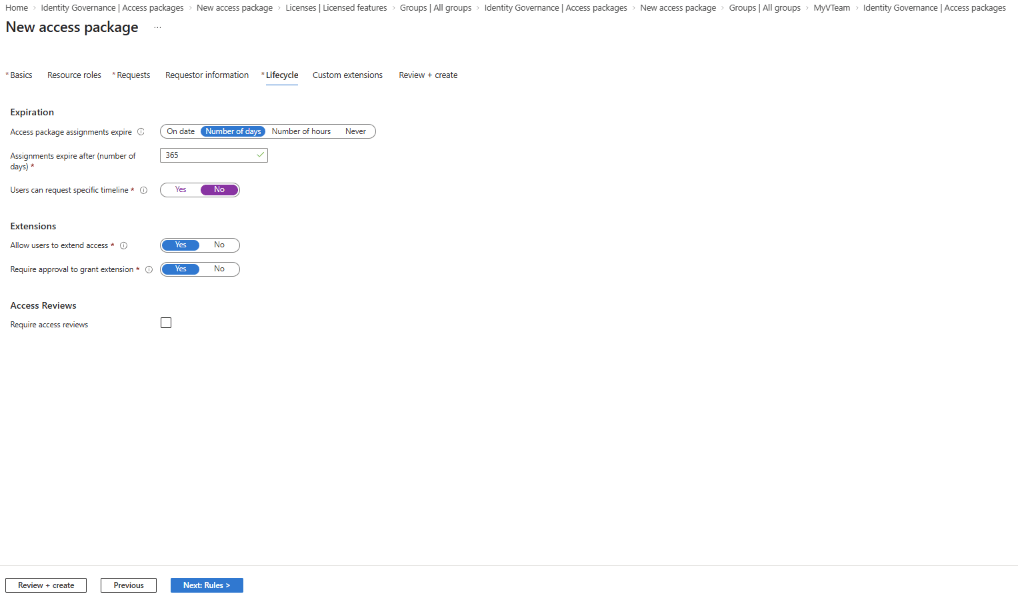
- The practice package saved an assignment duration of 365 days. Choose a duration that matches your organization’s access policy.
- Time-limited access reduces the need to remember every manual removal. Users can request an extension when the policy allows it.
The resource, request, approval, and lifecycle settings are complete. Next we will review and create the package.
Review and Create the Package
- Review the package name and catalog.
- Confirm that the group resource uses the Member role.
- Confirm the requester scope and approver.
- Confirm the expiration and extension settings.
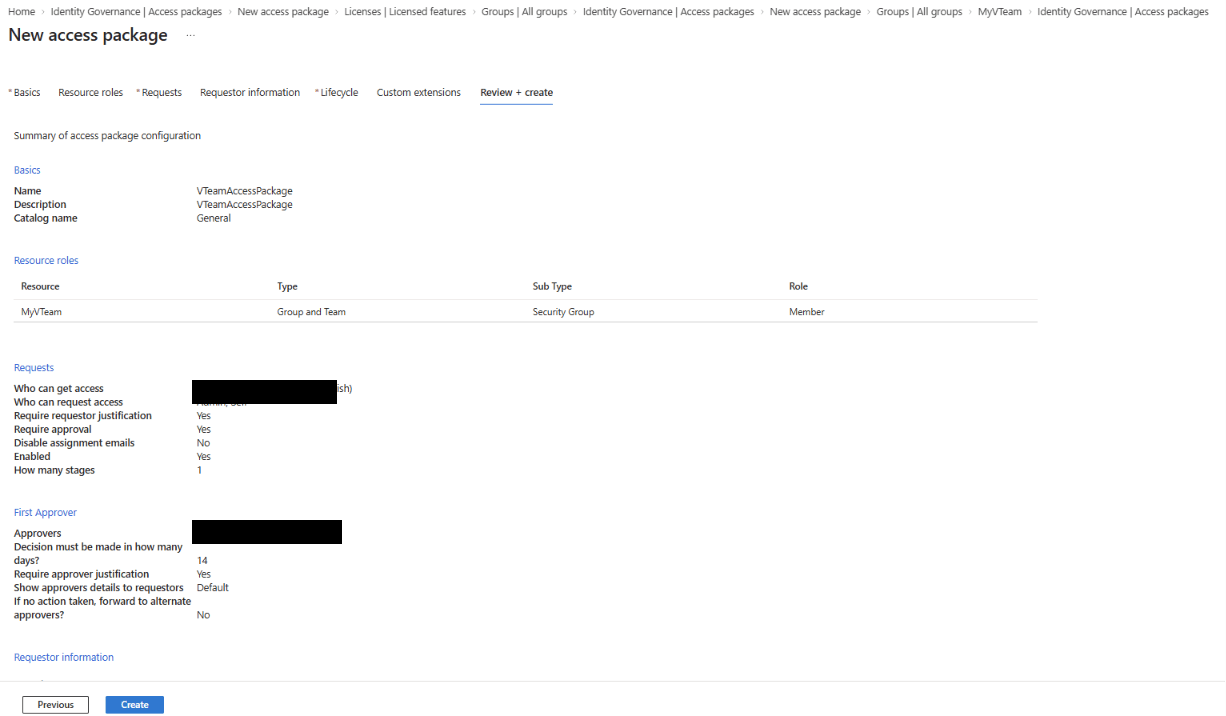
- Select Create.

- Open Policies to review the policy created with the package.

Before testing with JayVish, lets look at how users can find the package.
Share or Discover the Access Package
- A visible Access Package appears in My Access for users covered by its request policy. Sharing a direct URL is optional.

If Hidden is set to Yes, users need the direct link. They cannot find the package by browsing My Access.
The package is visible and ready. Next JayVish will request access from My Access.
Request Access from My Access
- Sign in to My Access as the requester.
- Find the Access Package under Access packages.
- Select Request.

- Review the requested access.
- Enter the required business justification.

- Select Submit request.

The request now waits for the configured approver. Next we will approve it and check the resulting group membership.
Approve the Request
- Sign in to My Access as the approver.
- Open Approvals.
- Select the pending request.
- Review the requester’s justification.
- Enter an approval justification when required.
- Select Approve.


- Once approved, entitlement management processes the assignment and adds JayVish to the selected Entra security group.
The request is approved. Now we can verify that the manual group-membership step was completed.
Verify Group Membership and Code App Access
- Return to the Entra security group.
- Open Members.
- Confirm that the approved requester is present.

The complete request flow is working. One final area to understand is what happens when the assignment ends.
What Happens When Access Expires
- The policy controls the assignment end date. It can also allow an extension request before that date.
- When the Access Package assignment expires or is removed, entitlement management removes the access it granted. The user can remain a group member if another active assignment grants the same resource role.
- Dataverse group-team access follows the Entra group membership. The updated access is applied when group and team membership is evaluated again.
Note: Changing a policy’s expiration setting does not update requests that are already pending or approved.
Now we have tested the full request and approval path. Lets close with a few production recommendations.
Production Recommendations
- Use a clear package name and description.
- Select only the users and groups that should be eligible.
- Use separate policies for different approval or expiration rules.
- Add fallback or alternate approvers where requests cannot wait.
- Choose an assignment duration based on the business need.
- Enable extensions only when continued access can be justified.
- Use access reviews for long-running access.
- Monitor delivery failures from the Access Package request details.
- Test removal and expiration before using the package for production access.
The setup now covers the request, approval, assignment, and removal stages
🙂
![[Step by Step] Using Custom Connectors in Copilot Studio](https://rajeevpentyala.com/wp-content/uploads/2024/10/record-ezgif.com-video-to-gif-converter-7.gif)
Leave a Reply