Coding agents like GitHub Copilot CLI, Claude Code, and Cursor spend a lot of tokens just reading your code repository before they can answer.
Graphify turns your project into a small knowledge graph the agent can query, so it stops grepping through files for every question.
This post walks through a quick proof of concept using Graphify with GitHub Copilot CLI.
What is Graphify?
Graphify is an open source tool that maps your entire project into a knowledge graph. It covers code, docs, PDFs, images, and videos. The agent queries this graph instead of reading raw files, which keeps the context window small and the responses faster.
- Works across many coding agents including GitHub Copilot CLI, Claude Code, Codex, Cursor, Gemini CLI, and more.
- Outputs are local files. Nothing is pushed to a server by default.
Why It Helps with Tokens
- Every time an agent needs to understand your code repo, it usually reads many files, that eats into the context window and slows things down.
- With Graphify, the agent looks up nodes and relationships from a compact graph. Less file reading means fewer tokens per question.
Prerequisites
- Python 3.10 or later. Check with
python --version. uvpackage manager. Install on Windows withwinget install astral-sh.uv.- GitHub Copilot CLI installed and signed in.
- A project folder to test against. For this post we use a small repo opened in the current working directory.
Setup Steps
Lets walk through the install in two short steps.
Install the Graphify package
- Open a terminal in your project root and run:
uv tool install graphifyy
- This pulls the
graphifyypackage and exposes thegraphifycommand on your PATH. Think of this as installing the engine. It is the Python CLI that actually scans your files, extracts entities, and writes the graph to disk. Without it, the skill we register in the next step would have nothing to call. If the command is not found after install, runuv tool update-shelland open a new terminal.

Register the skill with GitHub Copilot CLI
- Now we register the Graphify skill so Copilot CLI knows about it:
graphify install --platform copilot
- This step writes a
SKILL.mdfile (and a few reference files) into the Copilot CLI skills folder. Copilot CLI reads that folder on startup to discover what slash commands are available.

A Gotcha with the --project Flag on Copilot CLI
- Since this was a POC, I wanted the Graphify skill scoped to just this project rather than installed globally. So I added the
--projectflag:
graphify install --platform copilot --project
- This created the skill under
.copilot\skills\graphify\inside the repo. - But when I opened a new GitHub Copilot CLI session, the
/graphifycommand was not recognized. I had to manually copy thegraphifyfolder from.copilot\skills\to.github\skills\. After that, the new session picked up the skill. - The reason is that Copilot CLI scans
.github/skills/,.claude/skills/, or.agents/skills/for project-level skills (per the official docs).
Note for Claude Code users: This manual copy step is not needed. Graphify’s
--projectinstall for Claude Code writes to.claude\skills\graphify\by default, which is already a path Claude Code scans.
- If you do not care about scoping to one repo, just drop
--project. Graphify will install the skill under~\.copilot\skills\and Copilot CLI will find it automatically.
Build the Graph
- With the skill registered, open GitHub Copilot CLI inside your project and trigger Graphify:
/graphify .
- The dot tells Graphify to scan the current directory.

- Graphify reads your files, extracts entities, and builds the graph. When it finishes you will see a completion message.

- Next, Open
graphify-out\graph.htmlin any browser to explore the graph visually. You can click nodes, filter, and search.

Test the Difference
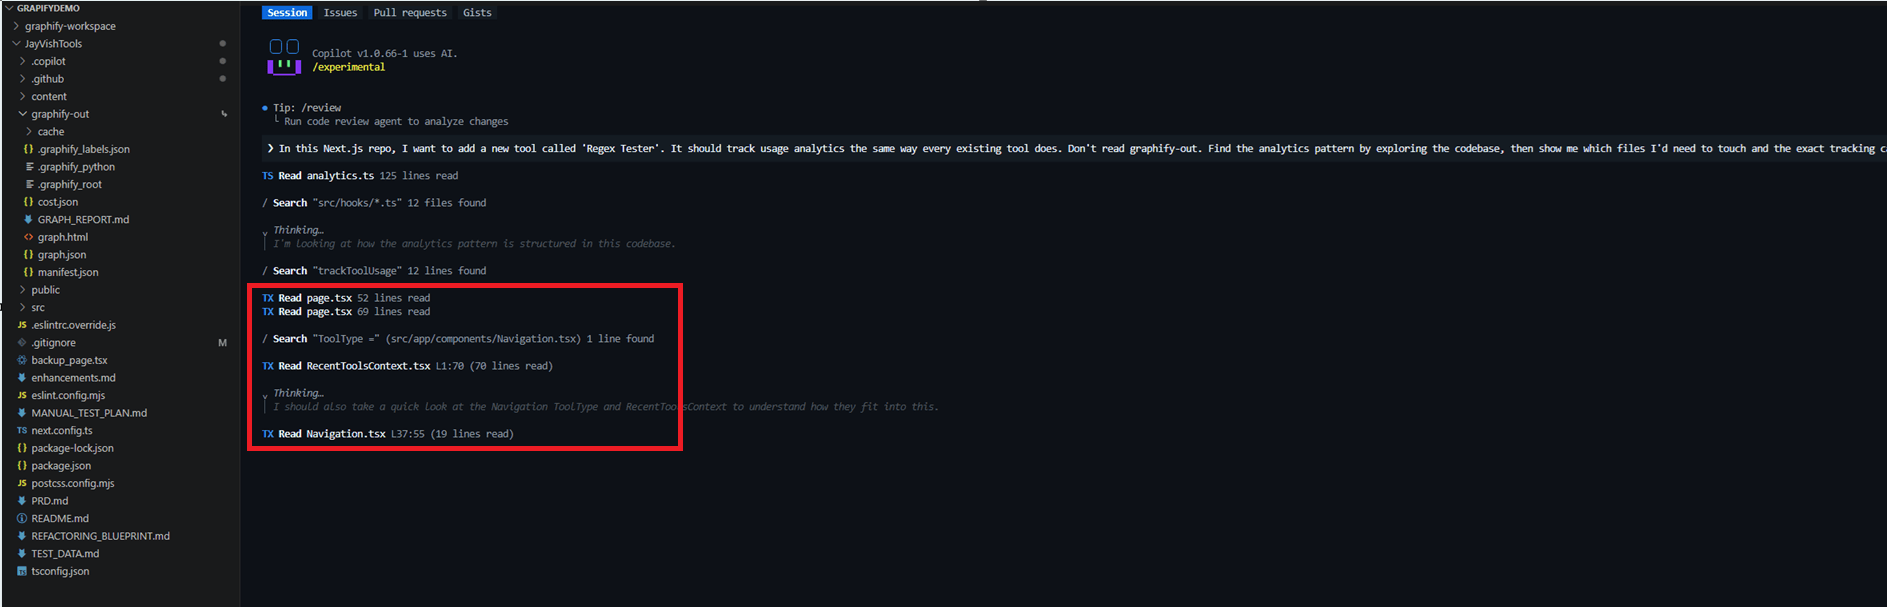
Now lets ask Copilot CLI a question about the codebase and compare the two runs.
Without the graph reference
- For this run I explicitly told Copilot CLI to ignore the graph and explore the repo on its own.
- The prompt was:
In this Next.js repo, I want to add a new tool called 'Regex Tester'. It should track usage analytics the same way every existing tool does. Don't read graphify-out.
- Copilot reads multiple files and runs several searches to piece together the pattern. Every file read adds to the token count.
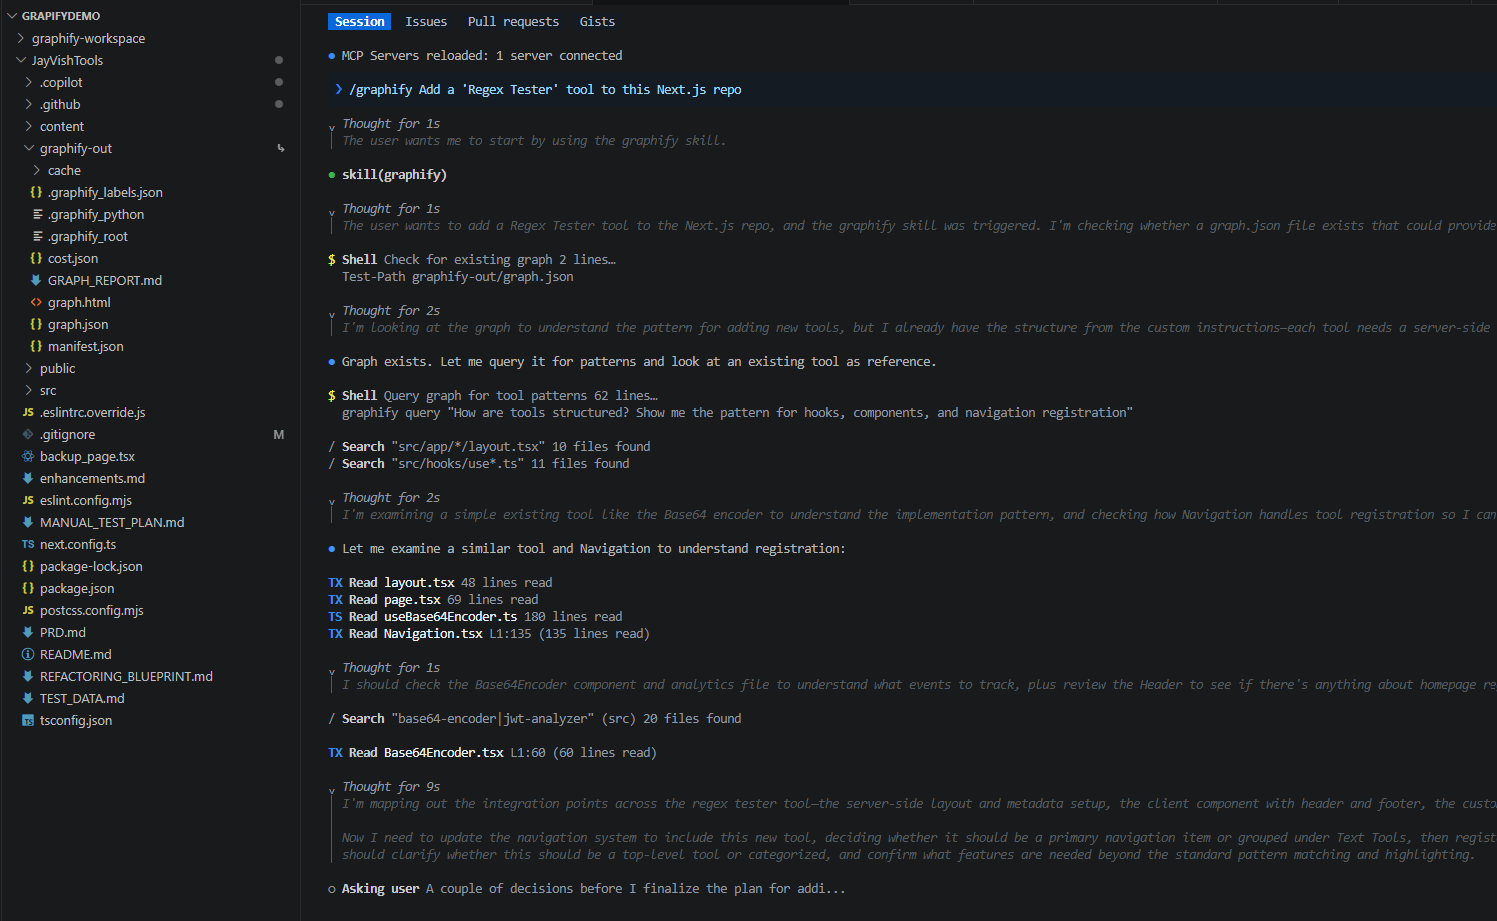
With the graph reference
- For this run I invoked the skill directly with a much shorter prompt:
/graphify Add a ‘Regex Tester’ tool to this Next.js repo
- Copilot triggers the
graphifyskill, runs a singlegraphify queryagainstgraph.jsonto fetch the tool pattern, and then opens only the handful of files it actually needs. Fewer searches, fewer file reads, fewer tokens.
A Note for Copilot CLI Users:
- If you read the Graphify docs you will notice most agents have a two-step setup:
- First install the skill, then run a second command to make the assistant always consult the graph (for example
graphify claude installwrites a section intoCLAUDE.md,graphify codex installwrites intoAGENTS.md, andgraphify vscode installupdates.github/copilot-instructions.md).
- First install the skill, then run a second command to make the assistant always consult the graph (for example
- When I tested with GitHub Copilot CLI, tere was no separate “always use the graph” config file generated.
- The command
graphify copilot installis essentially the same asgraphify install --platform copilot. Both just copy the skill folder into~/.copilot/skills/(or into.copilot/skills/in your repo when you add--project). - Copilot CLI loads that skill from its skills directory, which is how the agent learns to call
graphify query,graphify path, andgraphify explaininstead of reading source files one by one. So for Copilot CLI the two-command pattern collapses into one.
🙂


Leave a Reply