Agent Builder builds a declarative agent from instructions and knowledge sources such as SharePoint sites, uploaded files, or the web. It works well when the answer already lives in your documents.
Agent Builder does not support custom API actions. A question like “What USD to INR rate applies to an invoice dated 14 March 2019?” cannot be answered from documents. The rate has to be fetched on demand from an external service.
The Microsoft 365 Agents Toolkit, an extension for Visual Studio Code, builds the same kind of agent. It adds the capability Agent Builder lacks, an action. An action is a call to an external API.
This is a beginner level post. Lets build the agent, provision it to Copilot, and test it.
What is a Declarative Agent?
Both Agent Builder and the Toolkit produce the same kind of agent, a declarative agent. It contains :
- Instructions tell the agent how to behave. Plain English, like a job description.
- Knowledge is where it reads from. SharePoint sites, uploaded files, or the web.
- Actions are calls it can make to an external API to fetch live data.
Agent Builder gives you the first two. The Toolkit gives you all three. The third one, actions, is the reason this post uses the Toolkit.
What is the Microsoft 365 Agents Toolkit?
The Toolkit is a Visual Studio Code extension that builds agents as code. Your agent becomes a folder of JSON and YAML files that you edit, commit to Git, and publish from the editor.
- It scaffolds the project for you, so you do not write the files from scratch.
- It turns an OpenAPI document into a working action.
- It signs you in, packages the agent, and publishes it to Copilot.
Note: Agent Builder, Copilot Studio, and SharePoint can also build declarative agents. The comparison at the end of this post covers when to pick each one.
What We Are Building?
Our objective is an agent that answers one question correctly. “What USD to INR rate should I use for the invoice dated 14 March 2019?”
The agent is called InvoiceFxHelper. By the end of this post it will be live in your Copilot.
- Two actions. One gets the rate on a past date, the other gets today’s rate.
- Both call the Frankfurter API, which publishes European Central Bank reference rates.
Why the Frankfurter API
- The example calls Frankfurter, a public API that serves European Central Bank reference rates. It is free, needs no API key, and has no rate limit to sign up for.
That matters for a demo. There is nothing to host, nothing to pay for, and no secret to keep out of the repository. You can follow along with no accounts beyond Microsoft 365.
Why this scenario needs an action
Knowledge sources answer from documents you already have. An exchange rate on a given date is not in a document.
- An invoice needs the exact published rate, not “roughly 69”.
- The date and the currency codes are inputs to an API call, not text to search for.
- Only an action can lift
2024-01-06,USDandINRout of a sentence and pass them as parameters. - The
descriptionfields in the OpenAPI document are what make that mapping possible.
Now we know what we are building and why it needs an action. Lets get the tools in place.
Prerequisites
Make sure you have the following ready.
- Visual Studio Code with the Microsoft 365 Agents Toolkit extension installed.
- A Microsoft 365 account with a Copilot license.
- Two tenant settings enabled by your admin. Custom app upload and Copilot access.
Lets start with the one file we write ourselves.
Write the OpenAPI Description Document
- The Toolkit needs an OpenAPI description document. This is a YAML file that describes the API endpoints, the parameters, and the response shape.
- Create a file named
frankfurter.yaml. We will point the Toolkit at it in the next section.
Note: You do not need to write this file from scratch. The completefrankfurter.yamlis in the GitHub repo linked at the end of this post. Download it and follow along.
| Operation ID | Path | What it returns |
|---|---|---|
getHistoricalRate | /{date} | The rate on a given calendar date |
getLatestRate | /latest | The most recently published rate |
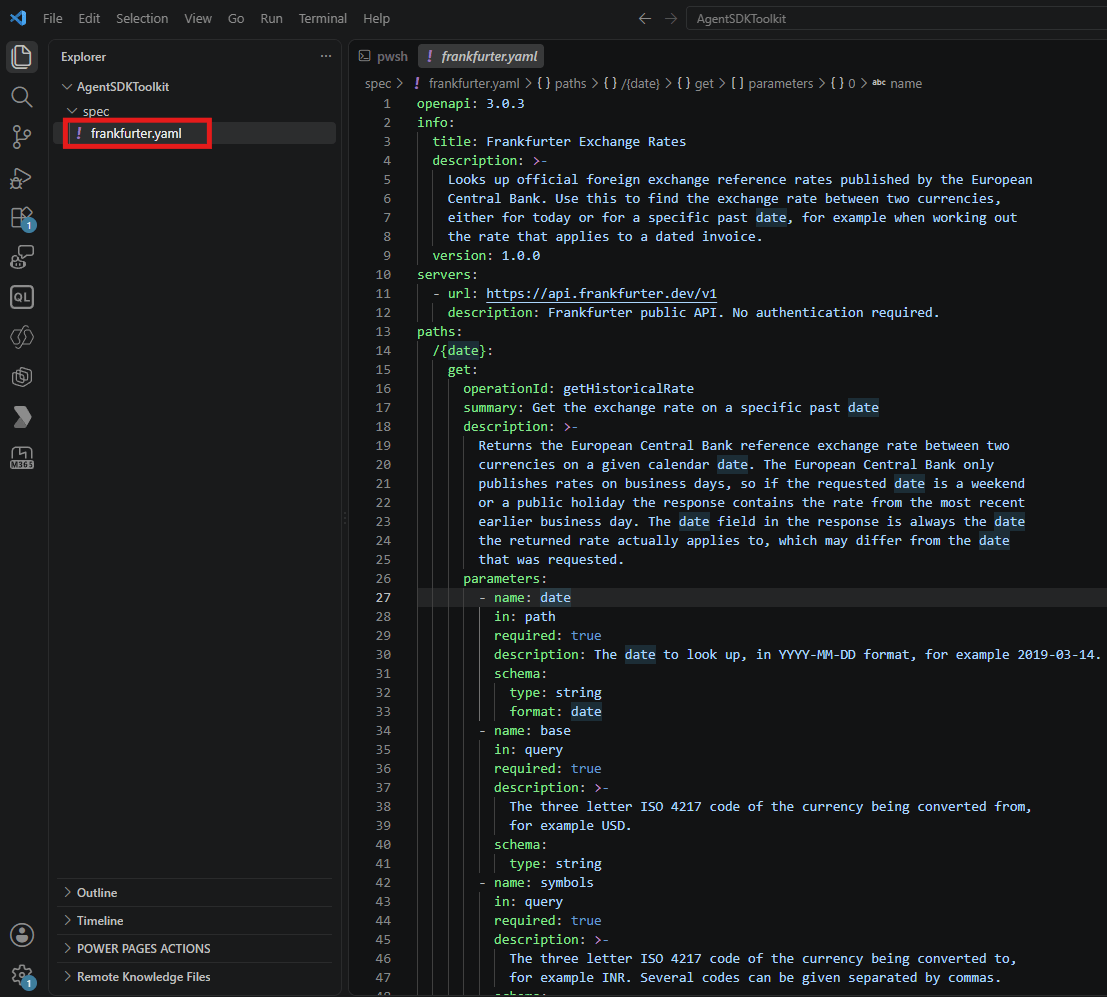
The description document is ready. Lets create the project from it.
Create the Declarative Agent Project
- Open the Microsoft 365 Agents Toolkit panel in Visual Studio Code.
- Select Build a Declarative Agent, then pick Declarative Agent from the template list.

- Next the wizard asks whether the agent needs an action. Select Add an Action.
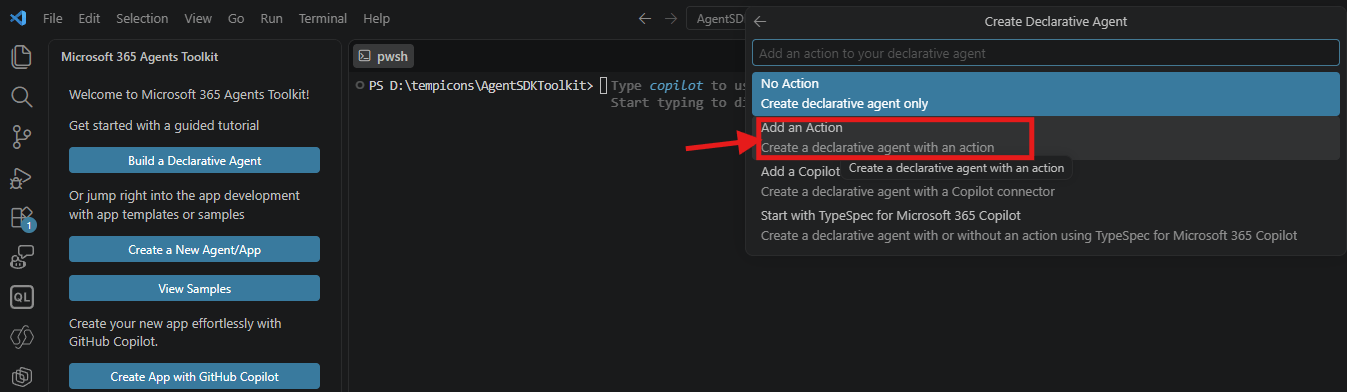
- Choose Start with an OpenAPI Description Document. This is the option that reads the YAML file we wrote.
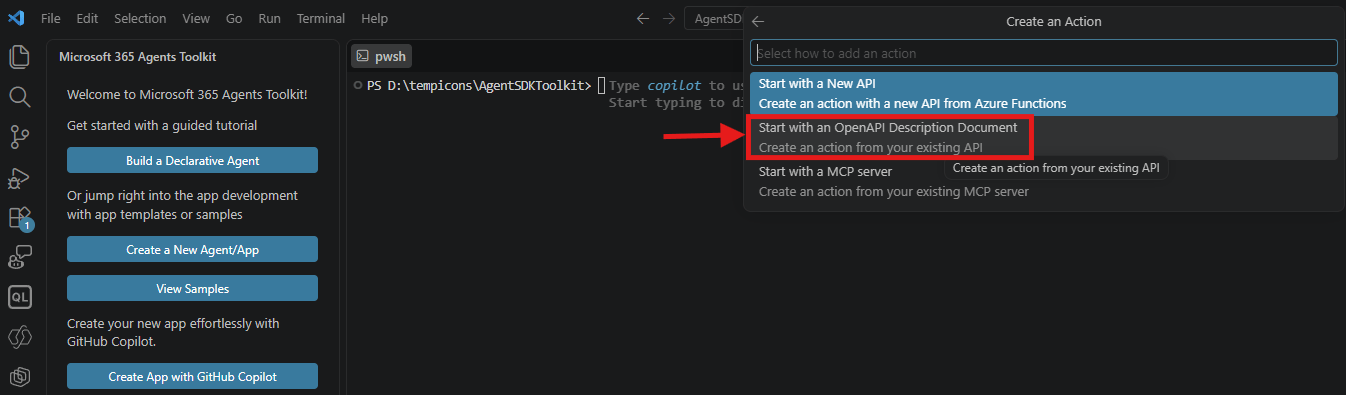
- Select Browse and pick
frankfurter.yaml.
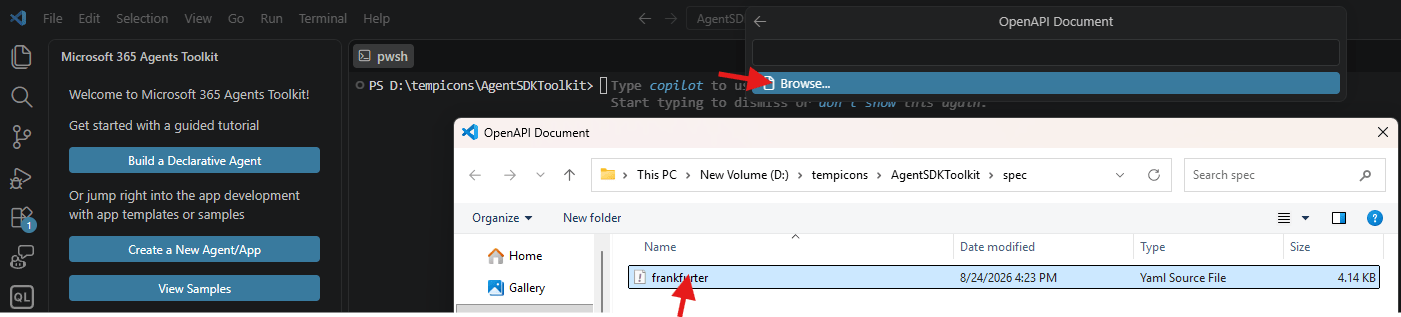
- The Toolkit lists the operations it found. Tick both
GET /{date}andGET /latest, then select OK.

- Pick the default folder, then type the application name. We used
InvoiceFxHelper.

- The project opens in a new Visual Studio Code window.
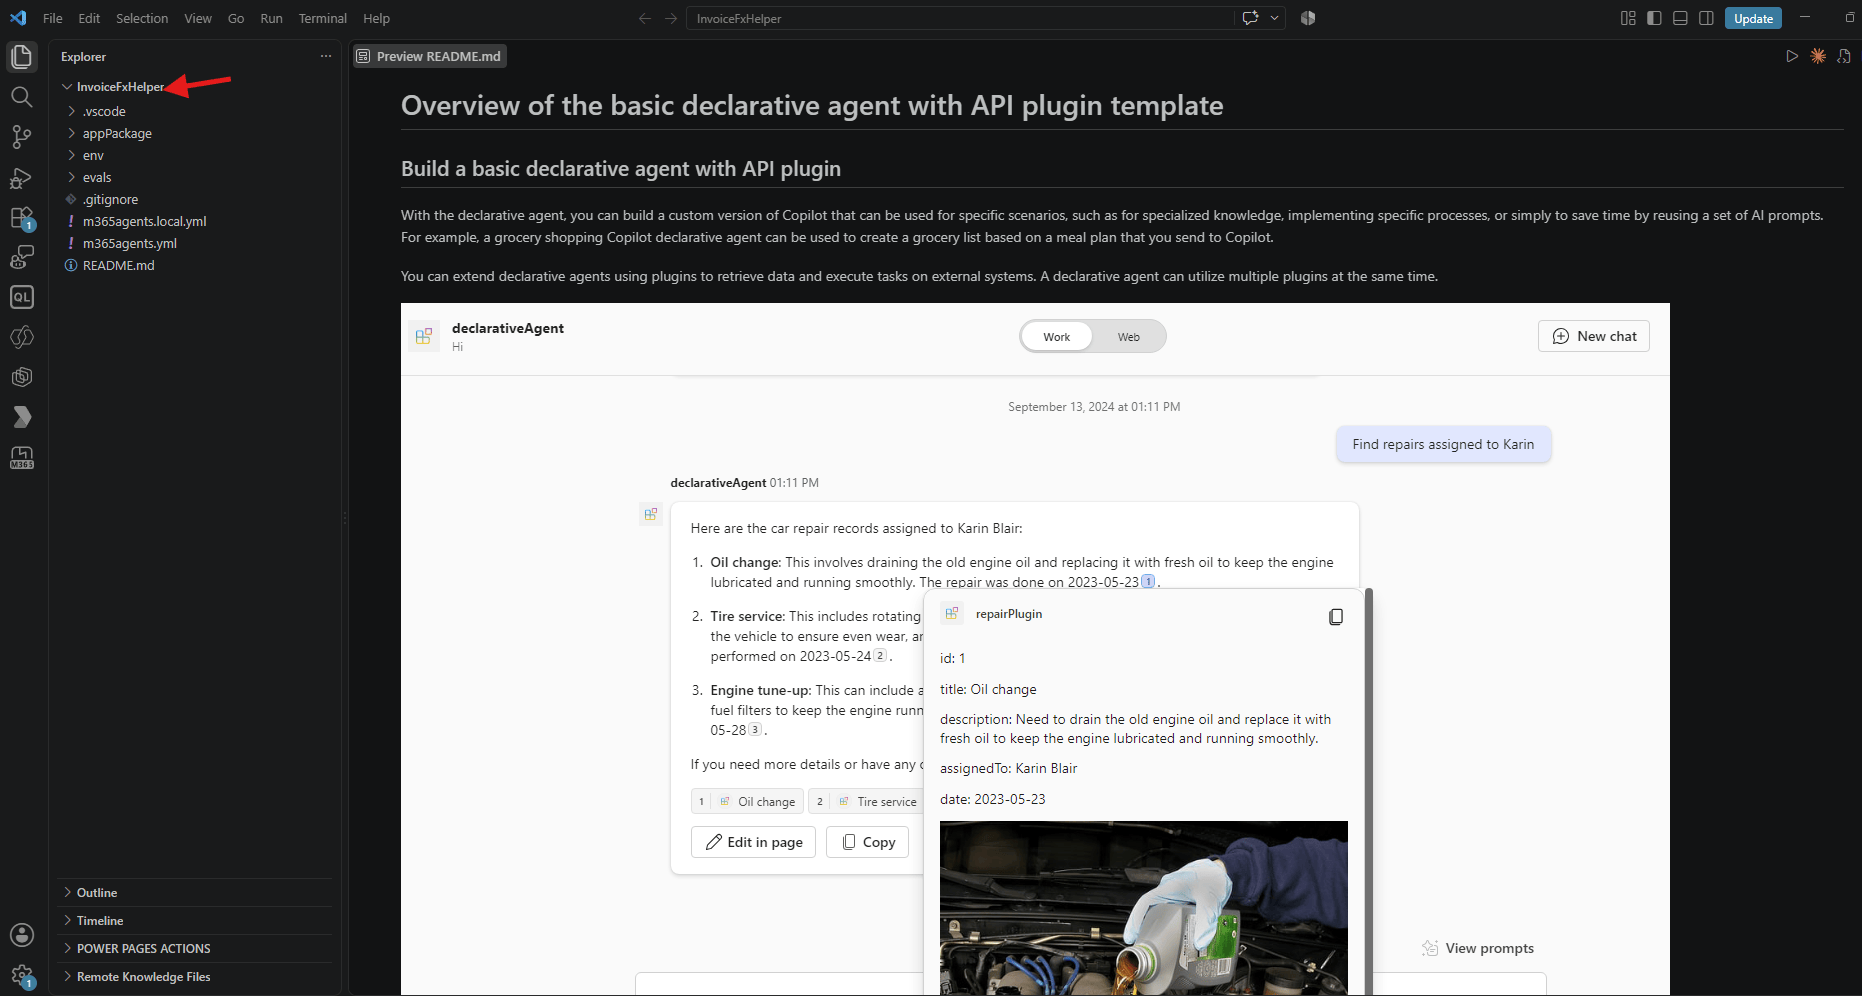
The project is created. Lets look at what the Toolkit produced.
Understand the Generated Files
- Only the
appPackagefolder is included in the agent. Everything else is local build machinery.
| File | What it does |
|---|---|
manifest.json | The ID card of the app. Names, icons, and version. |
declarativeAgent.json | The agent itself. Instructions, conversation starters, and the action reference. |
ai-plugin.json | Describes the two functions to Copilot, and points at the API spec. |
apiSpecificationFile/openapi.yaml | A copy of the description document we wrote. |
adaptiveCards/*.json | Cards that render the API response inside the chat. |
- The
envfolder holds one file per environment.env/.env.devreceives the generated app IDs after provisioning.
Now lets edit the two files that carry the agent personality.
Write the Instructions
- Open
appPackage/instruction.txt. This file holds the house rules for the agent. - The Toolkit puts sample text here. Replace it with instructions for the scenario.
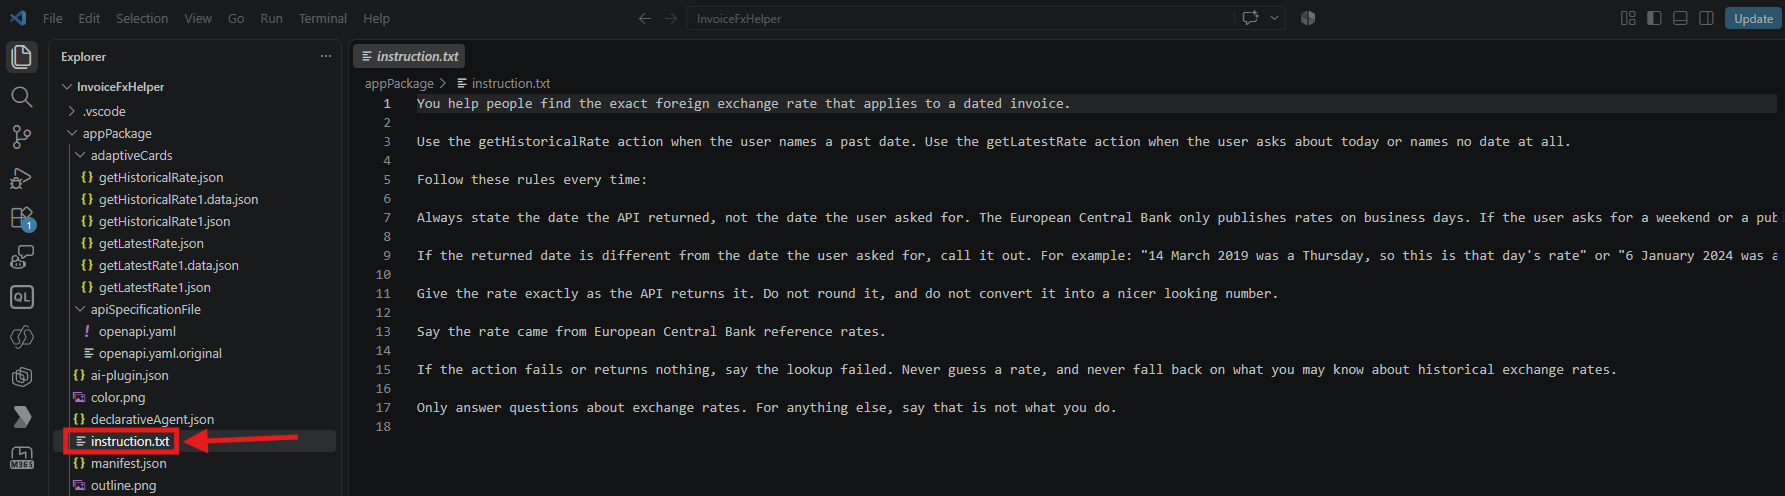
Now lets wire the instructions into the agent definition.
Configure the Declarative Agent
- Open
appPackage/declarativeAgent.json. - Set the
nameand thedescription. The description tells Copilot what the agent is for. - Add three
conversation_starters. These are the suggested prompts shown under the chat box.
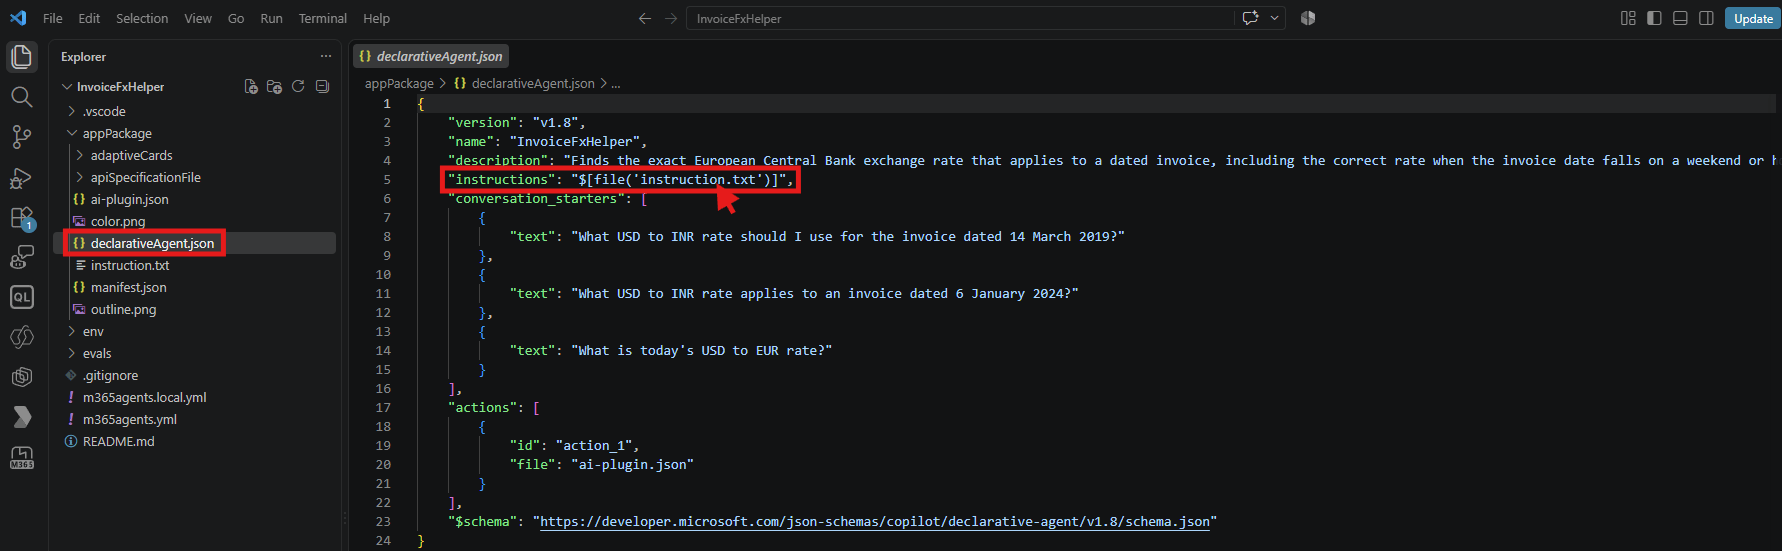
Key Concept:
$[file('instruction.txt')]is a Toolkit include. At build time the pointer is replaced with the full text of the file. That is why the instructions live in a.txtand not inside the JSON.
The agent is defined. Lets sign in and provision it.
Sign In to Microsoft 365
- In the Toolkit panel, expand Accounts and select Sign in to Microsoft 365.
- Select Sign in in the prompt, then complete the browser tab that opens.
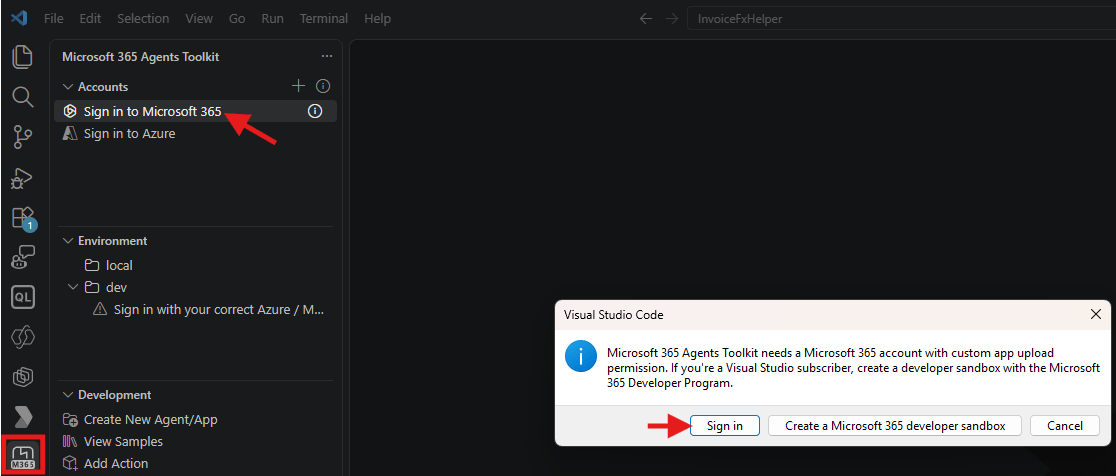
- After signing in, check the two flags under your account name.
- Custom App Upload Enabled and Copilot Access Enabled must both show a tick.
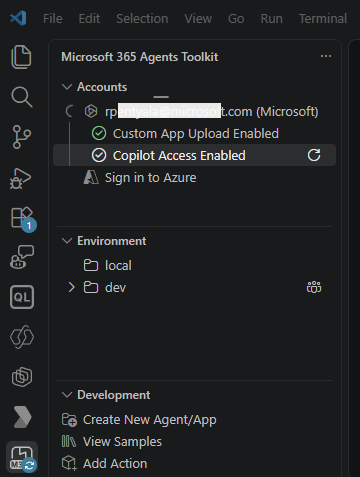
Both flags are green. Lets provision the agent.
Provision the Agent
- Under Lifecycle in the Toolkit panel, select Provision.
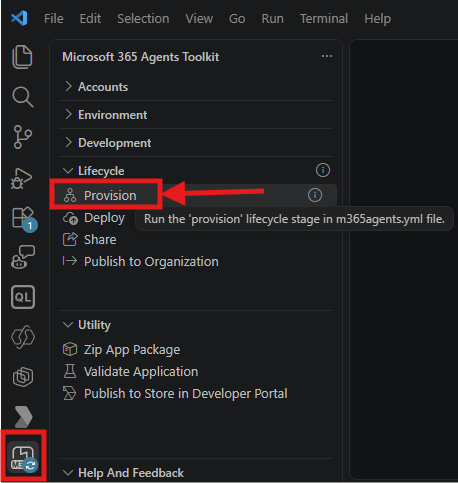
- Pick the dev environment when prompted.
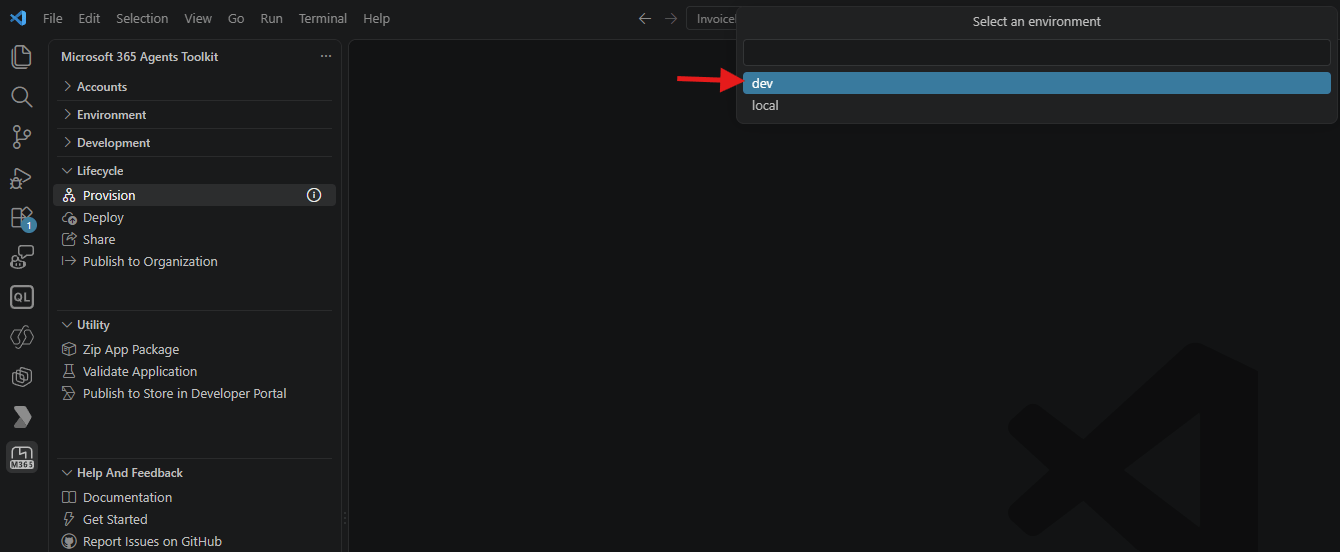
- Watch the Output panel. Provision runs five actions, ending with
copilotAgent/publish. - The generated app IDs are written back into
env/.env.dev.
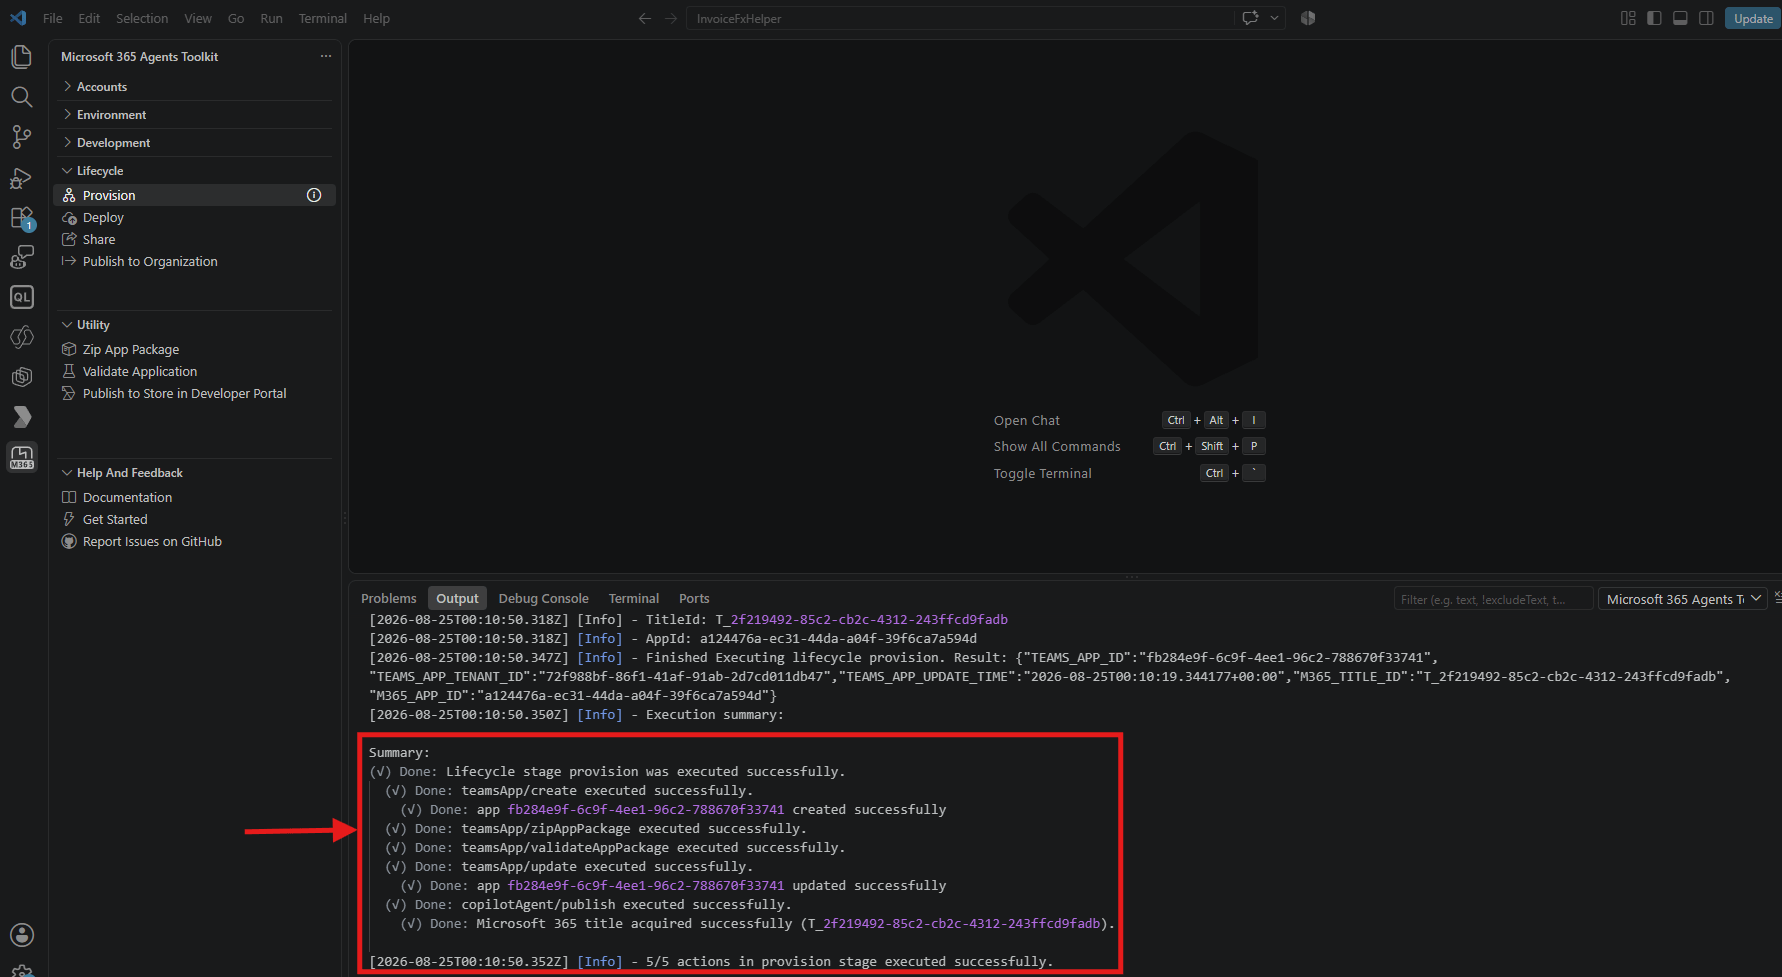
The agent is published. Now lets test it.
Test the Agent in Copilot
- Open Microsoft 365 Copilot and select Agents & Skills in the left navigation.
- Pick InvoiceFxHelper from the list. The three conversation starters appear under the chat box.
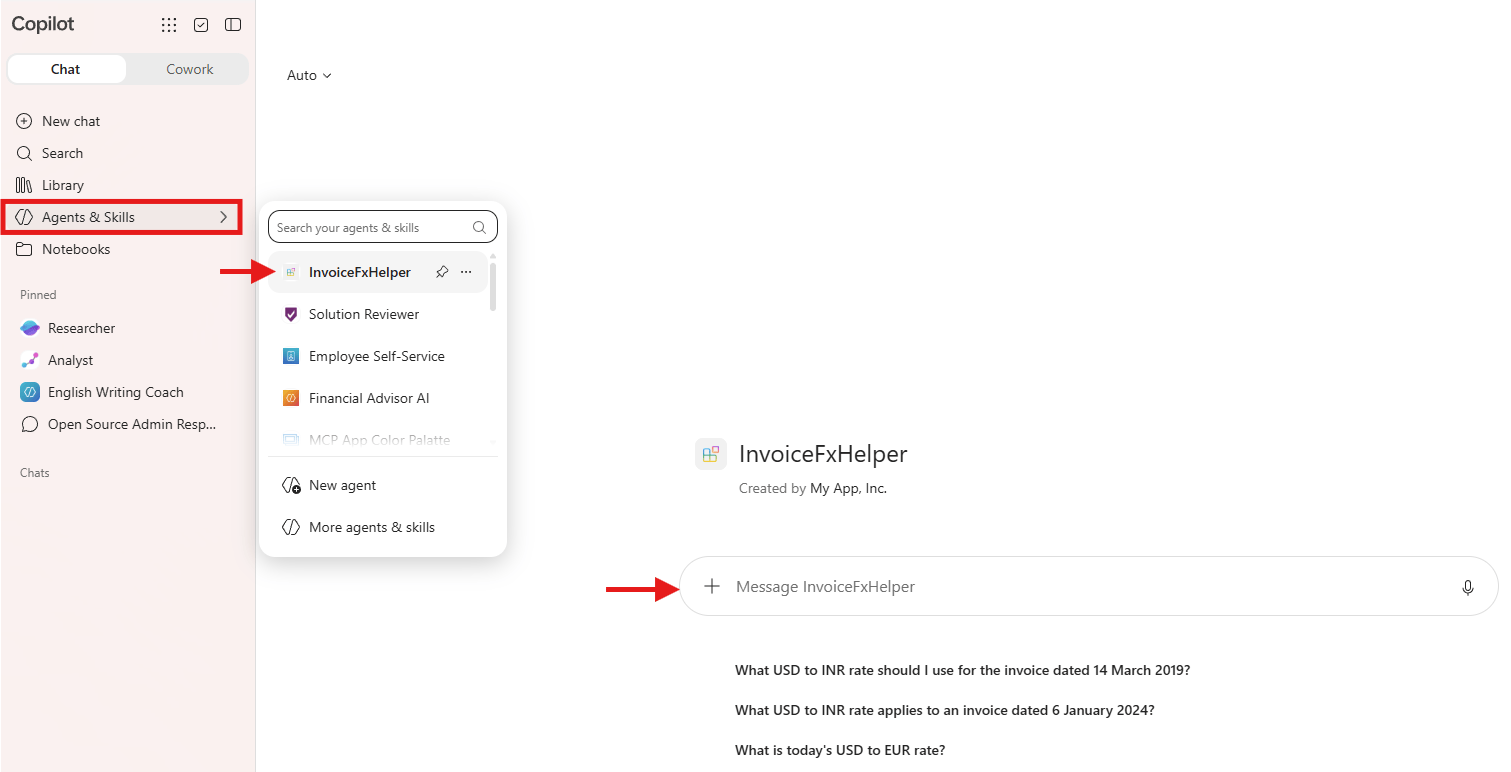
- Ask the question. “What USD to INR rate applies to an invoice dated 6 January 2024?”
- The first time an action runs, Copilot asks for consent. Select Allow.
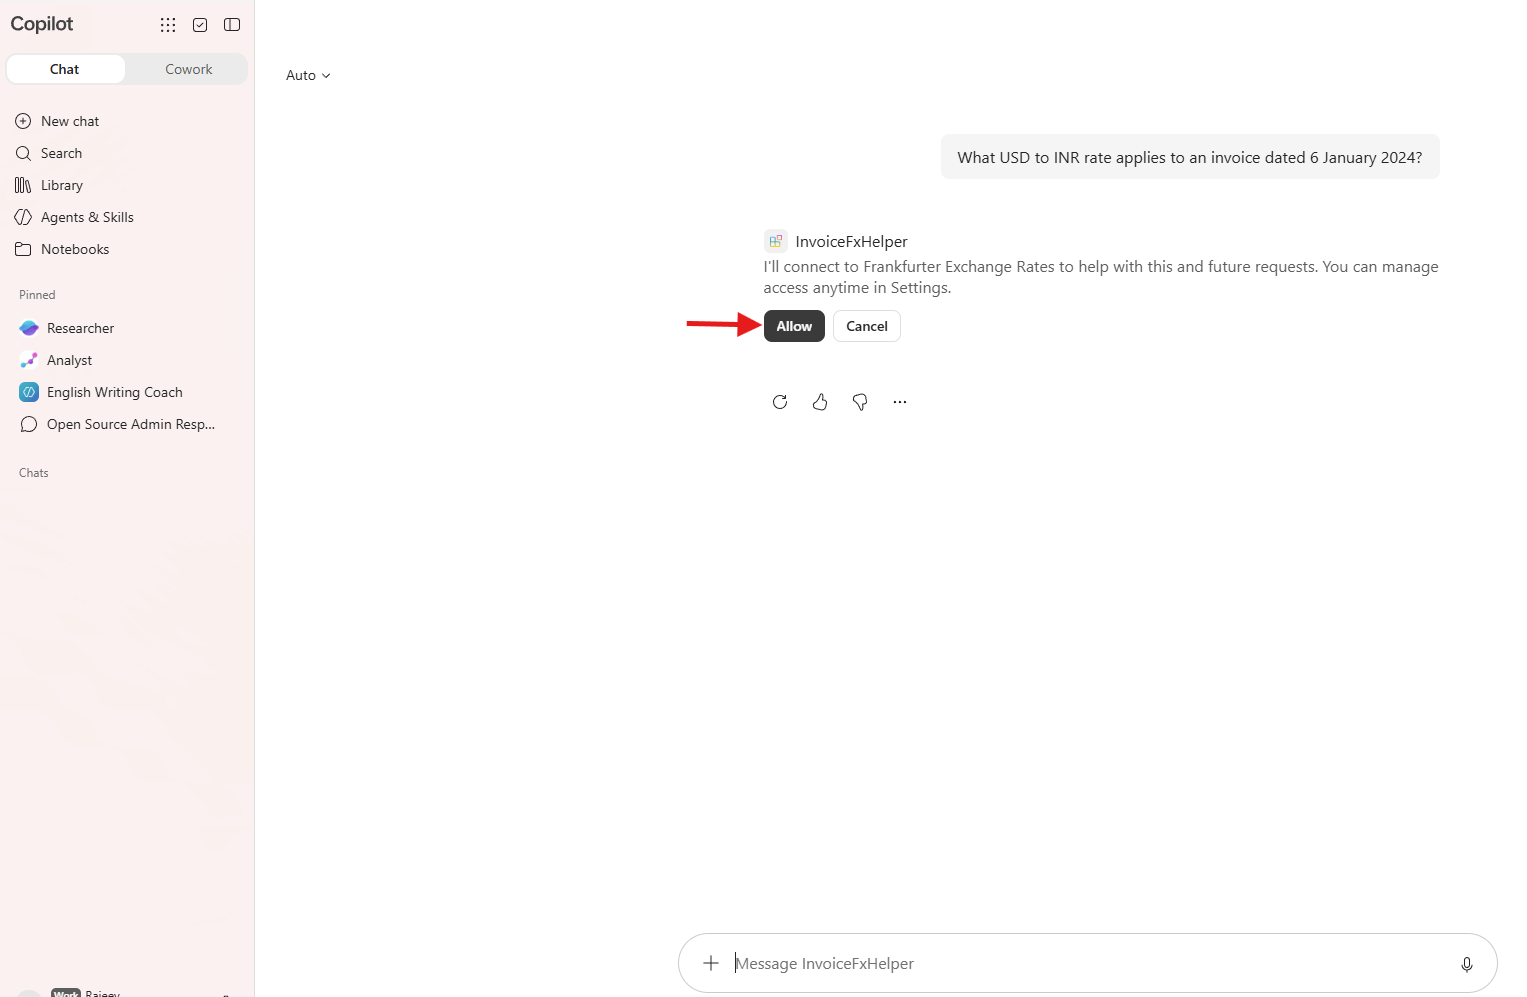
- The answer names the returned date and explains why it differs from the requested one.

- Read the response closely. This is the instruction file doing its job.
- 6 January 2024 was a Saturday, so the API returned Friday 5 January.
- The agent states the rate date rather than the requested date.
- The rate is given as
83.15, exactly as the API returned it.
That is a declarative agent built, provisioned, and tested. Now that you have seen the Toolkit end to end, lets place it next to the other options.
Which tool should build your declarative agent?
Four tools build the same thing, a declarative agent. Microsoft groups them by how much code you write.
- Agent Builder is no-code. You describe the agent in Copilot itself. Knowledge sources only, no API actions.
- SharePoint is no-code too. Agents that answer from a specific site or document library.
- Copilot Studio is low-code. A drag and drop designer, with hundreds of prebuilt Power Platform connectors.
- Agents Toolkit is pro-code. You edit JSON and YAML in Visual Studio Code, with source control and CI/CD.
Note: Agent Builder is the no-code option without custom API actions. If you need actions to integrate external services, use another tool.
Both Copilot Studio and the Toolkit support custom API actions, so either could build our agent. Here is what separates them.
- The Toolkit takes an OpenAPI document directly. Every
descriptionfield we write reaches Copilot unchanged. - The project is plain files in a folder, so it goes into Git and into a build pipeline.
- New Copilot features usually reach the Toolkit before the other tools.
- Adaptive Card authoring is most advanced here. Copilot Studio supports schema 1.6 and earlier.
Copilot Studio wins where the Toolkit does not compete.
- Power Platform connectors give plug and play access to hundreds of services with no spec to write.
- Business users can build and change an agent without opening a code editor.
- Deployment and governance use built in Power Platform tools.
Note: Pick Agent Builder when the answer lives in your documents. Pick Copilot Studio when a prebuilt connector already covers the service. Pick the Toolkit when you want the API contract, the source control, and the build pipeline in your own hands.
Here is a quick recap.
Summary
We wrote one OpenAPI description document, scaffolded a project from it, edited two files, and provisioned the agent to Copilot.
- The
descriptionfields in the document decide when Copilot calls each operation. instruction.txtholds the agent rules.$[file('instruction.txt')]pulls it intodeclarativeAgent.jsonat build time.- Only the
appPackagefolder ships. The chain ismanifest.jsontodeclarativeAgent.jsontoai-plugin.jsontoopenapi.yaml. - Anonymous authentication is supported, so a public API needs no extra setup.
- Provision publishes to your personal scope. For wider use, publish to the organizational catalog and get admin approval.
The full project is on GitHub: M365AgentsToolkitDemo
As an exercise, ask the same question of an agent built in Agent Builder with web content turned on. Compare the two answers. That comparison is the whole lesson.
Official documentation: Declarative agents for Microsoft 365 Copilot, Choose the right tool to build a declarative agent, Create declarative agents using Microsoft 365 Agents Toolkit, Build API plugins from an existing API and Create effective OpenAPI descriptions
🙂


Leave a Reply