Power Platform Pay-as-you-go is a plan that bills Power Apps, Power Automate, Dataverse, and Copilot Studio consumption directly to an Azure subscription. It removes the need to buy prepaid seat licenses up front.
In this post lets walk through steps of creating a billing plan and linking it to a Power Platform environment.
What is a Billing Plan?
- Configured from the Power Platform admin center under Licensing > Billing Plans. Ties one or more environments to an Azure subscription.
- Selects which product meters (Dataverse, Power Apps, Power Automate, Copilot Studio) are billed through the plan.
Before we create the plan, lets make sure the tenant and subscription have everything needed.
Prerequisites
- An Azure subscription in the same tenant as the Power Platform environment. Cross-tenant linking is not supported.
- Owner or Contributor role on the Azure subscription.
- A Power Platform role that can create a billing plan. Any of Power Platform admin, Dynamics 365 admin, Global admin, or Environment admin (for owned environments only) works.
Lets start with the Azure side of the setup.
Register the Resource Providers
Pay-as-you-go depends on two Azure resource providers. Microsoft.PowerPlatform hosts the billing account resource and Microsoft.CostManagement exposes consumption data.
- Sign in to the Azure portal and open the Subscription.
- From the left menu open Settings > Resource providers.
- Filter for
Microsoft.PowerPlatform. The provider shows NotRegistered by default.

- Select the row and click Register on the toolbar.
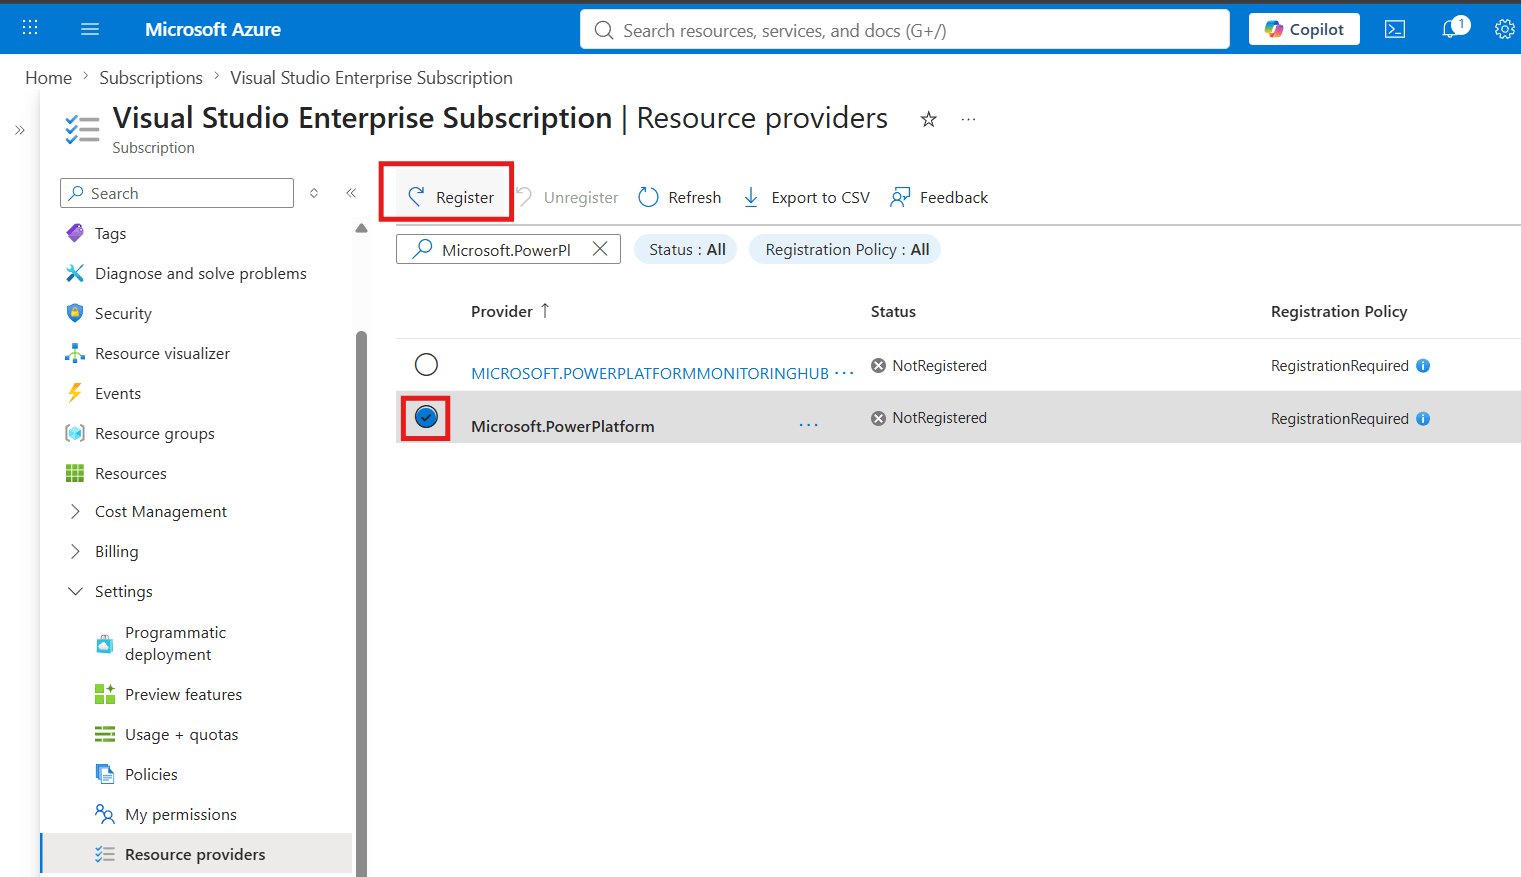
- After a minute or two, click Refresh. The status changes to Registered.

- Repeat the same steps for
Microsoft.CostManagement

Both providers are registered. Next lets create a resource group that will host the Power Platform account resource.
Create a Resource Group
The billing plan needs a resource group as its target. Any resource group in the subscription works, but a dedicated one keeps cost reporting clean.
- In the Azure portal search bar, type Resource groups and click + Create.
- Fill in the details. Click Review + create and then Create.

Now that Azure is ready, lets switch to the Power Platform admin center and create the billing plan.
Create the Billing Plan
- Sign in to the Power Platform admin center.
- From the left navigation open Licensing > Billing Plans.
- Click + New billing plan.
- In the New billing plan pane, select Azure subscription and fill in the details:
- Select ‘Resource group’ we created in previous section.
| Setting | Value |
|---|---|
| Name | bpcopilotstudiopoc |
| Azure subscription | Target subscription |
| Resource group | rg-pp-payg-dev |

- Under Meter, select the products to bill through this plan. Dataverse is included by default. For a Copilot Studio focused proof of concept, also check Copilot Studio, Power Apps, and Power Automate.

- Click Next. On the Select environments step, pick a region.

- Click Save. The billing plan is created with status Enabled.

Now we have the billing plan in place. Lets create a new environment and link it to this plan.
Create the Pay-as-you-go Environment
Only Production and Sandbox environments support pay-as-you-go. Default, Developer, Trial, and Teams environments are not eligible.
- In the Power Platform admin center, open Environments and click + New.
- Fill in the environment properties:
| Setting | Value |
|---|---|
| Name | PAYG-POC-Dev |
| Type | Sandbox |
| Region | United States (must match the billing plan region) |
| Add Dataverse | Yes |

- Expand Change default settings and toggle Pay-as-you-go with Azure to Yes. A Billing policy dropdown appears. Select the billing plan
bpcopilotstudiopoc.

- Click Next, then click Save. Provisioning takes two to five minutes.
- Once the state shows Ready, open the environment to confirm the details.

The environment is now billed against the Azure subscription. Lets verify the link on both sides.
Verify the Setup:
Two quick checks confirm the setup end to end.
- On the Billing Plans page, select
bpcopilotstudiopocand click See details. The Target environments section listsPAYG-POC-Dev.

- In the Azure portal, open the resource group
rg-pp-payg-dev. By default the Power Platform account resource is hidden. Click Manage view on the toolbar and enable Show hidden types.
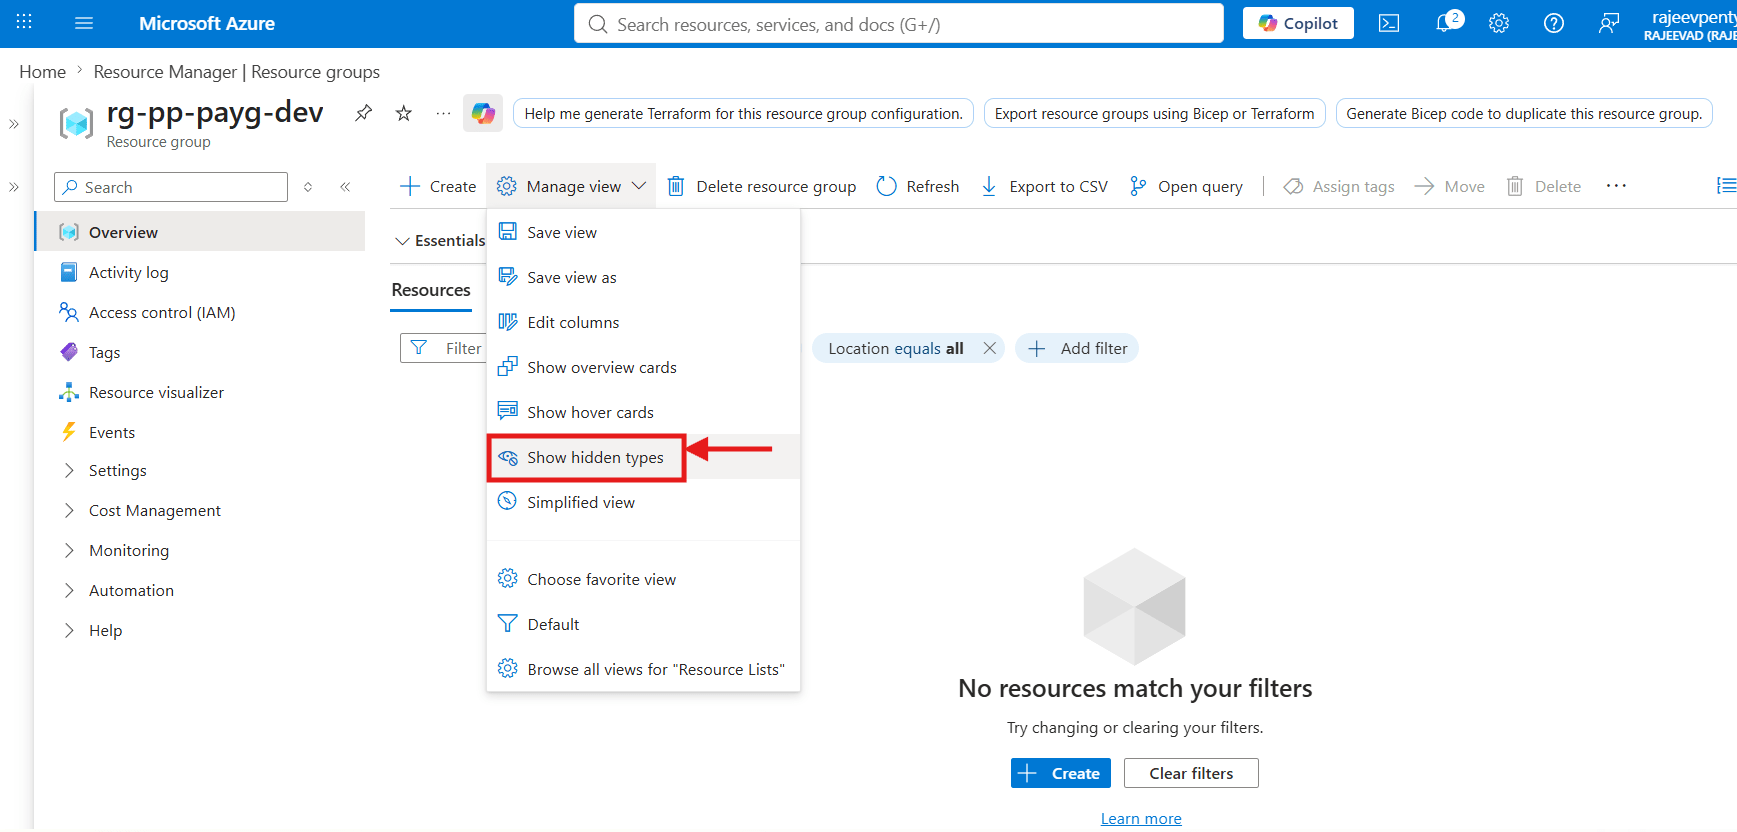
- The resource
bpcopilotstudiopocof typeMicrosoft.PowerPlatform/accountsappears. Every meter emitted fromPAYG-POC-Devis billed against this resource.

Note: Azure Cost Management data has a natural delay of 8 to 24 hours. Any consumption generated today does not show up in cost reports until the next update cycle.
Summary
We registered the two required Azure resource providers, created a resource group to host the billing target, created a Billing Plan in the Power Platform admin center with the Copilot Studio meter selected, created a Sandbox environment with Pay-as-you-go with Azure enabled, and linked it to the billing plan. Then we verified the link from both the Power Platform admin center and the Azure portal.
For the official reference, see Set up a pay-as-you-go plan and Pay-as-you-go plan overview. 🙂


Leave a Reply