In a traditional Azure Functions app, a trigger starts your function and your code does all the work. For example, to sort customer feedback in C#, you write rules for every keyword and edge case.
With Azure Functions hosted skills, you describe the task in plain language in a Markdown file instead. When the trigger fires, an AI model reads those instructions and does the work.
Note: Azure Functions hosted skills is in preview and supports Python only.
What is an Azure Functions hosted skill?
- Think of a hosted skill as an Azure Function where the logic is written in plain English instead of code.
- You write it in a Markdown file that ends in ‘.agent.md’.
- The top of the file says when it runs, for example when a message arrives on a queue.
- The rest of the file tells the AI model what to do. Write it the way you would brief a new team member.
- Azure Functions turns each ‘.agent.md’ file into one function. When it runs, your instructions go to the model and the answer comes back.
- You can keep reusable know-how in a separate ‘SKILL.md’ file, like a reference sheet.
Why hosted skills?
Some events need a judgement call before an action. A complaint arrives, and someone has to decide how urgent it is. A hosted skill lets the model make that call, while Azure Functions takes care of the trigger, scaling, identity and monitoring.
What we are building
- A message lands in the ‘feedback-in’ storage queue.
- The ‘triage_queue’ function asks the ‘feedback_classifier’ hosted skill to classify it.
- The skill returns the category, sentiment, priority (P1 to P3), a summary and a suggested reply.
- The function saves the result as a JSON file in the ‘triaged’ blob container.
- For P1 feedback, the function also sends an alert to the ‘p1-alerts’ queue.
- A second function, ‘triage_http’, returns the same classification over HTTP.
The complete code is in my GitHub repo AzureFunctionHostedSkillDemo.
Prerequisites
- An Azure subscription.
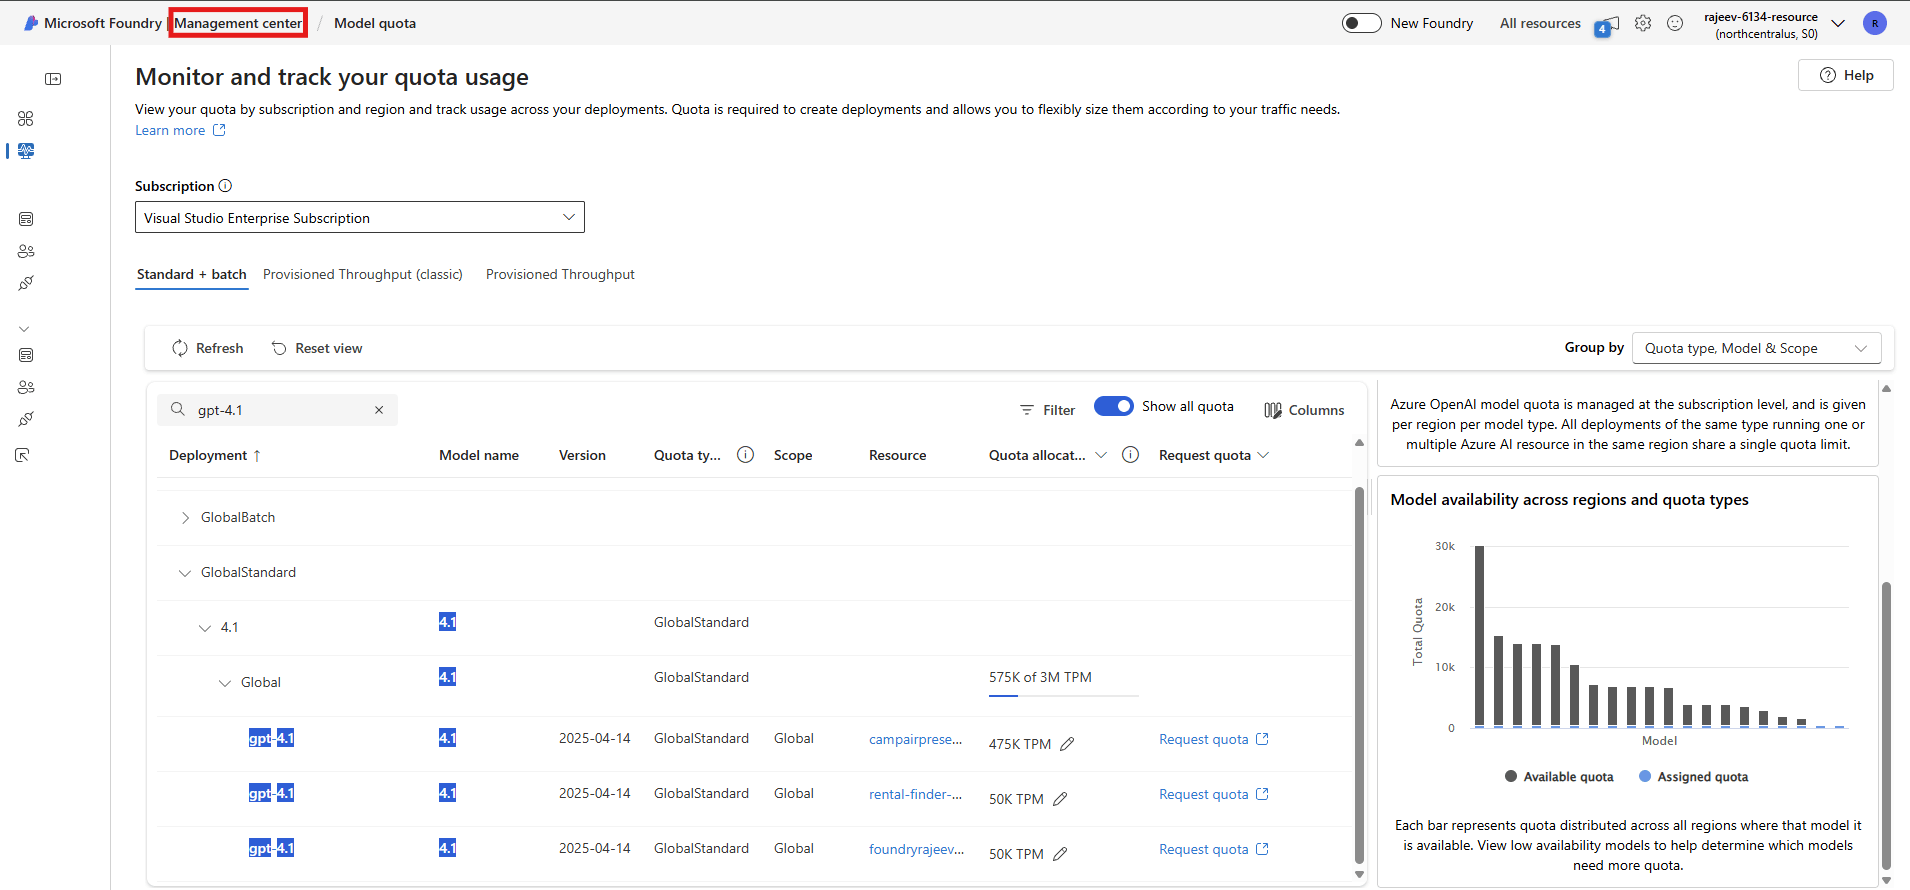
- Quota for the ‘gpt-4.1’ model.
- To check the quota, open the Microsoft Foundry portal and go to ‘Management center’ > ‘Model quota’. Search for ‘gpt-4.1’ and expand ‘GlobalStandard’.
- The Azure Developer CLI (azd). On Windows, execute:
winget install microsoft.azd

Now we have the prerequisites in place. Before creating the project, lets understand what ‘azd’ does.
What is azd?
- The Azure Developer CLI (‘azd’) is a command line tool that takes a project from your machine to Azure.
- An azd template contains both the app code and the infrastructure. The infrastructure is written in Bicep files.
- ‘azd init’ downloads a template into a folder.
- ‘azd up’ creates the Azure resources from the Bicep files and then deploys the code.
Note: If you used ‘func init’ in the past, it creates only the code. You create the Function App and storage account separately. An azd template creates both.
Lets create the project from the hosted skills template.
Create the project with azd init
- Create a folder and open it in VS Code.
- In the terminal, run the command below. The ‘-e’ flag sets the environment name. azd uses it in the resource group name, so we get ‘rg-feedback-triage’.
azd init --template Azure-Samples/functions-quickstart-serverless-agents-azd -e feedback-triage
- azd downloads the template. The ‘src’ folder has the app code and the ‘infra’ folder has the Bicep files.

- The template includes a sample hosted skill, ‘daily_microsoft_blog_summary.agent.md’. It runs on a timer and summarizes Microsoft blog posts.
- Notice the ‘trigger’ section in the header and the plain English instructions below it. That is the whole hosted skill.
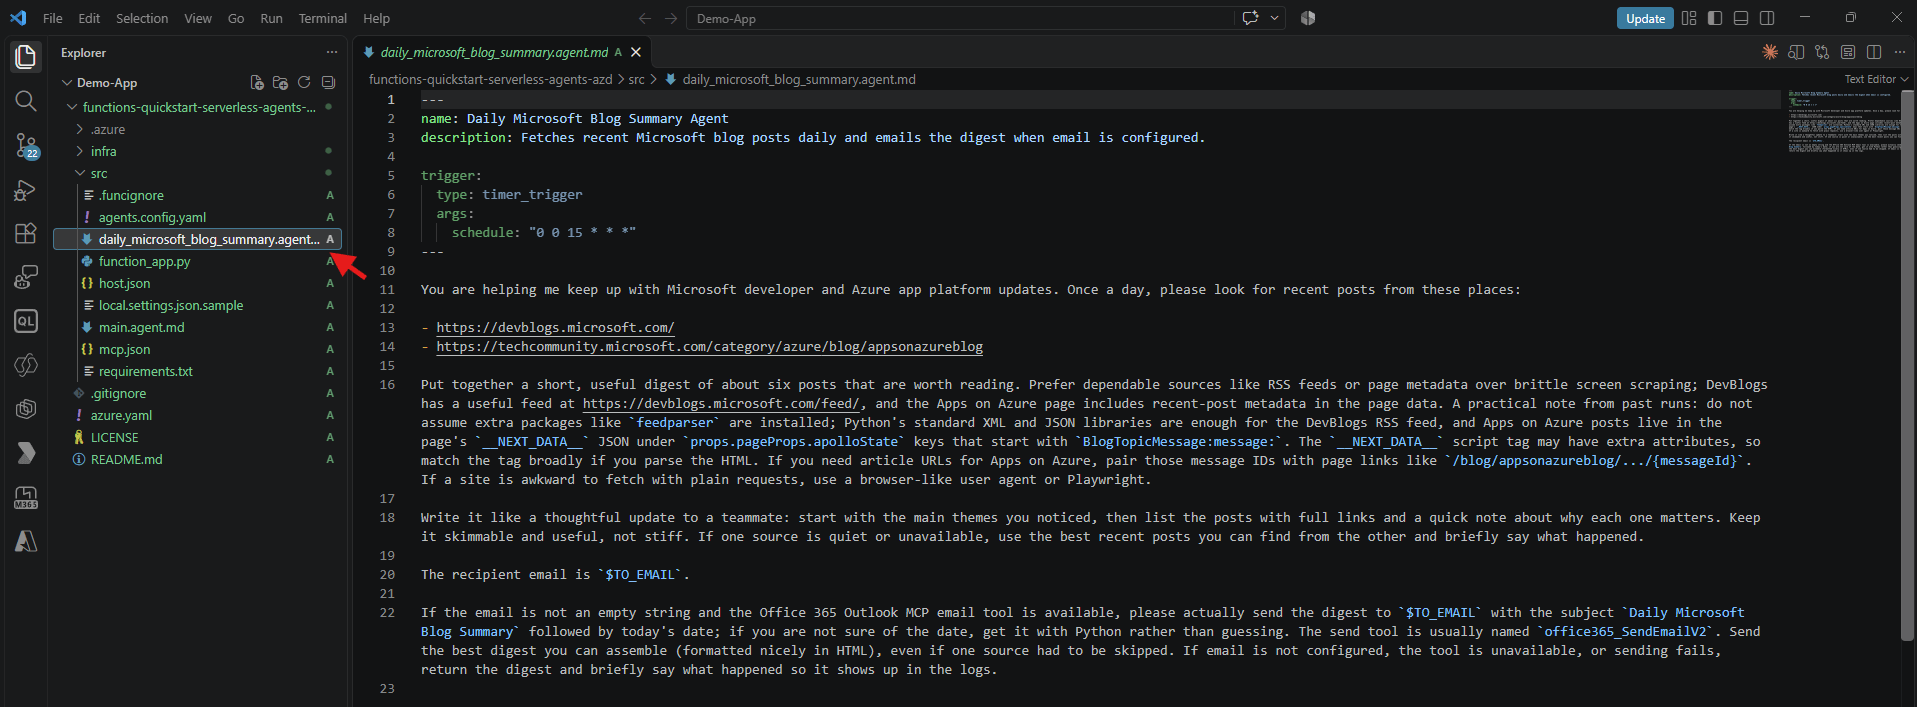
The sample shows the shape of a hosted skill. Lets replace it with our feedback triage skill.
Add the feedback triage hosted skill
- Delete ‘src/daily_microsoft_blog_summary.agent.md’.
- Add a new file ‘src/feedback_classifier.agent.md’. Note these settings in the header:
- There is no ‘trigger’. Our Python functions call this skill.
- ‘response_schema’ tells the model to return JSON with fixed fields. For example, ‘priority’ can only be P1, P2 or P3.
- ‘system_tools’ turns off the code sandbox and web requests. The classifier does not need them.
- The body tells the model to load the ‘feedback-triage’ skill and follow its rules.

- Add the skill file ‘src/skills/feedback-triage/SKILL.md’. It holds the triage rules.
- For example, an outage, data loss, a security issue, a wrong charge or a threat to cancel is P1.

Key Concept: The ‘.agent.md’ file says what to do. The ‘SKILL.md’ file holds the rules. You can change the rules without touching the agent file or the code.
Now the hosted skill knows how to classify feedback. Next lets write the functions that send feedback to it and save the result.
Write the Python functions that use the hosted skill
Our hosted skill has no trigger of its own. Two normal Azure Functions in ‘src/function_app.py’ call it.
- ‘triage_queue’ runs when a message lands in the ‘feedback-in’ queue.
- ‘triage_http’ runs when someone sends feedback to its web address. It is handy for quick tests.
- Azure hands the hosted skill to each function, ready to use. If you know C#, this works like an input binding.
- Each function sends the feedback text to the hosted skill and gets back a JSON answer.
- Python then saves the answer as a JSON file in the ‘triaged’ container. For P1 feedback, it also adds an alert to the ‘p1-alerts’ queue.
Key Concept: The AI model only decides. Your code does the saving. If saving fails, Azure retries the queue message.
We also changed two small settings files in the ‘src’ folder.
- ‘requirements.txt’ adds the Python packages that talk to Azure Storage.
- ‘host.json’ reads queue messages as plain text and retries a failing message up to 3 times.
The full code is in the GitHub repo linked at the end of this post.
The code is ready. The queues and the container must also exist in Azure. Lets add them to the Bicep file.
Add the queues and container to Bicep
Bicep files describe the Azure resources we want. azd reads them and creates the resources for us.
- In ‘infra/main.bicep’, we added the ‘triaged’ container and two queues, ‘feedback-in’ and ‘p1-alerts’, to the storage account.
- In ‘infra/app/rbac.bicep’, we added a permission so your own account can also read and write the queues. This lets you post test messages from the portal.
Everything is defined now. Lets deploy it.
Deploy with azd up
- From the project folder, run:
azd up
- Select your subscription and a region. We use ‘East US 2’.

- azd creates the resources from the Bicep files and then deploys the code.

‘azd up’ created these resources in the ‘rg-feedback-triage’ resource group:
- A Function App on the Flex Consumption plan.
- A storage account with the ‘triaged’ container and the two queues.
- A Microsoft Foundry resource and project with the ‘gpt-4.1’ model.
- A managed identity, so the app connects to storage and Foundry without keys.
- Application Insights and a Log Analytics workspace for logs.
The app is deployed. Lets confirm that Azure found our functions.
Verify the functions in the Azure portal
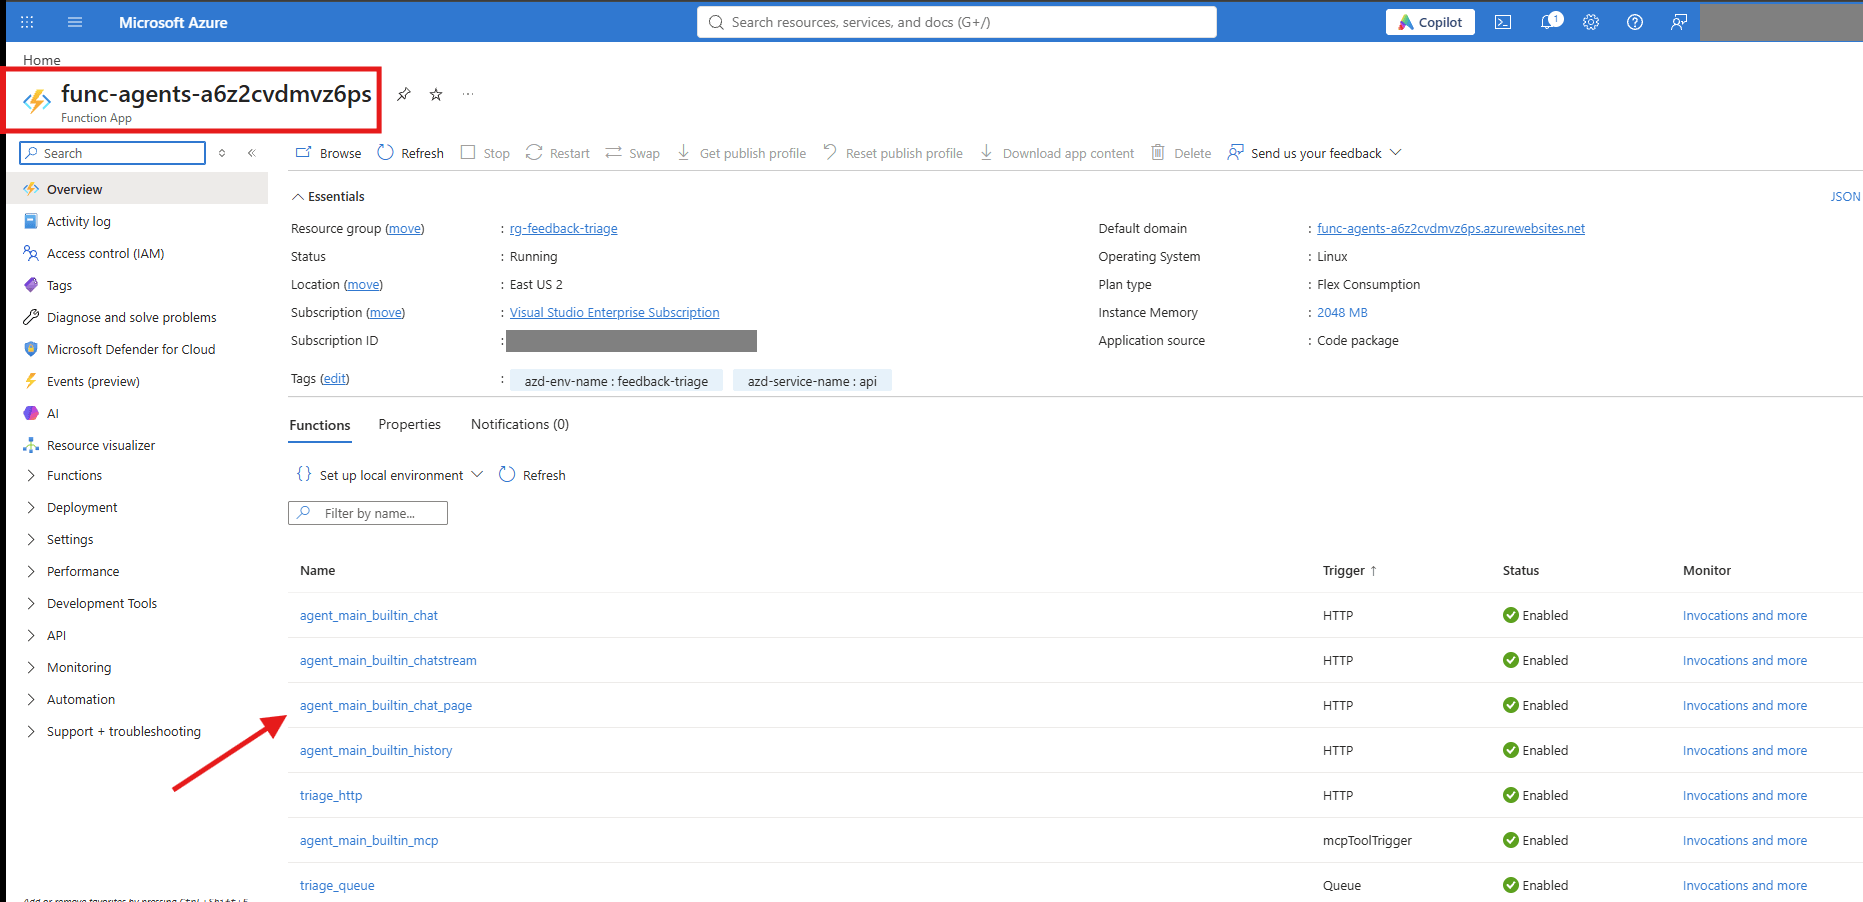
- Open the Function App in the Azure portal. On the ‘Overview’ page, select the ‘Functions’ tab.
- ‘triage_http’ and ‘triage_queue’ are our functions.
- The ‘agent_main_builtin_*’ functions come from ‘main.agent.md’ in the template. Its ‘builtin_endpoints: true’ setting creates a chat API, a chat page and an MCP endpoint.
Lets test the HTTP function first, because it returns the result right away.
Test the HTTP function
- Select ‘triage_http’ and open ‘Code + Test’. Click ‘Test/Run’.
- Set ‘HTTP method’ to ‘POST’ and paste the body below. Click ‘Run’.
{ "customer": "Contoso", "text": "Your app charged my card twice this month and support hasn't replied in 3 days. Fix this or I'm cancelling."}
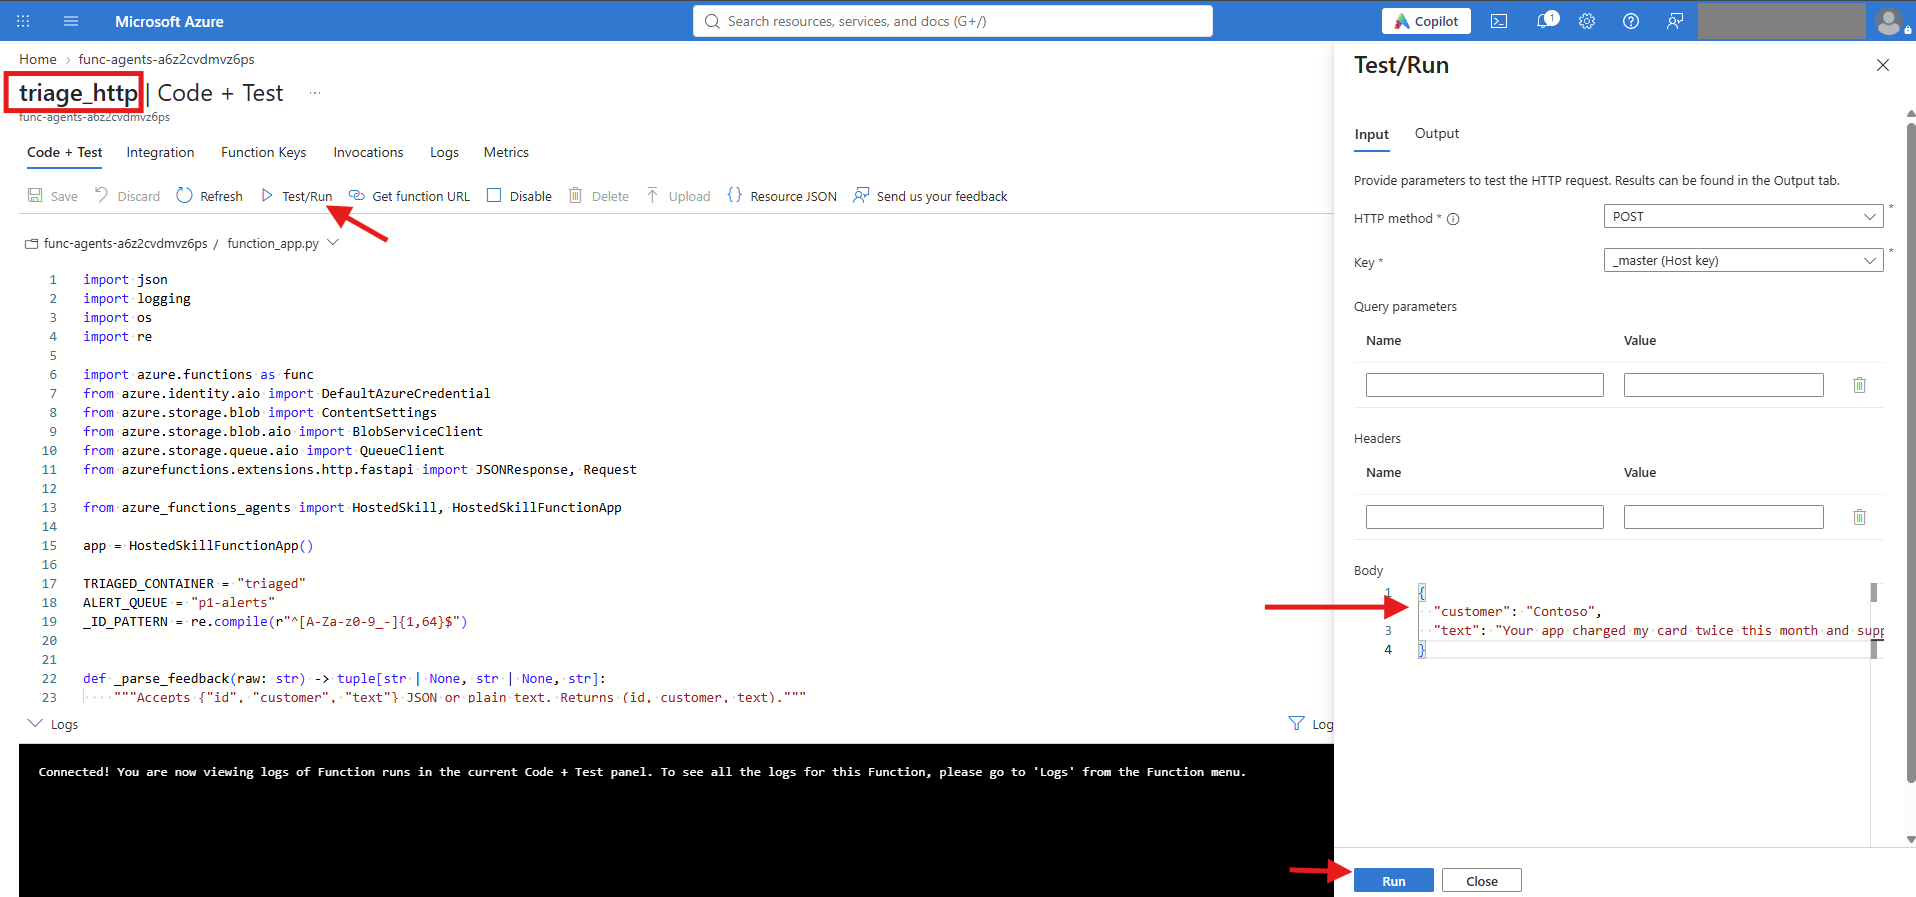
- The response is ‘200 OK’ with ‘Billing’, ‘Negative’ and ‘P1’.
- The ‘priority_reason’ quotes the customer’s own words, as the skill rules ask.
- In the logs, ‘Loaded skill: feedback-triage’ shows the hosted skill loaded our ‘SKILL.md’.
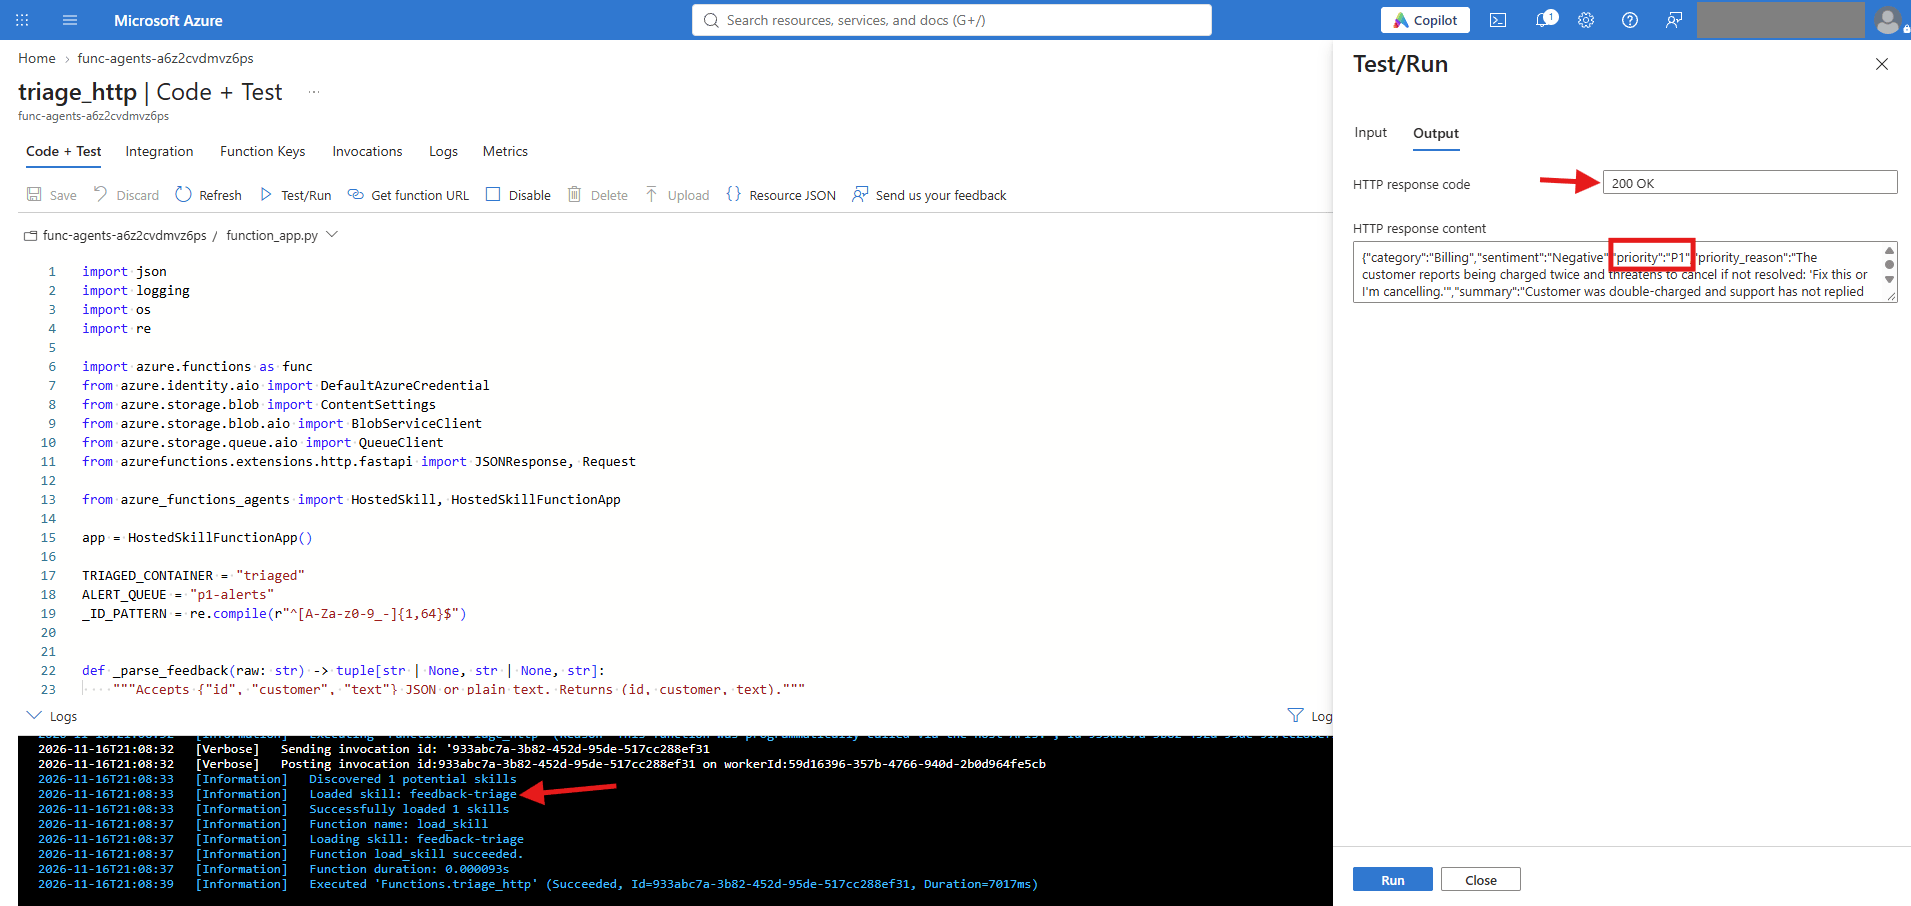
The HTTP function works. Now lets test the full flow through the queue.
Test the queue flow
- Open the storage account and go to ‘Data storage’ > ‘Queues’. The ‘feedback-in’ and ‘p1-alerts’ queues are there, created by Bicep.
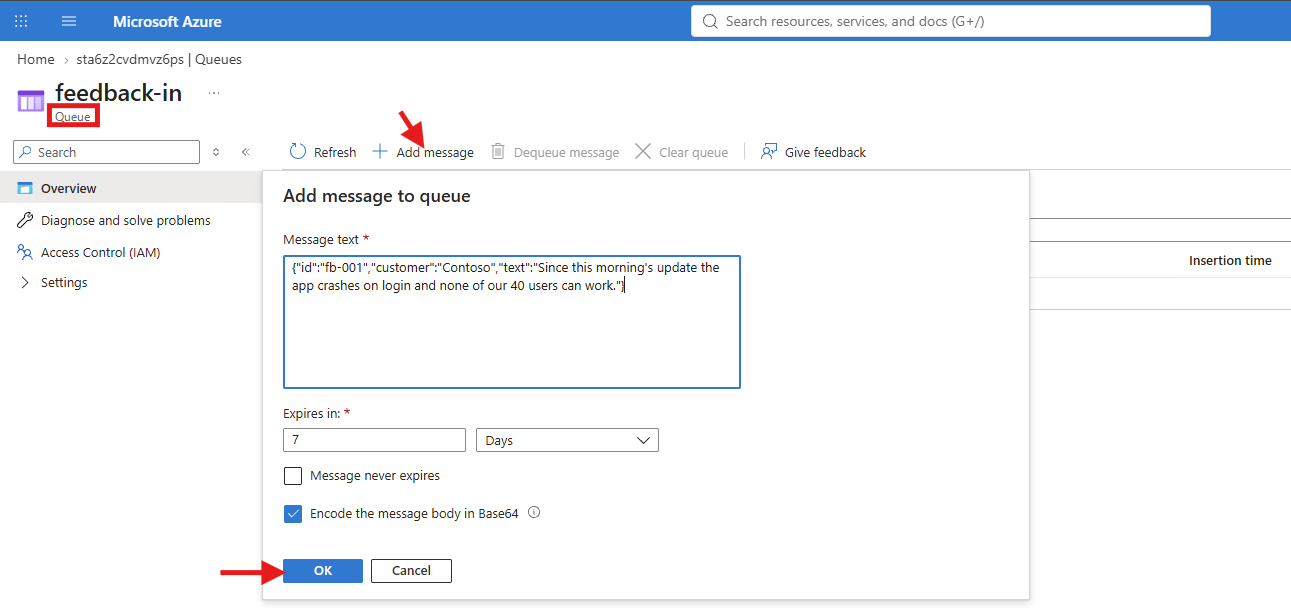
- Open ‘feedback-in’ and click ‘Add message’. Paste the message below.
- Clear the ‘Encode the message body in Base64’ checkbox. Our function reads plain text messages.
{"id":"fb-001","customer":"Contoso","text":"Since this morning's update the app crashes on login and none of our 40 users can work."}
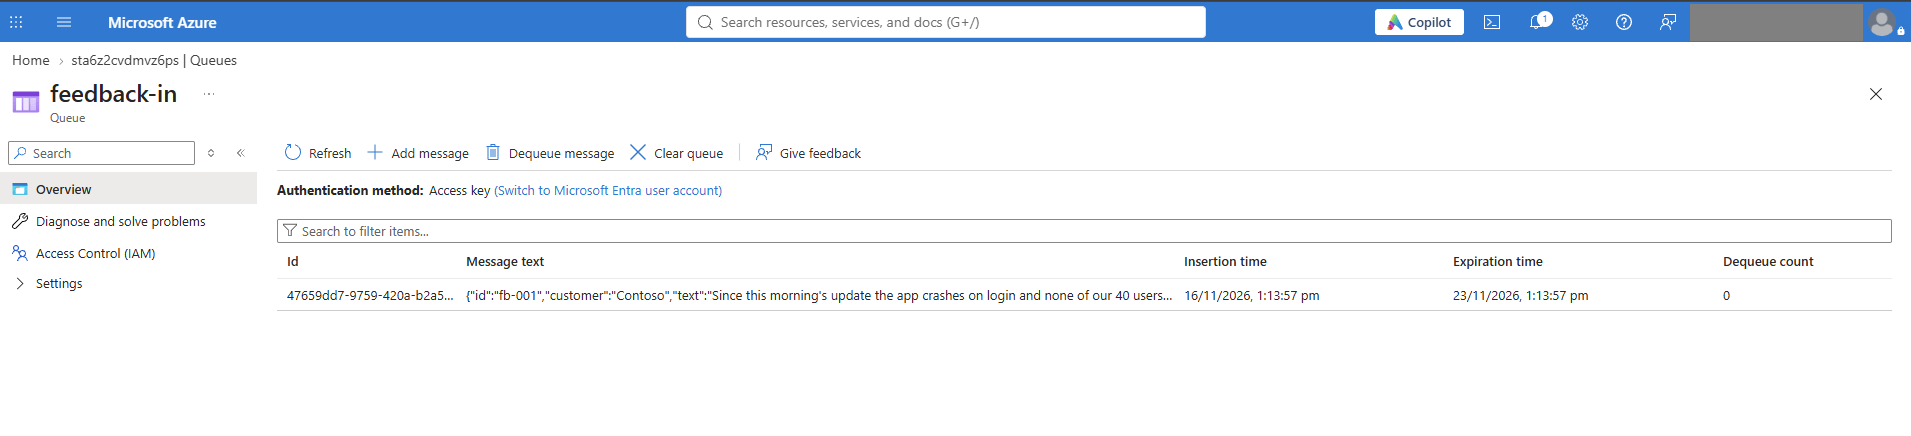
- Within a minute, the function picks up the message. Go to ‘Data storage’ > ‘Containers’ and open ‘triaged’.

- Open the new JSON file. The hosted skill classified the feedback as ‘Bug’, ‘Negative’ and ‘P1’.
- The file also has the ‘priority_reason’, the ‘summary’ and the ‘suggested_reply’.
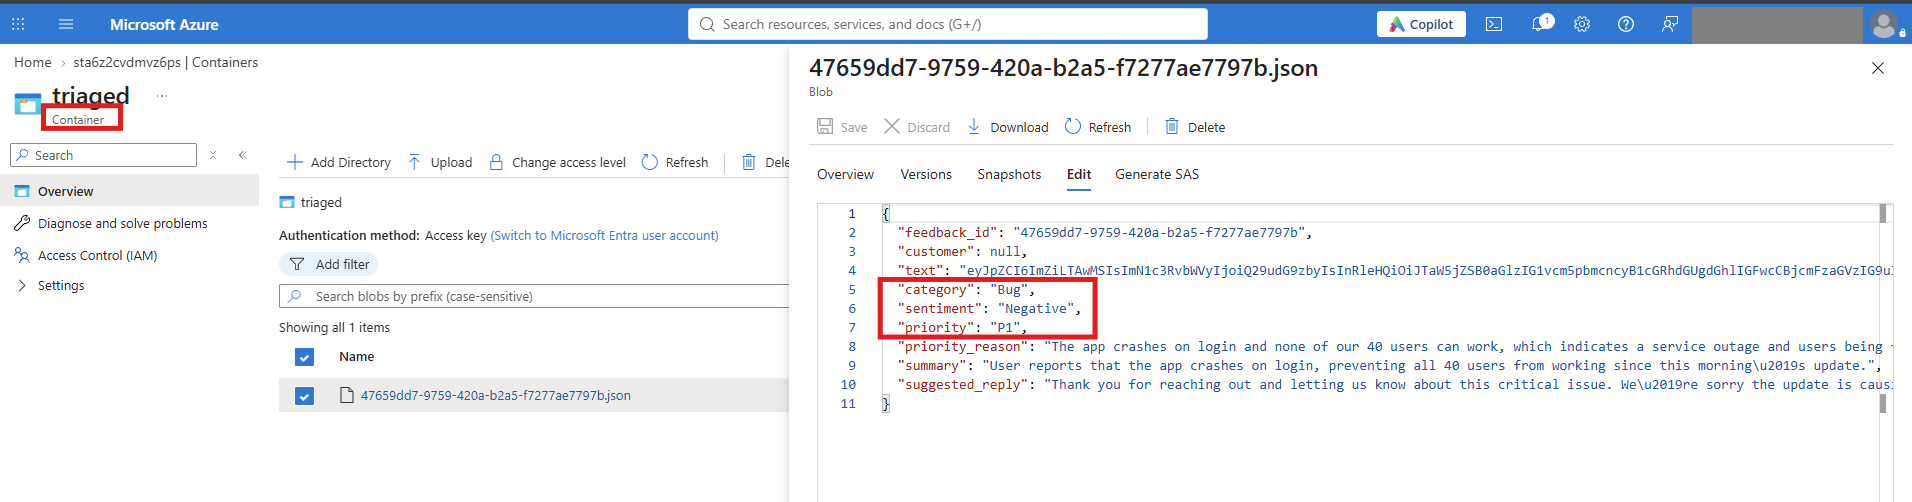
- Because it is P1, the ‘p1-alerts’ queue now has an alert message for this feedback.
Note: When you are done, run ‘azd down –purge’ from the project folder. It deletes all the resources the template created.
Summary
A hosted skill is AI work described in Markdown and run as an Azure Function. We used ‘azd’ to create the project, add a feedback triage skill and deploy everything with one command. Then we tested it over HTTP and through a storage queue.
The code is in my GitHub repo AzureFunctionHostedSkillDemo. Refer to these links for more details:
- What are Azure Functions hosted skills?
- Build an event-driven AI app with Azure Functions hosted skills
- Azure Developer CLI overview
🙂

Leave a Reply