Did you know you can generate audio files from text? With Azure Speech service, you provide a script, pick a voice, and get back natural-sounding audio.
In this article, lets create a Speech resource in Azure. Then we build a small C# console app that turns each line of a script into an MP3 file.
What is Azure Speech service?
- Azure Speech is a cloud service that converts text to speech, speech to text, and speech to another language.
- For text to speech, it offers prebuilt voices. The Voice Gallery lists 971 voices across 154 languages and variants.
- You pick a voice by its name, such as ‘en-US-GuyNeural’.
- Some voices also support speaking styles, like ‘newscast’ or ‘cheerful’.
Why Azure Speech service?
Recording your own voice for every demo take is slow. A small typo means recording the whole line again. With Azure Speech, you fix the text and run the app again.
Prerequisites
- An Azure subscription.
- The .NET SDK. We use .NET 10 in this article.
- Visual Studio Code or any code editor.
Create the Speech resource in Azure
- Sign in to the Azure portal.
- In the search box, type ‘speech’ and select ‘Speech services’.

- Click ‘+ Create’ and fill in the details as below.
| Setting | Value |
|---|---|
| Subscription | Your subscription |
| Resource group | Create new, for example ‘rg-speech-promo’ |
| Region | (US) East US |
| Name | A unique name, for example ‘speech-promo-rajeev’ |
| Pricing tier | Free F0 |

- Click ‘Review + create’ and then ‘Create’.
- Once the deployment is complete, click ‘Go to resource’.

- Once you open the speech resource, open ‘Resource Management > Keys and Endpoint’.
- Copy ‘KEY 1’ and note the ‘Location/Region’ value. Our region is ‘eastus’.

Now we have the Speech resource and its key. Before writing any code, lets pick a voice.
Pick a voice in the Voice Gallery
- Open the Speech Studio Voice Gallery portal.
- The ‘Voice catalog’ tab lists every voice. Use the filters to narrow by gender, age group, voice type and personality.
- Click a voice to play a sample. The ‘Sample code’ tab shows its exact name.

- I liked that one for demo narration, so I’ve used ‘en-US-GuyNeural’ with the ‘newscast’ style.
Now we know which voice to use. Lets create the C# console project.
Create the C# console project
- Create a C# console project and add the ‘Microsoft.CognitiveServices.Speech’ NuGet package, which is the Speech SDK for .NET.
dotnet add package Microsoft.CognitiveServices.Speech
- Open the project in your editor and replace the contents of ‘Program.cs’ with the code below.
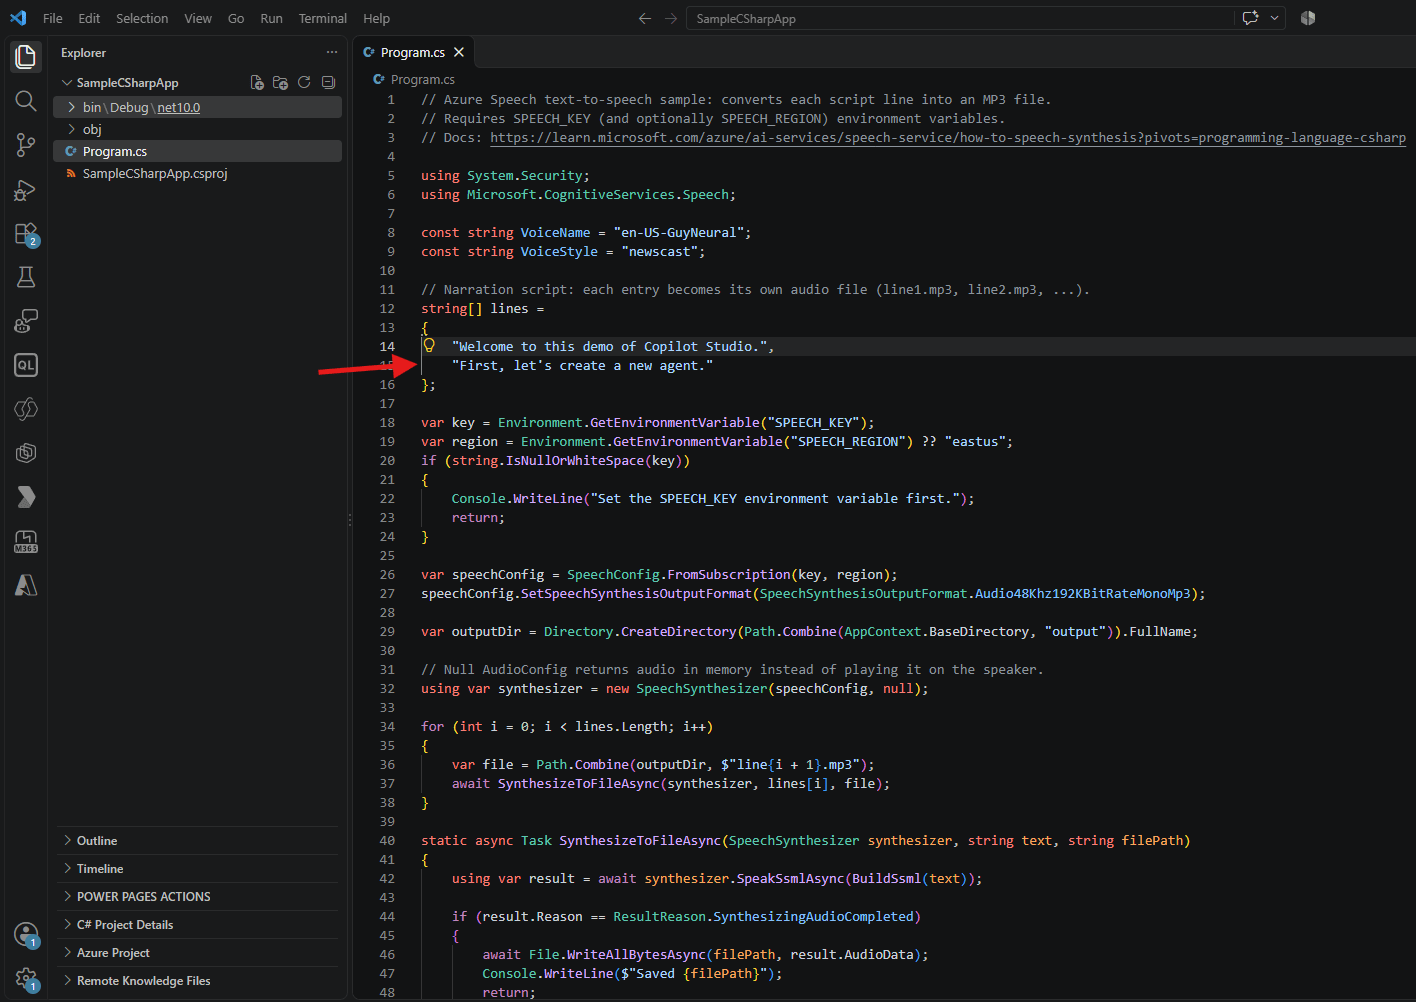
// Azure Speech text-to-speech sample: converts each script line into an MP3 file.// Requires SPEECH_KEY (and optionally SPEECH_REGION) environment variables.// Docs: https://learn.microsoft.com/azure/ai-services/speech-service/how-to-speech-synthesis?pivots=programming-language-csharpusing System.Security;using Microsoft.CognitiveServices.Speech;const string VoiceName = "en-US-GuyNeural";const string VoiceStyle = "newscast";// Narration script: each entry becomes its own audio file (line1.mp3, line2.mp3, ...).string[] lines ={ "Welcome to this demo of Copilot Studio.", "First, let's create a new agent."};var key = Environment.GetEnvironmentVariable("SPEECH_KEY");var region = Environment.GetEnvironmentVariable("SPEECH_REGION") ?? "eastus";if (string.IsNullOrWhiteSpace(key)){ Console.WriteLine("Set the SPEECH_KEY environment variable first."); return;}var speechConfig = SpeechConfig.FromSubscription(key, region);speechConfig.SetSpeechSynthesisOutputFormat(SpeechSynthesisOutputFormat.Audio48Khz192KBitRateMonoMp3);var outputDir = Directory.CreateDirectory(Path.Combine(AppContext.BaseDirectory, "output")).FullName;// Null AudioConfig returns audio in memory instead of playing it on the speaker.using var synthesizer = new SpeechSynthesizer(speechConfig, null);for (int i = 0; i < lines.Length; i++){ var file = Path.Combine(outputDir, $"line{i + 1}.mp3"); await SynthesizeToFileAsync(synthesizer, lines[i], file);}static async Task SynthesizeToFileAsync(SpeechSynthesizer synthesizer, string text, string filePath){ using var result = await synthesizer.SpeakSsmlAsync(BuildSsml(text)); if (result.Reason == ResultReason.SynthesizingAudioCompleted) { await File.WriteAllBytesAsync(filePath, result.AudioData); Console.WriteLine($"Saved {filePath}"); return; } var details = SpeechSynthesisCancellationDetails.FromResult(result); Console.WriteLine($"Failed '{text}': {details.Reason} {details.ErrorDetails}");}// SSML lets us pick the voice and speaking style. Remove <mstts:express-as> for voices without styles (e.g. HD voices).static string BuildSsml(string text) => $""" <speak version='1.0' xmlns='http://www.w3.org/2001/10/synthesis' xmlns:mstts='https://www.w3.org/2001/mstts' xml:lang='en-US'> <voice name='{VoiceName}'> <mstts:express-as style='{VoiceStyle}'>{SecurityElement.Escape(text)}</mstts:express-as> </voice> </speak> """;
How the code works
- ‘VoiceName’ and ‘VoiceStyle’ at the top pick the voice and its speaking style.
- Each entry in the ‘lines’ array becomes its own MP3 file.
- The key comes from the ‘SPEECH_KEY’ environment variable. The region comes from ‘SPEECH_REGION’, or defaults to ‘eastus’.
- ‘SetSpeechSynthesisOutputFormat’ asks the service for MP3 audio at 48 kHz.
- Passing ‘null’ to ‘SpeechSynthesizer’ keeps the audio in memory instead of playing it on your speaker.
- ‘BuildSsml’ wraps each line in SSML (Speech Synthesis Markup Language). SSML tells the service which voice to use and how to speak.
Note: If the voice you pick has no styles, remove the ‘mstts:express-as‘ element from ‘BuildSsml’.
The code is ready. Lets set the key and run the app.
Run the app
- In the terminal, run the command below. Replace ” with ‘KEY 1’ from the Azure portal.
$env:SPEECH_KEY="<your-key>"; dotnet run
- The app prints one ‘Saved’ line per audio file.
- The files are in the ‘bin\Debug\net10.0\output’ folder as ‘line1.mp3’, ‘line2.mp3’ and so on.

Summary
We created an Azure Speech resource, picked a voice in the Voice Gallery and built a C# app that turns a script into MP3 files. To narrate your own demo, replace the ‘lines’ array with your script and run the app again.
Refer to How to synthesize speech from text and SSML voice and sound for more details.
🙂

Leave a Reply