Did you know that you can use GitHub Copilot CLI inside your GitHub Actions?. This opens up interesting options, for, example:
- A new issue gets submitted to your repo.
- A GitHub Action runs and uses Copilot CLI to read the issue and classify it as
bug,enhancement, orquestion. - Based on the classification, the workflow assigns the issue to the right team member.
- Or the workflow can go ahead, generate a fix, and submit a Pull Request (PR).
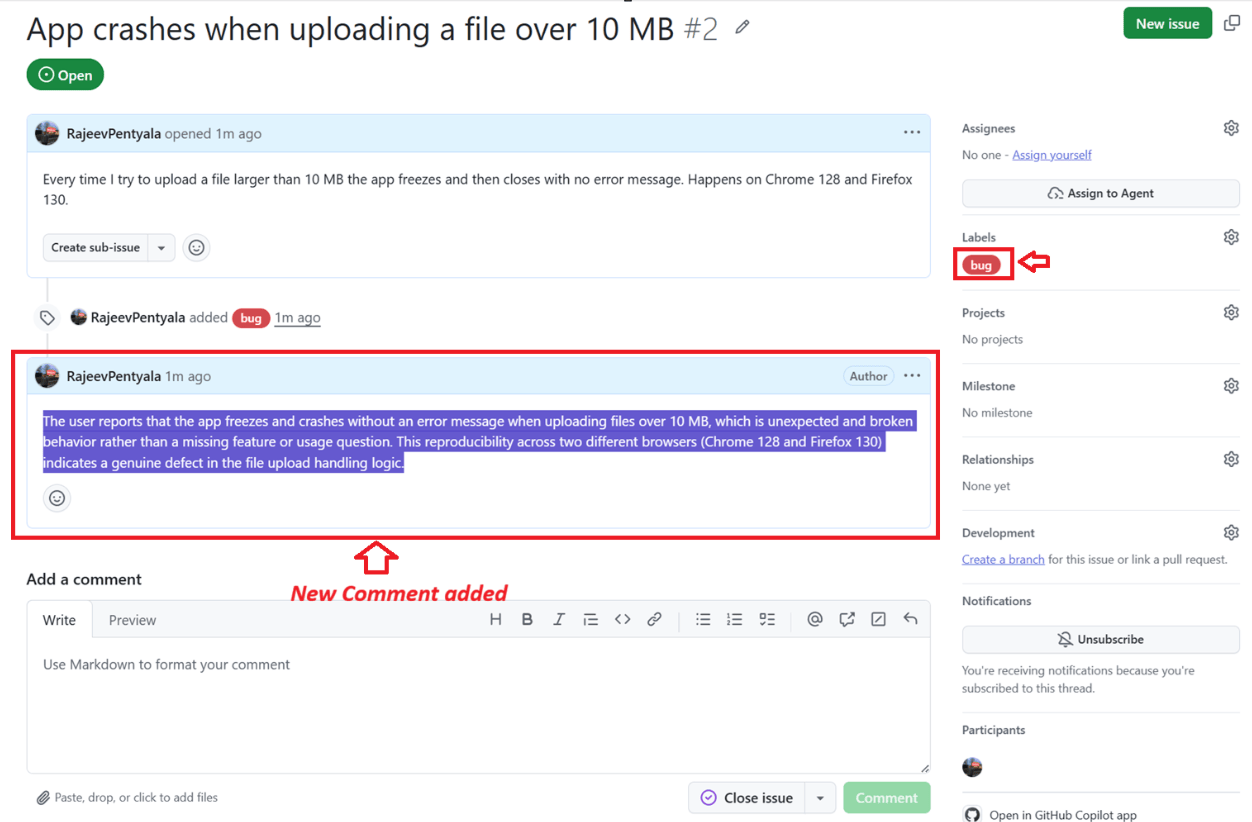
In this post we will build the GitHub Action which uses the Copilot CLI, classifies every new issue, applies the matching label, and posts a two-sentence AI-authored triage comment on the issue.
Here is what the reader of the issue sees, seconds after clicking Submit.
Prerequisites
Before we start, make sure you have:
- A GitHub account with an active Copilot subscription (Copilot CLI needs it).
- A GitHub repository where you want the triage bot to run.
- Basic familiarity with GitHub Actions workflows.
Now that you have the prerequisites in place, lets proceed with creating the PAT.
Create a Fine-Grained PAT with True-Minimum Permissions
Copilot CLI needs a token to talk to GitHub. We use one fine-grained PAT for both.
- Login to GitHub Portal
- Go to Settings → Developer settings → Personal access tokens → Fine-grained tokens → Generate new token.
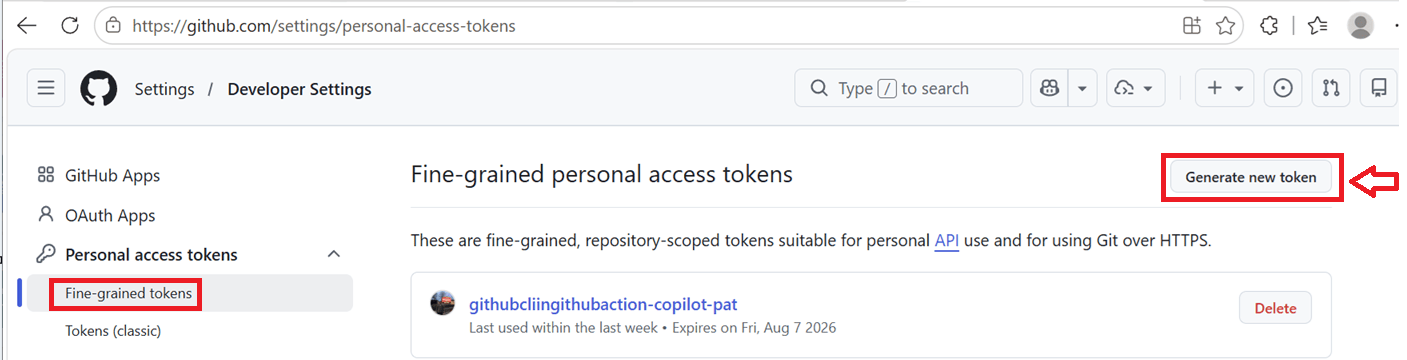
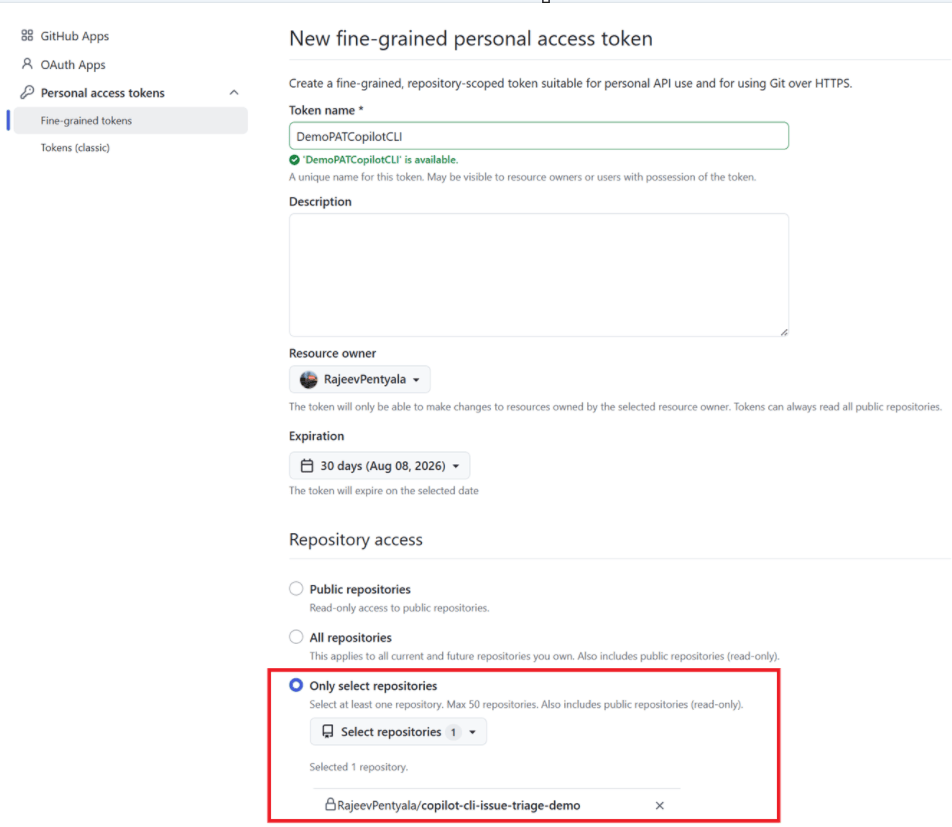
- Set the basics:
| Setting | Value |
|---|---|
| Token name | DemoPATCopilotCLI |
| Resource owner | Your account |
| Expiration | 30 to 90 days |
| Repository access | Only select repositories → pick your GitHub repo where you create the workflow |
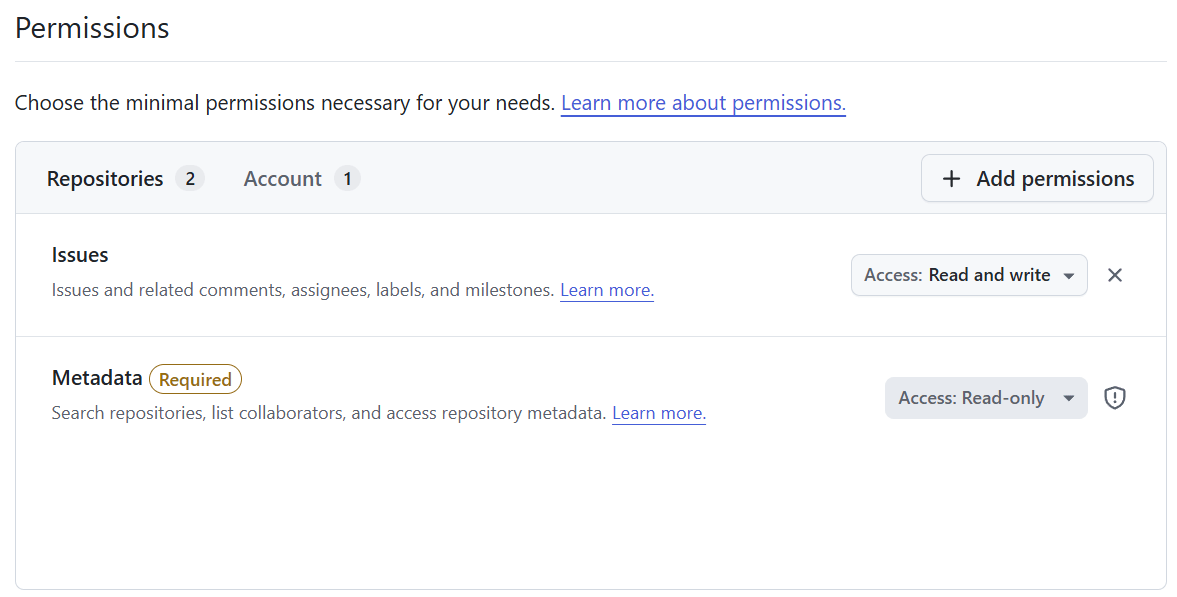
- Now the permissions. Under Repository permissions:
- Metadata: Read-only (this one is mandatory, GitHub always requires it)
- Issues: Read and write (needed to add the label and post the comment)
- Switch to the Account permissions tab (easy to miss, it is a separate section):
- Copilot Requests: Read-only (this is what lets the CLI actually send prompts to Copilot)
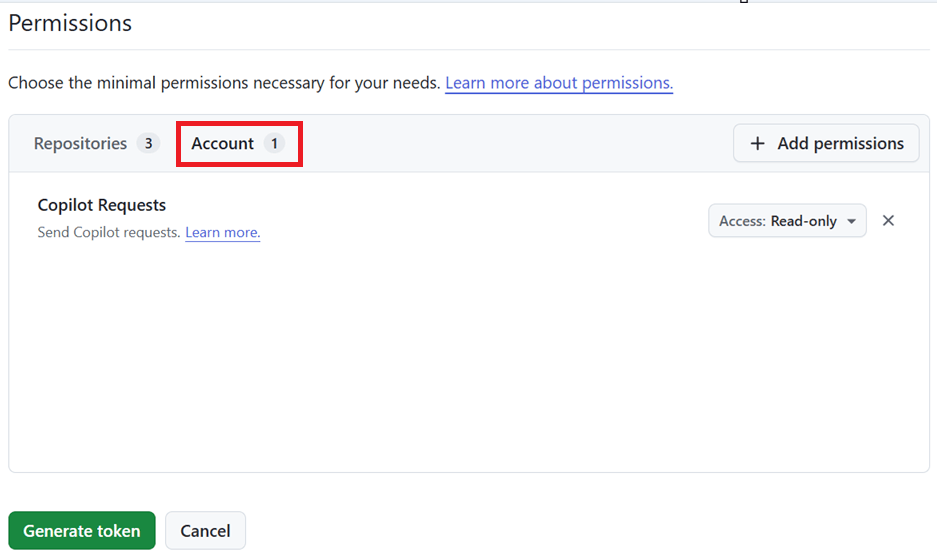
- Click Generate token and copy the value.
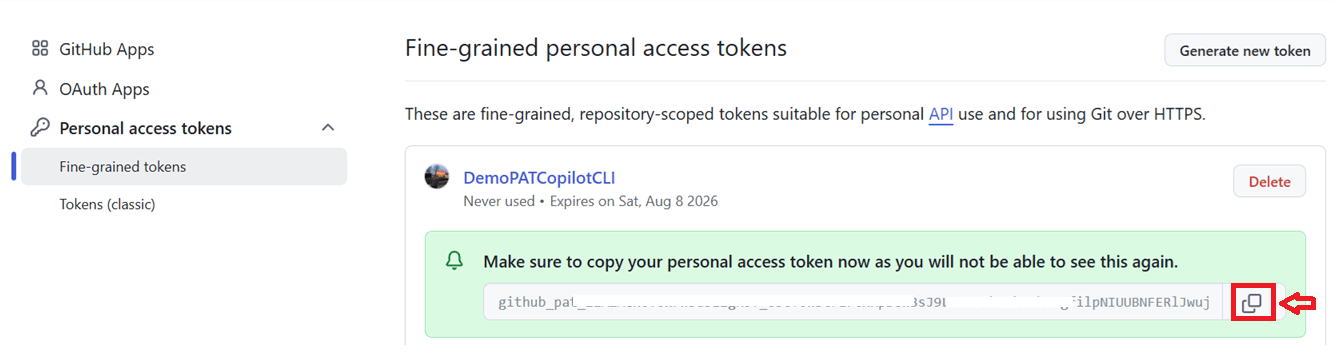
With the PAT ready, lets store it in the GitHub Repo where the workflow can read it.
Store the Token as a Repo Secret
Open your GitHub repo.
- Go to Settings → Secrets and variables → Actions → New repository secret.
- Name:
COPILOT_PAT - Value: paste the PAT token copied in above section
- Name:


- Click Add secret
- Secret gets created and copy the name (i.e.,
COPILOT_PAT). The workflow reads exactly this secret name.

The token is in place. Lets proceed with GitHub workflow configuration.
Configure GitHub Workflow
- Open your GitHub Repo
- Create
.github/workflows/issue-triage.ymlin the repo:
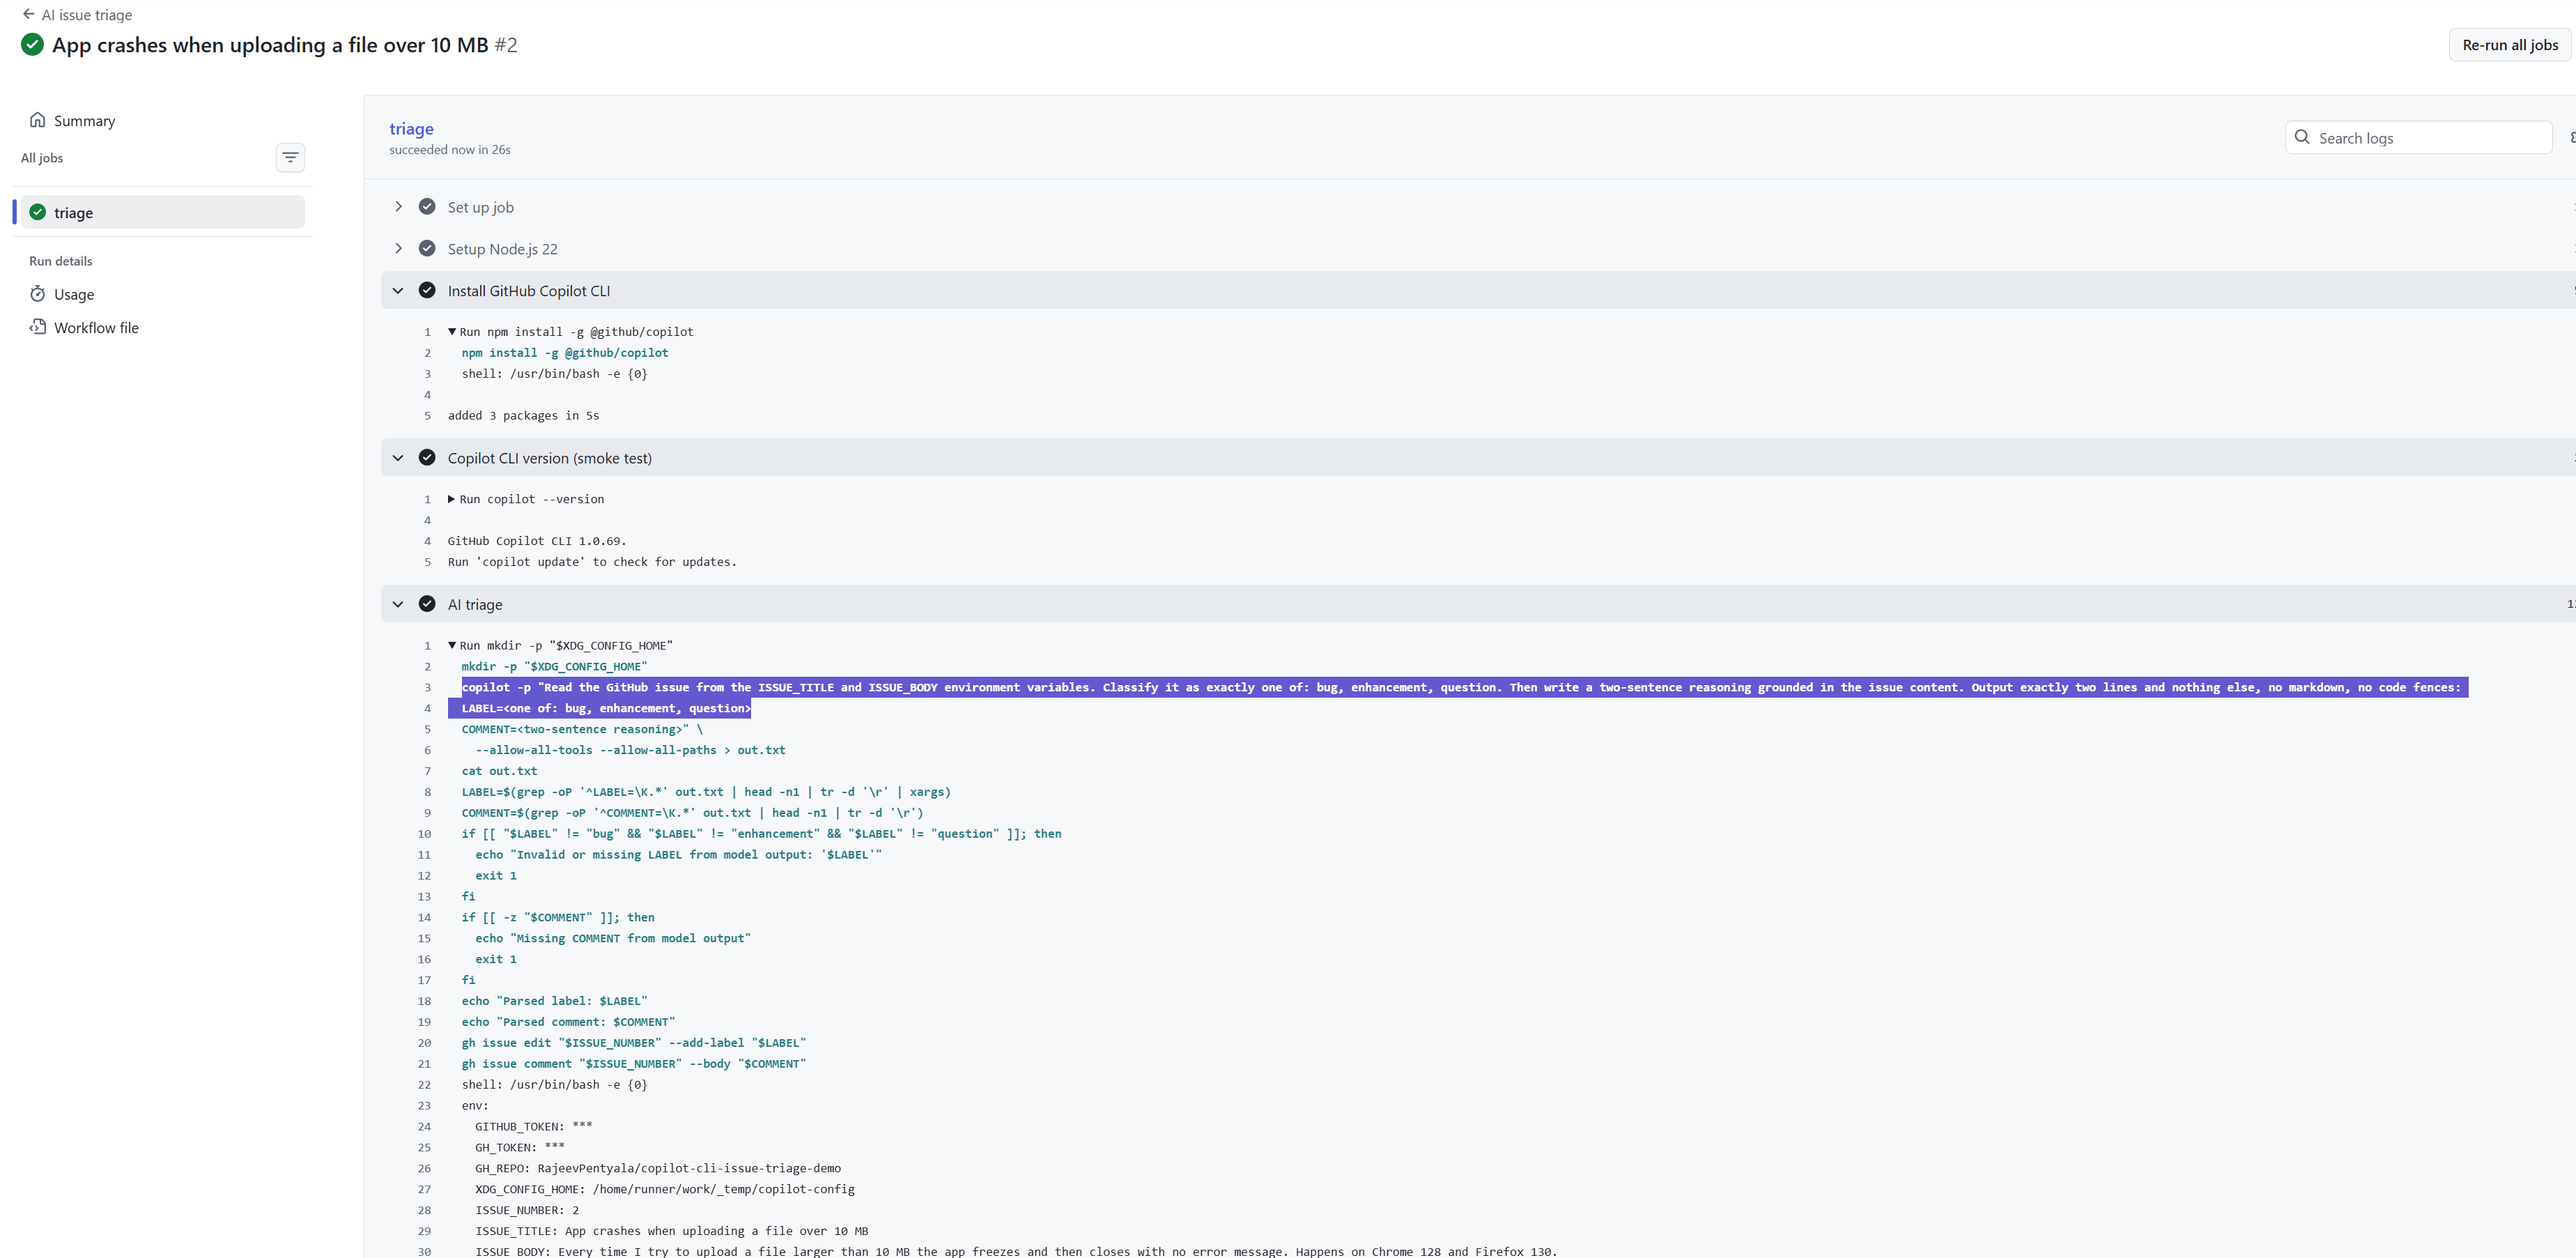
name: AI issue triageon: issues: types: [opened]permissions: issues: write contents: readjobs: triage: runs-on: ubuntu-latest steps: - name: Setup Node.js 22 uses: actions/setup-node@v4 with: node-version: '22' - name: Install GitHub Copilot CLI run: npm install -g @github/copilot - name: Copilot CLI version (smoke test) run: copilot --version - name: AI triage env: GITHUB_TOKEN: ${{ secrets.COPILOT_PAT }} GH_TOKEN: ${{ secrets.COPILOT_PAT }} GH_REPO: ${{ github.repository }} XDG_CONFIG_HOME: ${{ runner.temp }}/copilot-config ISSUE_NUMBER: ${{ github.event.issue.number }} ISSUE_TITLE: ${{ github.event.issue.title }} ISSUE_BODY: ${{ github.event.issue.body }} run: | mkdir -p "$XDG_CONFIG_HOME" copilot -p "Read the GitHub issue from the ISSUE_TITLE and ISSUE_BODY environment variables. Classify it as exactly one of: bug, enhancement, question. Then write a two-sentence reasoning grounded in the issue content. Output exactly two lines and nothing else, no markdown, no code fences: LABEL=<one of: bug, enhancement, question> COMMENT=<two-sentence reasoning>" \ --allow-all-tools --allow-all-paths > out.txt cat out.txt LABEL=$(grep -oP '^LABEL=\K.*' out.txt | head -n1 | tr -d '\r' | xargs) COMMENT=$(grep -oP '^COMMENT=\K.*' out.txt | head -n1 | tr -d '\r') if [[ "$LABEL" != "bug" && "$LABEL" != "enhancement" && "$LABEL" != "question" ]]; then echo "Invalid or missing LABEL from model output: '$LABEL'" exit 1 fi if [[ -z "$COMMENT" ]]; then echo "Missing COMMENT from model output" exit 1 fi gh issue edit "$ISSUE_NUMBER" --add-label "$LABEL" gh issue comment "$ISSUE_NUMBER" --body "$COMMENT"
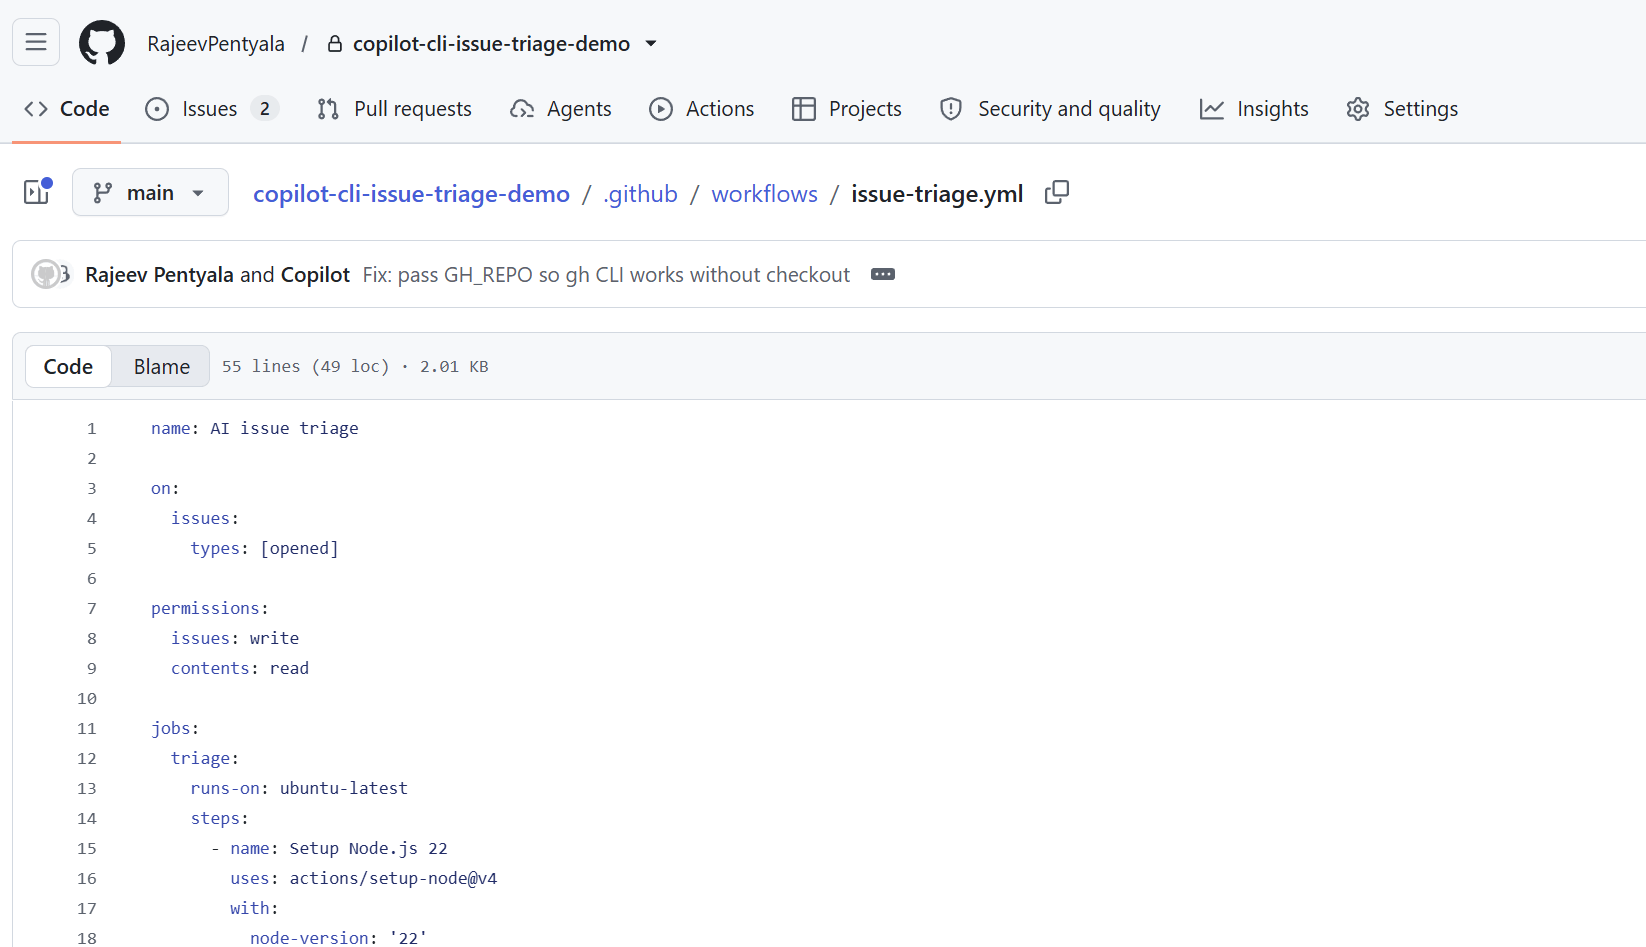
- A few bits in this YAML are worth calling out, because getting any of them wrong will break the run.
- Node.js 22 is required. .
- Both
--allow-all-toolsand--allow-all-pathsare required. Tool consent and path consent are separate axes in Copilot CLI. Miss either one and the CLI will hang waiting for input that never comes on a headless runner. XDG_CONFIG_HOMEpoints atrunner.temp. Copilot CLI writes a config directory on first run. Pointing it at the runner temp keeps things clean on ephemeral runners.
- Commit and push to
main. The workflow will now trigger on every new issue. Lets test it.
Try It
- Open a new issue in the repo.
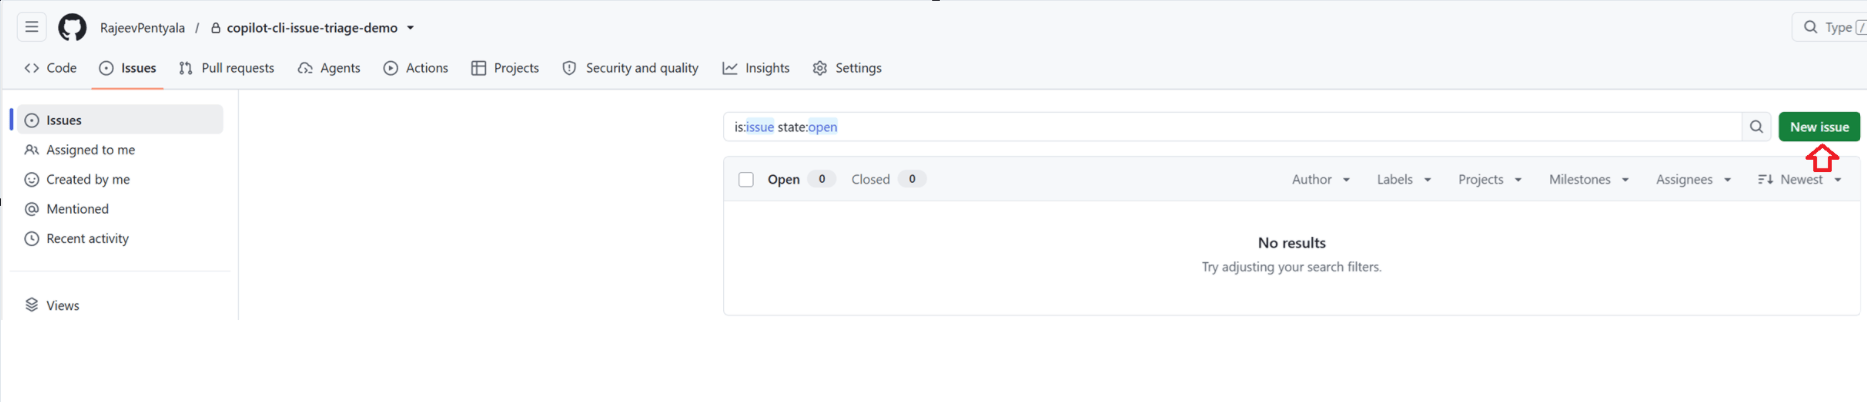
- Give it a title and body, something like: “App crashes when uploading files over 10 MB. Happens on Chrome 128 and Firefox 130.”
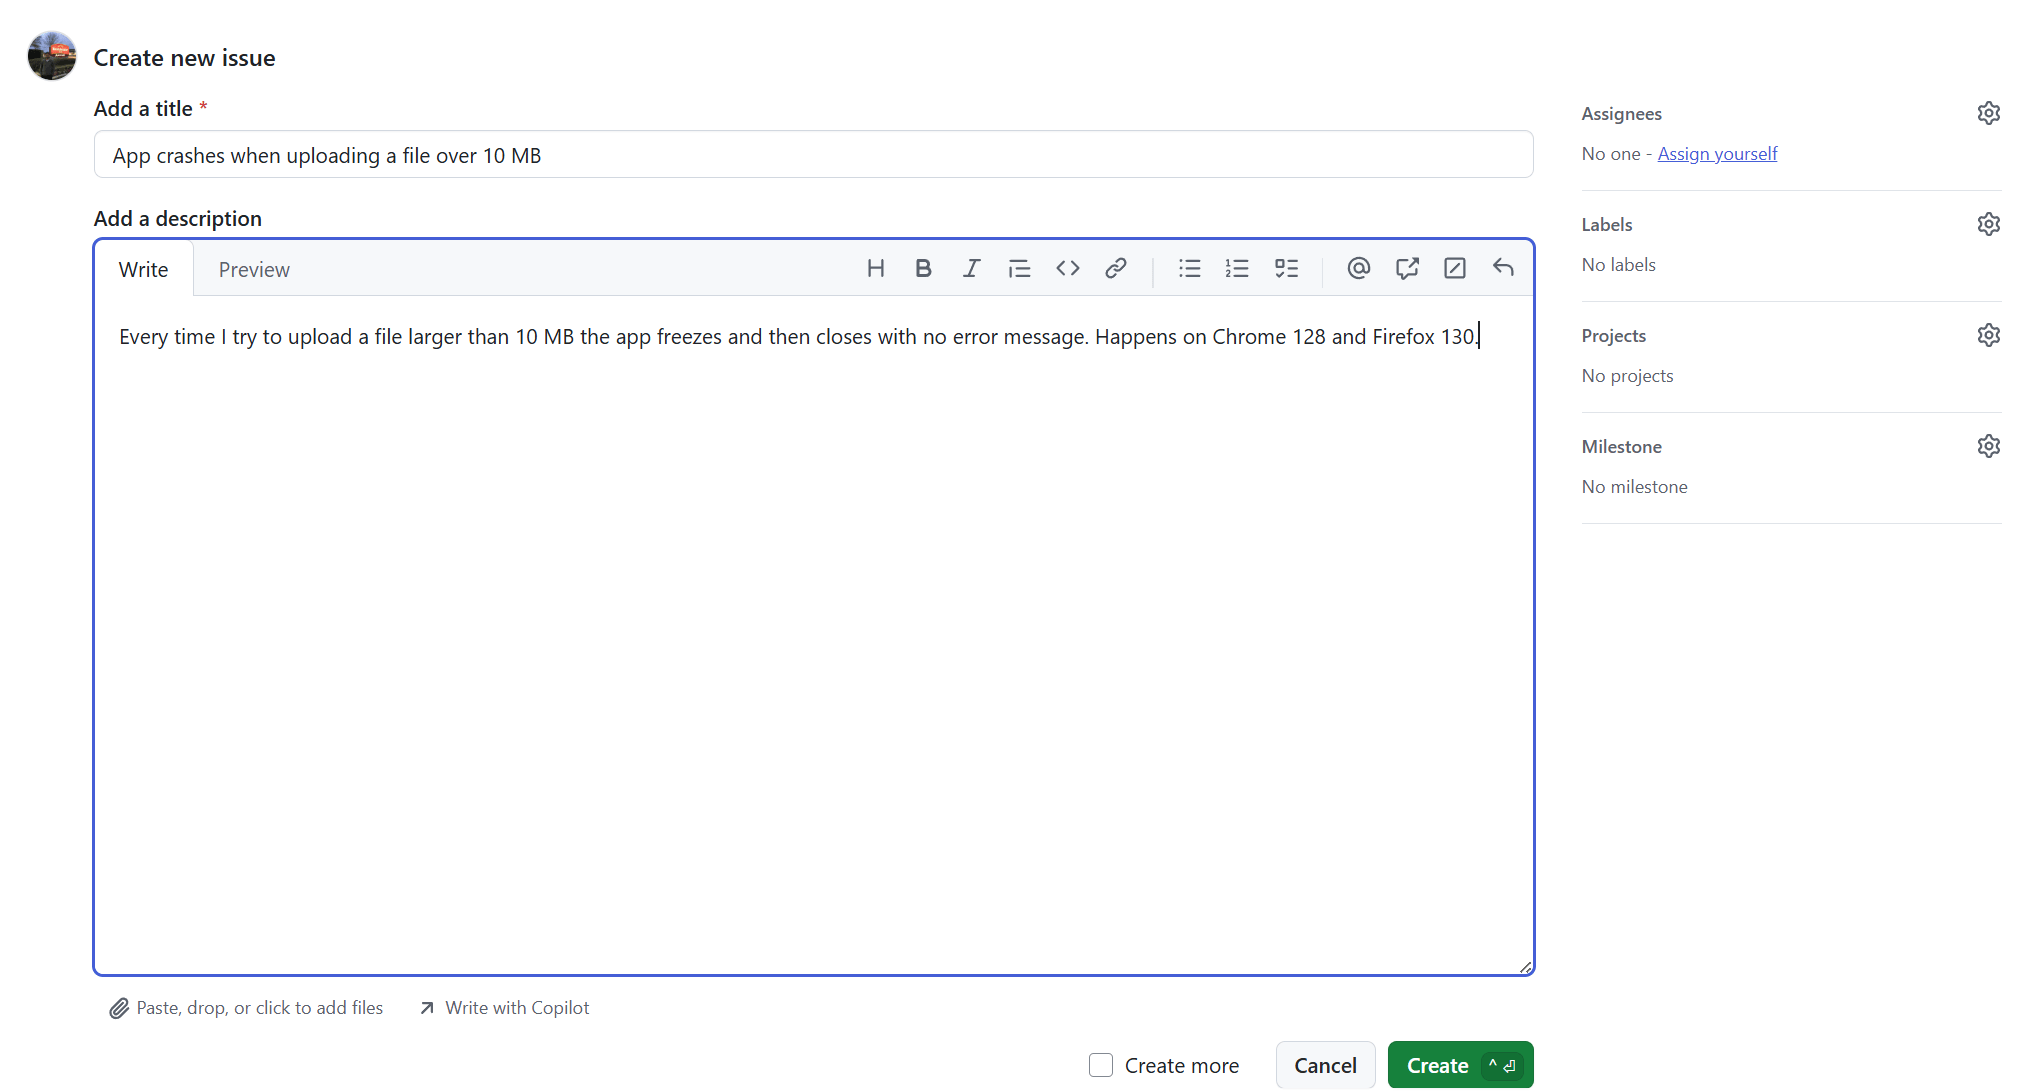
- Watch the Actions tab. Within a few seconds the
AI issue triageworkflow starts.

- Once the workflow completes its run, you can see the logs where Copilot CLI has been used using copilot -p
- Go back to the issue. The
buglabel is applied. A two-sentence comment from your account is posted, explaining why the classifier pickedbug.

Does this approach works for Claude Code CLI?
- The same pattern works for Claude Code CLI as well.
- It supports non-interactive mode through the
claude -pcommand, and Anthropic provides an official claude-code-action for GitHub Actions workflows. - Authentication uses an
ANTHROPIC_API_KEYsecret - The overall design stays the same. An event triggers a workflow, the workflow passes a prompt to a CLI, and the workflow acts on the CLI’s output.
Summary
The triage bot is small on purpose. You can extend this exact workflow to :
- Auto-summarize PRs, suggest reviewers, or close stale issues with an AI-written rationale.
- Route bugs to the right team based on file paths mentioned in the body.
🙂

Leave a Reply