Archive
ADX Portal – Display ‘Message’ during maintenance window
There might be times when your Portal is under scheduled maintenance or is down due to temporary outage. When a user accesses the portal during maintenance, unpredictable behavior and intermittent unavailability might be experienced.
In ADX portal we can display a message to users during a maintenance activity by following below steps:
- Create a HTML page with the message you would want to display.
- Save it as ‘App_Offline.htm‘.
- Make sure the name of the file is exactly same.
- Place this file in root folder of ADX website.

- ADX always opens ‘App_Offline.htm’ page, if it finds in root folder.
- Hit the portal URL and you would get the ‘App_Offline.htm’ page, which displays your maintenance message.

🙂
ADX Portal – Prevent URL redirection
Recently our ADX portal underwent Penetration testing (Also called ‘Ethical hacking’) and we got a following recommendation:
Prevent on-domain URL redirection. All URL redirection should be validated to only redirect to approved domains and/or URLs.
Reason:
- In ADX portal, when ever you signed out or the session expires from a particular ‘web page’, Portal will take you back to the ‘web page’ you were before you signed out.
- ADX portal achieves this behavior by appending ‘ReturnURL‘ parameter to the URL. ‘ReturnURL’ contains the web page path before you signed out.

Whats the harm with this behavior?
- ADX portal, will try to redirect to the URL formed in ‘ReturnURL’.
- An attacker can redirect users from portal to a specific URL (Phishing).
- As an example, attacker can mail you a link with Portal URL along with ‘ReturnURL?myphishingsite.com‘.
- If the user think, its a genuine Portal URL and sign-in, ADX portal would redirect you the myphishingsite.com as the same was mentioned in ‘ReturnURL‘.
How to handle this in ADX website?
- We modified the ‘Login’ logic to ignore ‘ReturnURL’ and redirect Users to portal’s Home page always.
- All we need to do is
- Set returnUrl=”/” on ‘LoginController.cs -> Login’ function.

- We can also modify the logic to allow redirection only to a set of URLs.
🙂
ADX Portal – Prevent unauthorized access of custom pages
For one of our requirements, we built a custom .aspx page and placed under ‘Areas’ folder of OOB ADX website’s ‘MasterPortal’ project.

Issue:
- The .aspx page was accessible without signing in to the portal by using the following URL convention
- https://base_portal_url/Areas/folderName/Pages/filename.aspx
Fix:
- On Page_Load of the aspx page, check whether the request is from authenticated user or not.
- If unauthenticated request, set 401 error code (i.e., Unauthorized error) to the Response object and redirect to portals ‘SignIn’ page.
- Below is the code snippet need to be placed in Aspx page’s ‘Page_Load’ event, which redirects unauthenticated requests to Portal’s ‘SignIn’ page.
protected void Page_Load(object sender, EventArgs e)
{
if (!Request.IsAuthenticated)
{
Response.StatusCode = 401;
Response.End();
}
}
🙂
ADX/Dynamics portal – Setting up password policies
If you want to imply password policy (i.e., Certain length, must have a digit, etc…) during the portal registrations, following entries need to be added to ‘Site Settings’ entity.

| Name | Value |
| Authentication/UserManager/PasswordValidator/AlphanumericUserNames | TRUE |
| Authentication/UserManager/PasswordValidator/RequireDigit | TRUE |
| Authentication/UserManager/PasswordValidator/RequiredLength | 9 |
| Authentication/UserManager/PasswordValidator/RequireLowercase | TRUE |
| Authentication/UserManager/PasswordValidator/RequireNonLetterOrDigit | TRUE |
| Authentication/UserManager/PasswordValidator/RequireUppercase | TRUE |
If the password does not meet any of the configured setting values, you gonna get OOB validation error as follows:

For more ‘Authentication’ related settings, refer the article
Refer this article for portals client scripting.
🙂
ADX Portals – Cannot register for ‘OnSendingHeaders’ event
Other day, while configuring portal on a new CRM instance, portal shown error page, up on clicking the ‘Apply’ button.

There were no details on error screen to deduce the reason. So we had to go to the server where our portal website hosted.
When checked the ‘Event Viewer’ logs in Portal server, there was this following exception:
Exception type: InvalidOperationException
Exception message: Cannot register for ‘OnSendingHeaders’ event after response headers have been sent.
Reason & Fix:
- CRM instance was missing ‘Adxstudio License Key’ record.
- Post CRM connection, ADX would first check for the valid ‘License Key’. Since there was no ‘License Key’ record, Portal thrown error.
- To fix this, add the ‘License Key’ by going to ‘Advanced Find -> ADXStudio License Keys‘, add a key.

🙂
‘Address Suggestions’ in Portals using Esri ArcGIS
In our Dynamics Portals, we got a requirement to show ‘Address Suggestions’ as and when the end user start typing the address.
We implemented the solution by consuming the Esri ArcGIS mapping service, from our Portal’s web page.

‘Entity Form’ with Address Suggestions
In this article lets see how to implement this at a high level.
What is ESRI ArcGIS?
- Its a cloud based mapping and analytics platform.

- For our ‘Address Suggestions’ requirement, we have consumed ESRI ArcGIS’s World Geocoding Service
- World Geocoding Service:
- Its part of ESRI ArcGIS.
- This Service finds addresses and places in all supported countries from a single endpoint.
- The service can find point locations of addresses, business names, and so on.
Steps to fetch ‘Address Suggestions’:
- To fetch the ‘Address Suggestions’, we have used findAddressCandidates operation of ‘World Geocoding Service’.
- findAddressCandidates operation is REST based and takes ‘Input address’ as parameter.
- As an example, to fetch the ‘Microsoft Office’ addresses in ‘Redmond’ the REST URL would be as follows:
https://geocode.arcgis.com/arcgis/rest/services/World/GeocodeServer/findAddressCandidates?SingleLine=Microsoft+Redmond&sourceCountry=USA&category=&outFields=*&forStorage=false&f=pjson
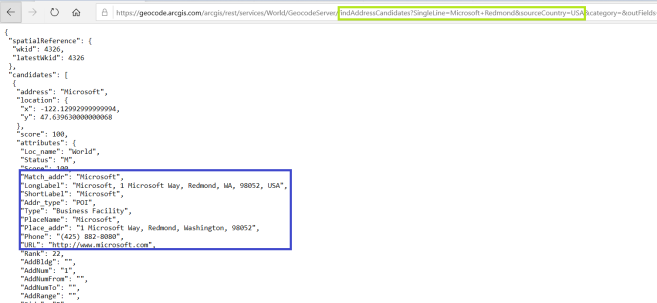
- In the above URL,
- ‘findAddressCandidates’ – Operation name.
- ‘SingleLine’ – Parameter which you need to pass address you are looking for (i.e., Microsoft+Redmond). Use + symbol to combine the words.
- ‘sourceCountry’ – Optional parameter. if provide, results will be specific to provided country code.
- Below is the sample script to call the service from Portal Web Page/Entity Form/ Web Templates.
function GetAddressrecommendations(address) {
var url = https://geocode.arcgis.com/arcgis/rest/services/World/GeocodeServer/findAddressCandidates?SingleLine=”+address+”&category=&outFields=*&forStorage=false&f=pjson;
// To limit the address to ‘United States’ country uncomment below line
// url += “&sourceCountry=USA”;var xhr = createCORSRequest(“GET”, url);
if (!xhr) {
throw new Error(“CORS not supported”);
}
xhr.onload = function () {
var text = xhr.responseText;
// Success and add logic to Parse the Response.
};
xhr.onerror = function () {
alert(“Unable to fetch addresses.”);
};
xhr.send();
}function createCORSRequest(method, url) {
var xhr = new XMLHttpRequest();
if (“withCredentials” in xhr) {
xhr.open(method, url, true);
} else if (typeof XDomainRequest != “undefined”) {
xhr = new XDomainRequest();
xhr.open(method, url);
} else {
xhr = null;
}
return xhr;
}
How to call the method?
- Call the GetAddressrecommendations function by passing the address you are looking for
- GetAddressrecommendations(‘Microsoft+Redmond’)
Notes:
- Esri ArcGis platform provides both hosted GIS services and a portal with a web UI and APIs for publishing, sharing, and managing content, maps, applications, and users.
- It has both Free and Paid services. Read the documentation before making the decision.
🙂
Dynamics/ADX Portals – Create Notes using SDK
As part of an integration requirement, we had to create ‘Notes’ (i.e., Annotation) with attachment using SDK.
Key Notes:
- ‘Subject’ and ‘Notetext’ field values of Portal Notes follows a specific pattern than that of Dynamics. Values must be set as follows:
- Subject – Note created on {DateTime.Now.ToString()} by {Portal User Name} [contact:{PortalUserGUID}]
- If the Portal user name is ‘Rajeev P’ and Portal user GUID(i.e.,Contact record’s GUID) is ‘2510ae27-7289-e911-a958-001dd800d97c’, Subject will be Note created on {DateTime.Now.ToString()} by Rajeev P [contact:2510ae27-7289-e911-a958-001dd800d97c]
- Notetext – *WEB*
- Subject – Note created on {DateTime.Now.ToString()} by {Portal User Name} [contact:{PortalUserGUID}]
- If you don’t pass Portal User’s GUID in ‘Subject’ field, Portal shows the Notes record created by as User whom the Portal was configured.
Code to create Annotation:
Below is the code snippet
var noteSubject = “Note created on {DateTime.Now.ToString()} by Rajeev P [contact:2510ae27-7289-e911-a958-001dd800d97c]“;
var entAnnotation = new Entity(“annotation”);
entAnnotation[“subject“] = noteSubject;
entAnnotation[“notetext“] = “*WEB*”;
entAnnotation[“filename”] = {File_name}; // Set FileName
entAnnotation[“documentbody”] = {Base64String}; // Pass document body in Base64 format
entAnnotation[“isdocument”] = true;
entAnnotation.Attributes[“objectid”] = new EntityReference({RegardingSchemaName}, {RegardingGuid}); // Set Schema and GUID
entAnnotation.Attributes[“objecttypecode”] = {RegardingSchemaName}; // Set Schemavar noteId = crmService.Create(entAnnotation);
- Note : Replace values in {} with actual values.
🙂
ADX Portals – Clear Cache On Web Page Submission
Adxstudio Portal application caches the results from Dynamics CRM to improve the performance.
But, there are times, where we need to override (invalidate) cache behavior to show latest data on Portals. Lets take a scenario
- My Portal has a ‘Contact’ web page and up on ‘Submit’, a plug-in updates all the associated ‘Cases’ in the background.
- Now, on Portal, navigate to ‘Cases’ entity list Web Page, which should show the latest ‘Cases’ data, which has been updated by plug-in in above step.
In above scenario, we will not get the latest ‘Cases’ due to Portal Cache behavior.
So what are the ‘Cache Invalidation’ options?
- Manual Cache Invalidation:
- This option is to manually hit the JavaScript bookmark-let as specified here.
- Drawback:
- Its not viable, to ask portal users to hit the URL every time they ‘Submit’ the ‘Contact’ web page
- Web Notifications:
- A Web Notification Plugin registered with the Adxstudio Portals solution in CRM is triggered on all entity create, update, delete, disassociate, associate, publish, and publish all messages and notifies the Web Notification URLs defined in the CRM to invalidate the cache so the users visiting the portal get the recent data changes
- Drawback:
- A ‘System Job’ gets created up on update of the entity, and the execution may get delayed based on the occupancy of CRM Async Service Job.
- This is not fool proof solution.

We took an approach to automate the ‘Manual Cache Invalidation’ process to fetch the latest CRM data.
Our Cache Invalidation Approach :
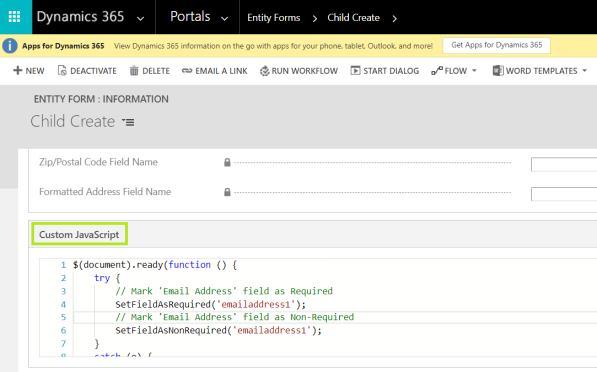
- Create a new ‘Web Page’ and paste below ‘Manual Cache Invalidation JavaScript’ code in ‘Custom JavaScript’ field.
- Note: You don’t need to associate any ‘Web Form’, ‘Entity List’ or ‘Entity Form’ to this Web Page.
$(document).ready(function () {
var url = document.location.protocol + ‘//’ + document.location.host + (document.location.host.indexOf(“demo.adxstudio.com”) != -1 ? document.location.pathname.split(“/”).slice(0, 3).join(“/”) : “”) + ‘/Cache.axd?Message=InvalidateAll&d=’ + (new Date()).valueOf();
var req = new XMLHttpRequest();
req.open(‘GET’, url, false);
req.send(null);
// Redirect to Portal Home Page
window.location.href = ‘../’;
});
- In below screen, I created a new Web Page ‘Portal Cache Clear’ and copied the above script.

- So, to invalidate ‘Cache’ on the ‘Submit’ of any of your Portal form, In Entity Form’s ‘On Success Settings’, Redirect to Cache ‘Web Page’ as configured in below screen.

- That’s it. Your portal should invalidate cache, up on Entity Form submission. One caveat of this approach is, ‘Portal Cache’ web page will flash for few seconds before redirecting to portal’s ‘Home’ page.
Note:
- This Information is Relevant to Legacy Adxstudio Portals Only.
- Dynamics 365 Portal Add-on’s Do Not Require this Configuration.
🙂
[Code Snippet] Dynamics Portals/ADX – Set ‘Field Requirement’ using script
Below is the code snippet to set the requirement level (i.e., Required/Non-Required) of a field using script in portals. This logic handles all kind of field types including Check boxes.
Set Field As Required:
function SetFieldAsRequired(fieldName) {
if (typeof (Page_Validators) == ‘undefined’) return;
if ($(“#” + fieldName) != undefined && $(“#” + fieldName + “_label”) != undefined) {
$(“#” + fieldName).prop(‘required’, true);
$(“#” + fieldName).closest(“.control”).prev().addClass(“required”);// Create new validator object
var Requiredvalidator = document.createElement(‘span’);
Requiredvalidator.style.display = “none”;
Requiredvalidator.id = fieldName + “Validator”;
Requiredvalidator.controltovalidate = fieldName;
Requiredvalidator.errormessage = “<a href=’#” + fieldName + “_label’>” + $(“#” + fieldName + “_label”).html() + ” is a required field.</a>”;
Requiredvalidator.initialvalue = “”;
Requiredvalidator.evaluationfunction = function () {
var fieldControl = $(“#” + fieldName);
if (fieldControl.is(“span”)) {
var value0 = $(“#” + fieldName + “_0”).prop(“checked”);
var value1 = $(“#” + fieldName + “_1”).prop(“checked”);
if (value0 == false && value1 == false) {
return false;
} else {
return true;
}
}
else {
var value = $(“#” + fieldName).val();
if (value == null || value == “”) {
return false;
} else {
return true;
}
}
};// Add the new validator to the page validators array
Page_Validators.push(Requiredvalidator);
}
}
Set Field As Non Required:
function SetFieldAsNonRequired(fieldName) {
if (typeof (Page_Validators) == ‘undefined’) return;
if ($(“#” + fieldName) != undefined) {
$(“#” + fieldName).closest(“.control”).prev().removeClass(“required”);
$(“#” + fieldName).prop(‘required’, false);for (i = 0; i < Page_Validators.length; i++) {
if (Page_Validators[i].id == fieldName + “Validator”) {
// Remove the current field’s ‘Required’ validator from ‘Page_Validators’ array
Page_Validators.splice(i);
}
}
}
}
How to use the functions:
- Above functions can be called from ‘Custom JavaScript’ tab of Portal’s ‘Entity Form’.
- Pass the Dynamics field’s schema name as the parameter to both functions.
- In below example, ’emailaddress1′ is the field name which I want to set the Requirement level.
Refer the article for Portal script syntax’s and usage.
🙂
ADX\Dynamics Portals – Using sub grids in Entity Form
In this article, lets see how to work with ‘Sub grids’ on ‘Entity Forms’ in Portals.
Lets take a scenario to understand this better, In Dynamics:
- Create a new custom Entity named ‘Employee’
- Create a related entity ‘Child’ to capture children details of ‘Employee’
- Configure a single portal screen, to capture ‘Employee’ and ‘Children’
Below is how the ‘Employee’ entity form with ‘Children’ sub grid, in Dynamics, looks like:

High level design steps:
- Create a new ‘Entity Form’ for ‘Employee’ Dynamics form
- Create a new ‘Entity Form’ (i.e.,Child Create) for ‘Child’ entity to ‘Insert’ (i.e., Mode=Insert) record

- Create a new ‘Entity Form’ (i.e., Child Details) for ‘Child’ entity to ‘Edit’ (i.e., Mode=Edit) record

- On ‘Employee’ entity form, configure ‘Child’ ‘Sub grid’ using ‘Entity Form Metadata’
- Add ‘Create’ and ‘Details’ actions on Sub grid.
Now lets see step by step.
Create new ‘Entity Form’ Employee:
- Create a new ‘Employee Details’ Entity Form pointing to ‘Employee’ entity and ‘Information’ form.

- Now lets see how the ‘Employee’ form looks in the portal.

- If you notice, there is a grid section ‘Children’ available on Portal form, however its unusable, as there are no ‘Create’ or ‘Edit/Details’ options.
Configure ”Entity Form Metadata’:
With ‘Entity Form Metadata’, we can make sub grid usable. We can add actions (i.e.,Create/Edit/Details buttons) and to the sub grid.
- Go to ‘Employee’ form site map and click on ‘Entity Form Metadata’

- Under the ‘Type’ select ‘Subgrid’ and choose your ‘Subgrid Name’

- Next, we need to configure ‘Create’ and ‘Edit’ buttons to the sub grid.
- Under the ‘Grid Configuration’ tab, click on ‘Create’ and fill the ‘Entity Form’ (i.e.,Child Create) details

- To add, Edit/Details action click on ‘Details’ and fill the ‘Entity Form’ details
- Note: Even though, I choose ‘Details’ action, my associated ‘Entity Form’ (i.e.,Child Details) is set form mode ‘Edit’ which can be used to view and edit.

- Save the ‘Entity Form Metadata’.
Test the functionality:
- Login to your portal
- Clear the Portal Cache by navigating to “Portal URL+‘/_services/about’”
- Note: This step is optional and needed only if you don’t find your changes in portal
- Open the ‘Employee’ record and now you should see ‘Child’ grid with ‘Add new child’ button.

- Click ‘Add new child’ button and it will open up ‘Child Create’ entity form.

- Click ‘Submit’ which saves the record.
- Now either click on 1st column or ‘Details’ button to ‘Edit’ the record which opens up ‘Child Details’ Entity form.

- Modify the data, if needed and click ‘Submit’

🙂
