Archive
Canvas App | Multiple Combo box filters on Collection
In this article, let’s see how to achieve complex multi-combo box filters on collections. Here is what the app with filters looks like:
Let’s first understand our scenario and then proceed with building the app.
Scenario:
- I have the ‘Customers’ collection as defined below.
- Collection has ‘Status’ and ‘Fav Sports’ attributes
- ‘Status’ holds a single value (i.e., Active or Inactive)
- ‘Fav Sports’ holds comma-separated values.
- Collection has ‘Status’ and ‘Fav Sports’ attributes
ClearCollect(
    Customers,
    {
        Name: "Rajeev",
        Status: "Active",
        'Fav Sports': "Cricket"
    },
    {
        Name: "Jayansh",
        Status: "Inactive",
        'Fav Sports': "Cricket,TT"
    },
    {
        Name: "Mahesh",
        Status: "Active",
        'Fav Sports': "TT,Chess"
    },
    {
        Name: "Havish",
        Status: "Inactive",
        'Fav Sports': "TT"
    }
);- Build an App with two combo boxes for both ‘Status’ and ‘Fav Sports’.
- Add a Gallery and load the ‘Customers’ collection.
- Filter the Gallery records using the selected values from the ‘Status’ and ‘Fav Sports’ combo boxes.
As we know the scenario now, let’s build the App.
Building the App:
- Create a new Canvas App and on App > Start define the ‘Customers’ collection.
- Add a Gallery and set Items as ‘Customers’ collection.
- Add two combo box controls for ‘Status’ and ‘Fav Sports’, as shown below. We’ll primarily set the Items and NoSelectionText properties.
- NoSelectionText property sets ‘All’ as the text when no item is selected in the combo box.
Now that we’ve added the required controls to the screen, let’s proceed with the filter logic.
Build ‘Status’ combo box filter:
- To build the filter logic for the ‘Status’ combo box, place the following formula in the Items property of the Gallery, and then play the app.
- Following is the formula explanation:
- If no items are selected, the cmbStatus ‘SelectedItems’ property will be blank, and IsBlank() or IsEmpty() will return true, hence all records will be shown.
- If items are selected in cmbStatus, we use the ‘in’ operator to fetch only the matched records by the ‘Status’ field.
Filter(
    Customers,
    Or(
        IsBlank(cmbStatus.SelectedItems),
        IsEmpty(cmbStatus.SelectedItems),
        Status in cmbStatus.SelectedItems
    )
)
Build ‘Fav Sports’ combo box filter:
- Now, this is the tricky part of the filter, as we have to match the cmbFavSports combo box values to the comma-separated ‘Fav Sports’ text field.
- To build the filter logic for the cmbFavSports combo box, place this formula in the Items property of the Gallery, and then play the app.
- Note : We are removing the cmbStatus filter for now to explain the cmbFavSports filter. Towards the end, we will combine both combo box filters into one filter formula.
- Following is the formula explanation:
- If no items are selected, the cmbFavSports ‘SelectedItems’ property will be blank, and IsBlank() or IsEmpty() will return true, hence all records will be shown.
- If items are selected, we split and count how many favorite sports of each customer match the selected items in the cmbFavSports , ensuring that only customers with at least one matching sport are included in the filter.
Filter(
    Customers,
    Or(
        IsBlank(cmbFavSports.SelectedItems),
        IsEmpty(cmbFavSports.SelectedItems),
        CountIf(
            Split(
                'Fav Sports',
                ","
            ),
            Value in cmbFavSports.SelectedItems.Value
        ) > 0
    )
)
Build ‘Status’ and ‘Fav Sports’ combo box filters together:
Lets get both filters get working in one formula.
- To build the combined filter logic for cmbStatus and cmbFavSports combo boxes, place the following combined filter formula in the Items property of the Gallery, and then play the app..
Filter(
    Customers,
    Or(
        IsBlank(cmbStatus.SelectedItems),
        IsEmpty(cmbStatus.SelectedItems),
        Status in cmbStatus.SelectedItems
    ) &&
    Or(
        IsBlank(cmbFavSports.SelectedItems),
        IsEmpty(cmbFavSports.SelectedItems),
        CountIf(
            Split(
                'Fav Sports',
                ","
            ),
            Value in cmbFavSports.SelectedItems.Value
        ) > 0
    )
)
That’s it! We have achieved multi-combo box filter logic. I hope you learned how to apply multi-combo box filters on a collection.
🙂
FetchXML : Filter on column values in the same row
Did you know that by using the valueof attribute, you can create filters that compare columns on values in the same row.
Scenario 1 : Find Contact records where the firstname column value matches the lastname column value
- The following FetchXML has valueof attribute, which matches firstname with value of lastname and returns matching Contact records.
<fetch>
   <entity name='contact' >
      <attribute name='firstname' />
      <filter>
         <condition attribute='firstname'
            operator='eq'
            valueof='lastname' />
      </filter>
   </entity>
</fetch>
Scenario 2 : Cross table comparisons – Fetch rows where the contact fullname column matches the account name column
- In the below FetchXML, we are using valueof and link-entity to compare column values across the tables Contact and Account.
- Please note that, the link-entity element must use an
aliasattribute and the value of thevalueofparameter must reference that alias and the column name in the related table.
<fetch>
   <entity name='contact'>
      <attribute name='contactid' />
      <attribute name='fullname' />
      <filter type='and'>
         <condition attribute='fullname'
            operator='eq'
            valueof='acct.name' />
      </filter>
      <link-entity name='account'
         from='accountid'
         to='parentcustomerid'
         link-type='outer'
         alias='acct'>
         <attribute name='name' />
      </link-entity>
   </entity>
</fetch>
Please refer my past articles or Microsoft Docs on how to execute the FetchXML.
🙂
[Tip] Dataverse | Quickly copy column’s Logical and Schema names
Did you know that you can quickly copy the columns Logical and Schema names from the column’s context menu?
- Open a Solution and select the Table
- Go to Columns and select a column > Advanced > Tools
- Use either Copy schema name or Copy logical name to copy.
🙂
Power Automate | Insert a new option for a global or local option set (Choice) field
In this article, let’s learn how to insert a new option for a global or local option set using the InsertOptionValue unbound action in Power Automate.
Create new option in global choices field:
- I have a global option set (i.e., Choice) field by name ‘Location’
- To add the new option ‘Delhi’ to the option set, use the following properties. Set the label in the following JSON format. Here :
- Label : Optionset label text.
- LanguageCode : 1033 is language code for English.
{
  "LocalizedLabels": [
    {
      "Label": "Delhi",
      "LanguageCode": 1033
    }
  ]
}- After saving, test the flow. This should create a new option named ‘Delhi’ in the global option set.
Now lets see how to create new option in local choice field.
Create new choice in local choice field:
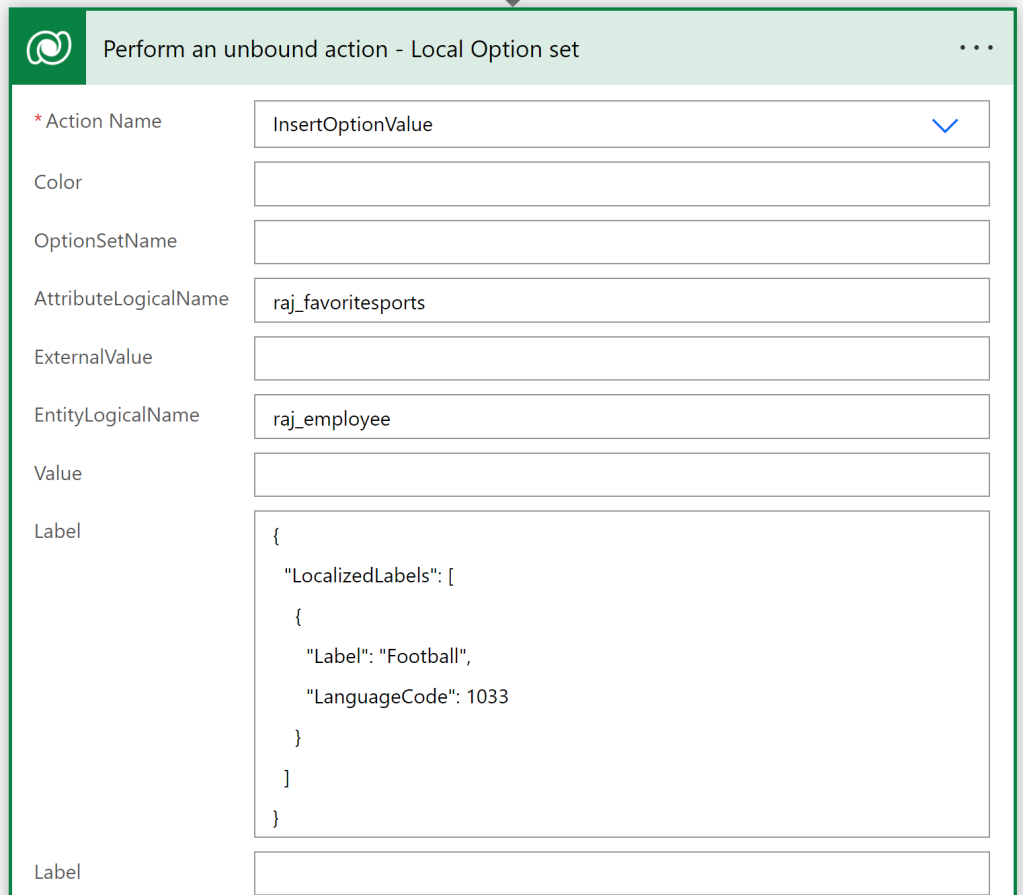
- I’ve a local option set by name ‘Favorite Sports’ in my table ‘Employee’.
- To insert new option ‘Football’ in the ‘Favorite Sports’ local option set, use following properties. Set the Label in the following json format.
- After saving and testing the flow, a new option named ‘Football’ will be created in the local option set.
That’s it! I hope you’ve learned how to create options in both global and local option sets using Power Automate.
🙂
Microsoft Adoption | Sample solution gallery
Imagine you’re new to Power Platform and eager to learn from others’ experiences in app development. Did you know that you can explore and download amazing apps/solutions of others from a sample gallery?
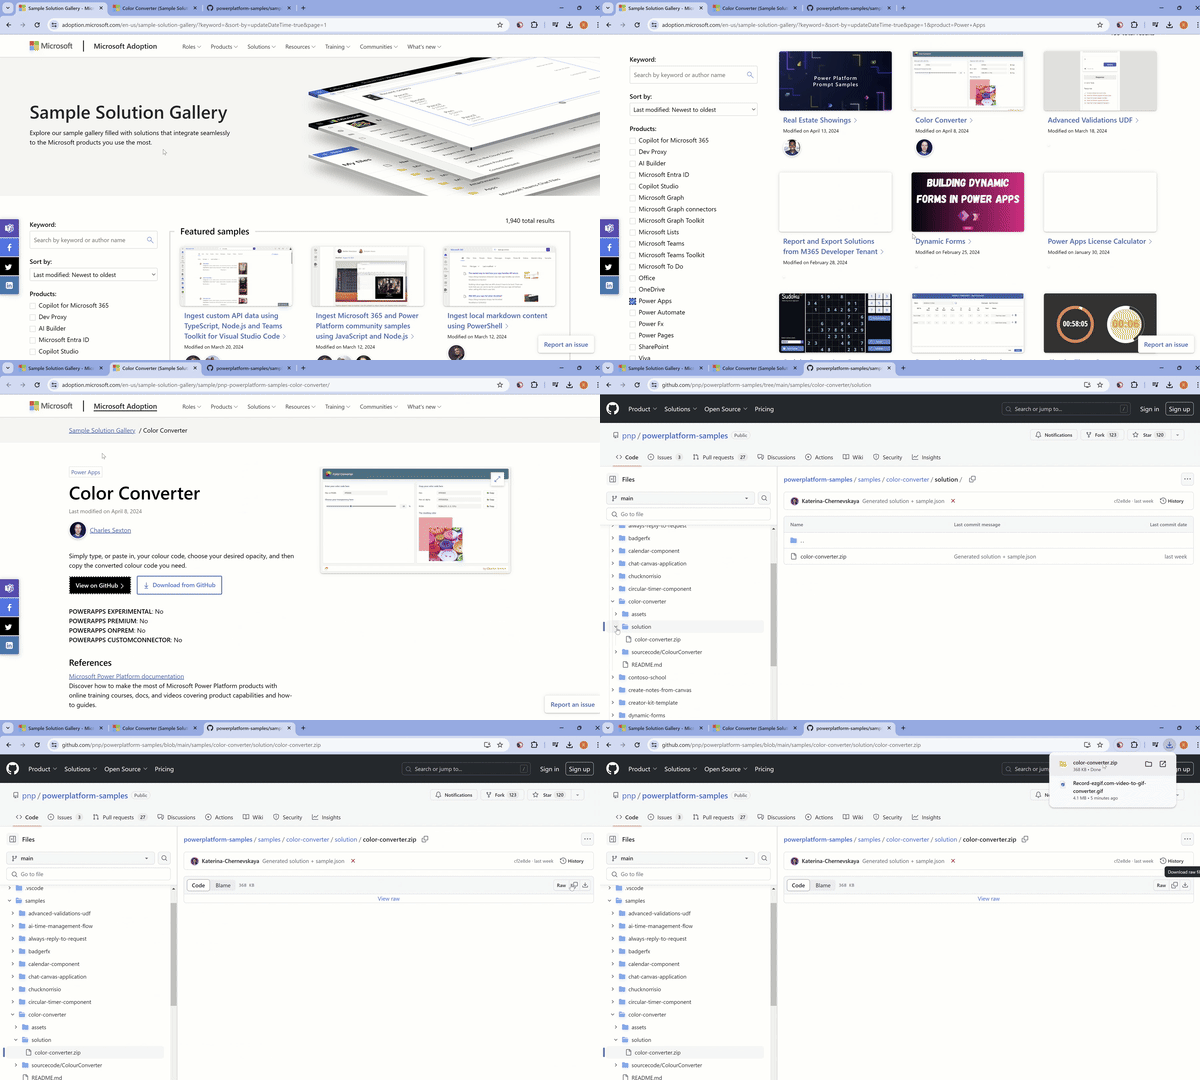
Go to Microsoft Adoption portal and navigate to Solutions > Sample Solution Gallery.
Let’s discover how to explore and find a Power Apps solution, then put it to use.
Steps to find a Power App solution and download:
- Open the Microsoft Adoption portal and navigate to Solutions > Sample Solution Gallery
- Filter by Products > Power Apps
- Select the app you’re interested in and navigate to its GitHub page.
- Review the selected app’s summary from the README.md file.
- Download the solution and install it in your environment.
- Likewise, you can also find sample solutions for other Microsoft products.
Happy exploring 🙂
Power Automate | Achieve transaction and rollbacks using Changeset request
Imagine a scenario where you need to perform the following actions as a transaction: if any operation fails, all completed operations should be rolled back.
- Create an Account record.
- Create a Contact record by setting the Contact.CompanyName as Account created in previous step.
To achieve this scenario in Power Automate, we can utilize the Perform a changeset request action. However, it’s not straightforward, and I’ll explain why.
Lets first understand Perform a changeset request action before proceeding with our scenario.
Perform a changeset request:
- Change sets provide a way to bundle several operations that either succeed or fail as a group.
- When multiple operations are contained in a changeset, all the operations are considered atomic, which means that if any one of the operations fails, any completed operations are rolled back.
Now lets configure the flow with Perform a changeset request action to achieve our scenario.
Configure flow using Perform a changeset request action:
- Create a new Instant flow
- Add a Initialize variable action and set Value as guid() expression.
- If you are wondering why we need a new GUID, you’ll find out by the end of this post.
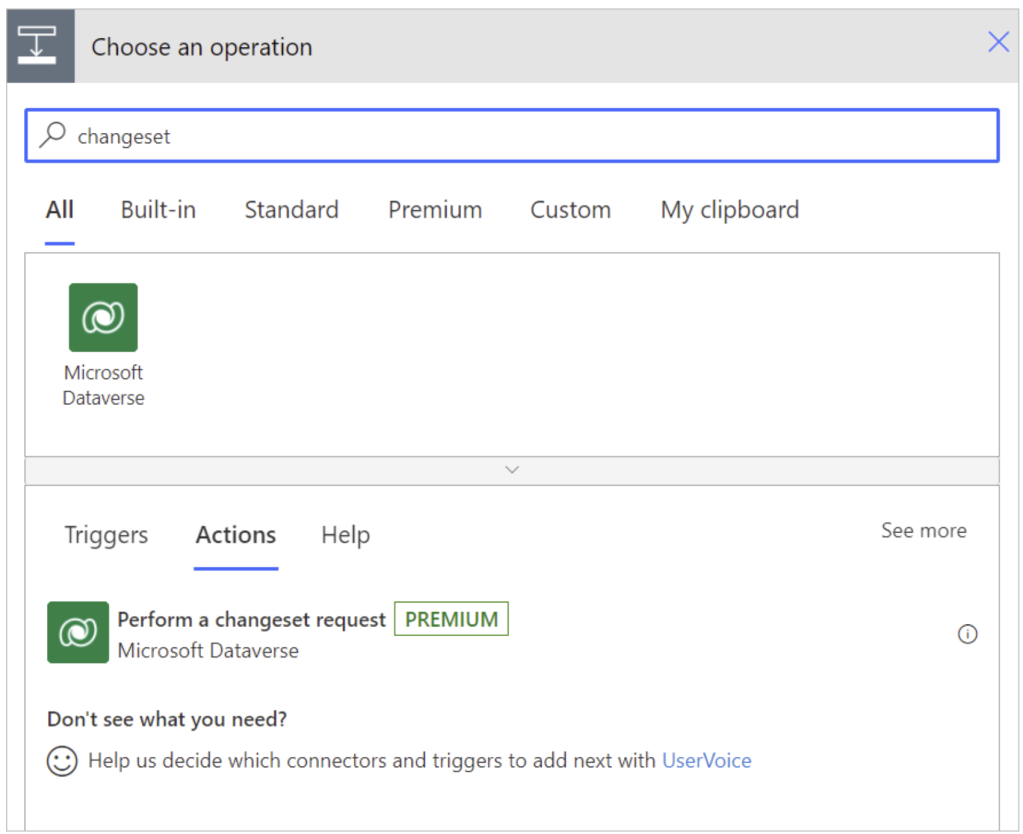
- Add Perform a changeset request action and add two Add a new row actions to create Account and Contact records.
- First Add a new row action, select ‘Table name’ as ‘Accounts’. Important thing here is to set the Account primary column as :
variables('vAccountId')- In the second Add a new row action, set ‘Table name’ as ‘Contacts’ and set ‘Company Name (Accounts)’ column as :
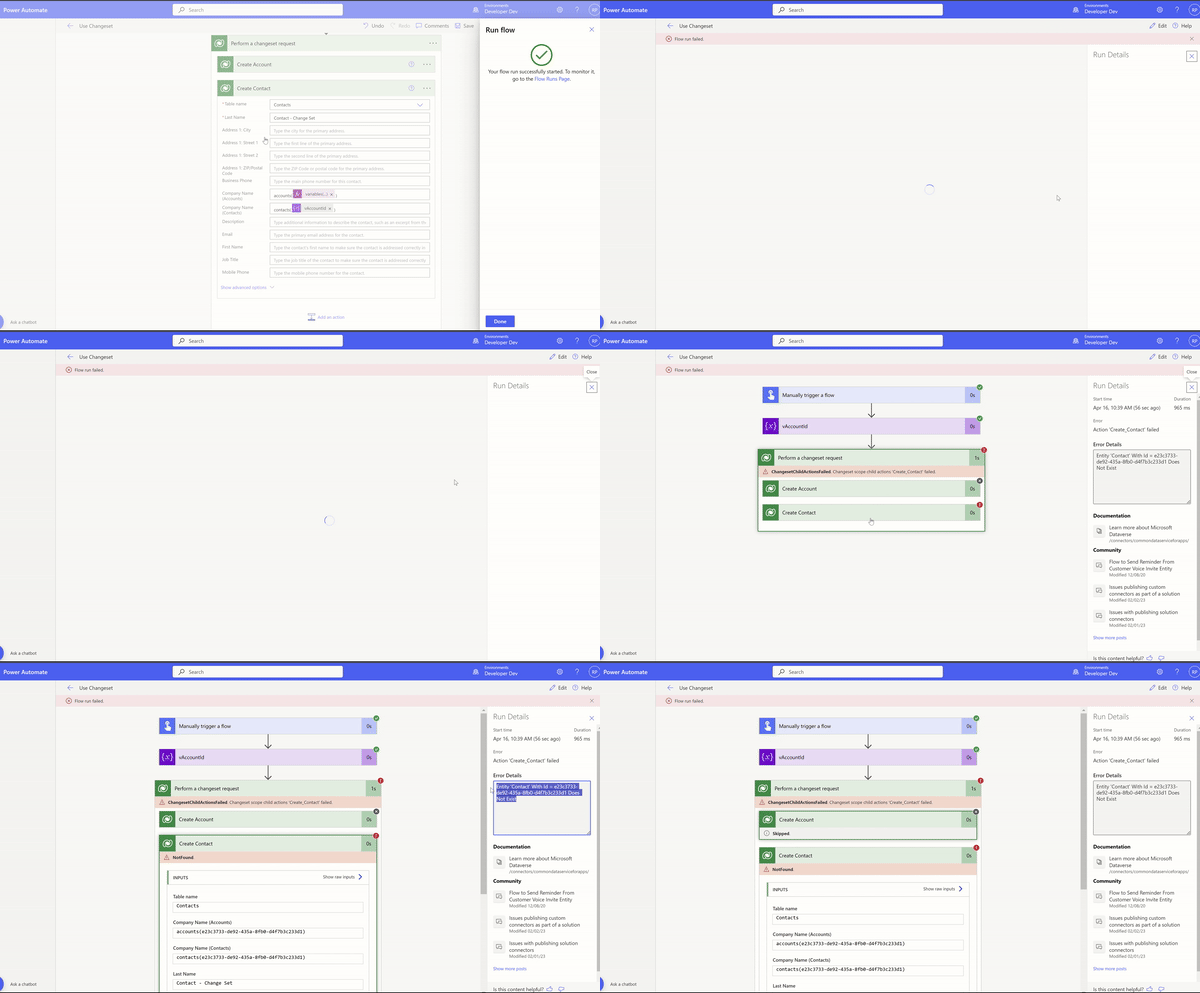
accounts(variables('vAccountId'))- Once configured, flow looks as below.
- Save and test the flow.
- After the flow run, you’ll see a new Account created along with the child Contact record.
- Now, to test the rollback behavior of the Perform a changeset request action, let’s intentionally fail the Contact creation action and observe if it also rolls back the completed Account creation.
- To intentionally fail the Contact creation, I’m setting a non-existing GUID in the ‘Company Name (Contacts)’ field.
- Save and Test the flow.
- After the flow run, you’ll notice that it failed with the message ‘Entity ‘Contact’ With Id = xxxx-xxx-xxx-xxxx Does Not Exist’. This occurred because we intentionally passed a non-existing GUID. Additionally, the ‘Create Account’ action was skipped, which demonstrates that the Perform a changeset request action ensures that if any operation fails, any completed operations will be rolled back.
Now that we understand how the Perform a changeset request action behaves, let’s also explore why I had to use pre-generated GUID in our flow.
Reason for using a pre-generated GUID in our flow:
Perform a changeset request action has following limitation:
- We can’t reference an output of a previous action in the changeset scope.
- In the changeset scope, you see that there are no arrows between each of the actions, indicating that there aren’t dependencies between these actions (they all run at once).
In our scenario for creating Accounts and Contacts, if we don’t use pre-generated GUIDs, we can’t get the platform-generated ‘Account GUID’ from the ‘Create Account’ step to pass it to the ‘Create Contact’ step.
So, I had to use the prepopulated GUID in both the ‘Create Account’ and ‘Create Contact’ steps to work around the limitation with the Perform a changeset request action.
That’s all for this post. I hope you now understand how to use the Perform a changeset request action.
🙂
Power Automate | Dataverse | Create row by setting lookup column with ‘Key’
Imagine you’re in the midst of creating a Contact record in Cloud Flow using Dataverse > Add a new row action. You can easily set the ‘Company Name’ field, which is a lookup, with the syntax: accounts({account_guid}), as shown below.
Did you know that instead of parent record’s GUID, you can also use the Alternate Key to set the look up column?. In this article, let’s learn how to set the lookup column using Alternate Key.
What is an Alternate Key:
- With alternate keys you can now define a column in a Dataverse table to correspond to a unique identifier (or unique combination of columns) used by the external data store.
- This alternate key can be used to uniquely identify a row in Dataverse in place of the primary ke (i.e., GUID).
Steps to Create a Key:
To create an alternate key in Account table,
- Navigate to Account > Keys
- Click on New Key and choose column as shown below. I’ve chosen Account Number column.
- Click on Save
- Wait for some time until the status changes to Active.
- Now, go ahead and create a new Account record with ‘Account Number’. Copy the value of the ‘Account Number’ (i.e., 989898) which we will be using in the flow.
Now that we have created an alternate key in the Accounts table and added a new Account record, let’s proceed with creating a flow to generate a Contact record using the account’s alternate key.
Create a flow:
- Create an Instant Flow.
- Add Dataverse > Add a new row action.
- Set the ‘Company Name’ lookup column to accounts(accountnumber=’989898‘). Here is an explanation of the syntax.
- accounts : Schema name of ‘Account’ table.
- accountnumber : The logical name of the column configured in Keys.
- Since we configured the ‘Account Number’ column in ‘Keys’, use ‘accountnumber’, which is the logical name of the ‘Account Number’ column.
- 989898 : Account Number value of the Account record.
- Save and Test the flow. You will notice that the Add a new row action succeeds.
- Open the Contact record in Dataverse, and you will notice the Account Name look up is set with the ‘Contoso Ltd’ Account.
Hope you learned about using alternate keys while setting up lookup columns in flows.
🙂
Power Apps Component Framework (PCF) | Create React (virtual) code component.
In 2020, I created the PCF Beginner Guide post, which explains the basics of Power Apps component framework. Since then, there have been numerous changes to the framework, prompting me to write another blog post on React based virtual code components.
Please note that if you are familiar with the term ‘PCF Component’ but not ‘Code Component,’ they both refer to the same concept. I will be using ‘Code Component’ terminology throughout this post.
In this blog post, I will cover the following topics:
- What is a Standard code component
- What is a React based virtual code component
- Differences between React based virtual code component and standard components
- Scenario
- Demo : Creating a React code component and deploying to Dataverse
Lets get started.
What is Standard code component:
- Standard code components are standard html control types.
- Controls are allocated an HtmlDivElement in it’s init lifecycle method and mounts its UX/UI inside the allocated Div directly working on DOM.
- Please refer to this article for a detailed understanding of standard components.
What is a React based virtual code component:
- Virtual or React based virtual code components are built using the React framework.
- React apps are made out of components.
- A component is a piece of the UI (user interface) that has its own logic and appearance
- React (virtual) controls provide a new pattern optimized for using React library in code components.
- If you are not clear at this point, don’t worry; you will understand during the next sections.
Differences Between React based virtual code component and Standard code components:
- Virtual code components can have performance gains which are at par with some of the 1st party controls.
- You can expect much better performance across web and mobile, especially on slower networks.
- Following are some high-level numbers comparing standard and virtual versions of FacePile control on development machine.
- As you can see from the statistics above, in React-based code components, the React and Fluent libraries aren’t included in the package because they’re shared. Therefore, the size of bundle.js is smaller.
Now that you have the basics of both Standard and React code components, let’s proceed with our scenario and demo.
Scenario:
- We will be building a simple React component with a ‘Label’ control, which animates the text from left to right.
- Our React component takes 4 parameters
- textcontent
- fontsize
- fontcolor
- animationpace
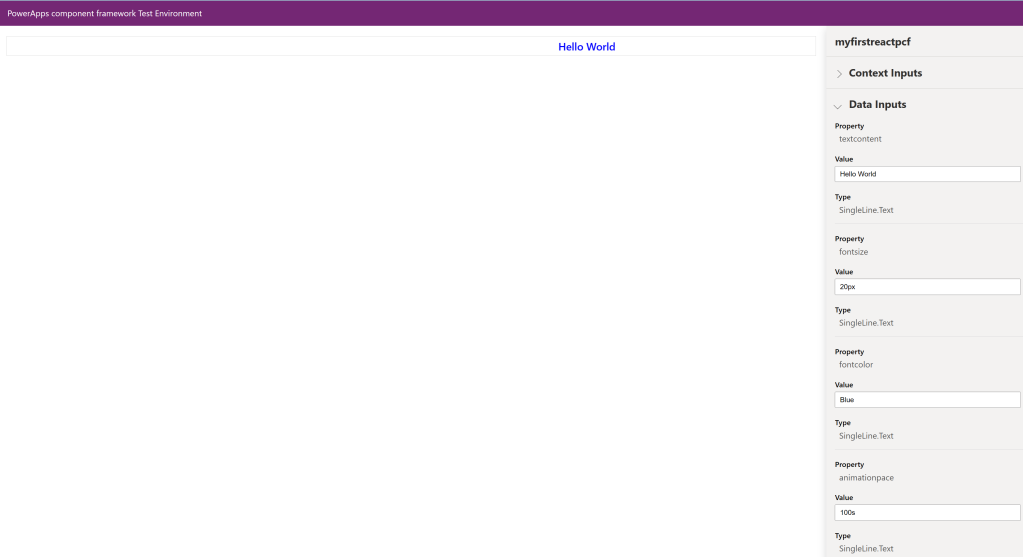
Now we have the scenario, lets get started with building the component. Please ensure that the prerequisites mentioned here are fulfilled before proceeding with the next steps.
Steps to create a React component project:
- Create an empty folder as shown below.
- Open the VSCode editor. Navigate to the newly created folder mentioned above and open a new terminal, which should appear as shown below.
- Create a new ‘React Code Component’ project by executing the pac pcf init command with
--frameworkparameter set toreact.
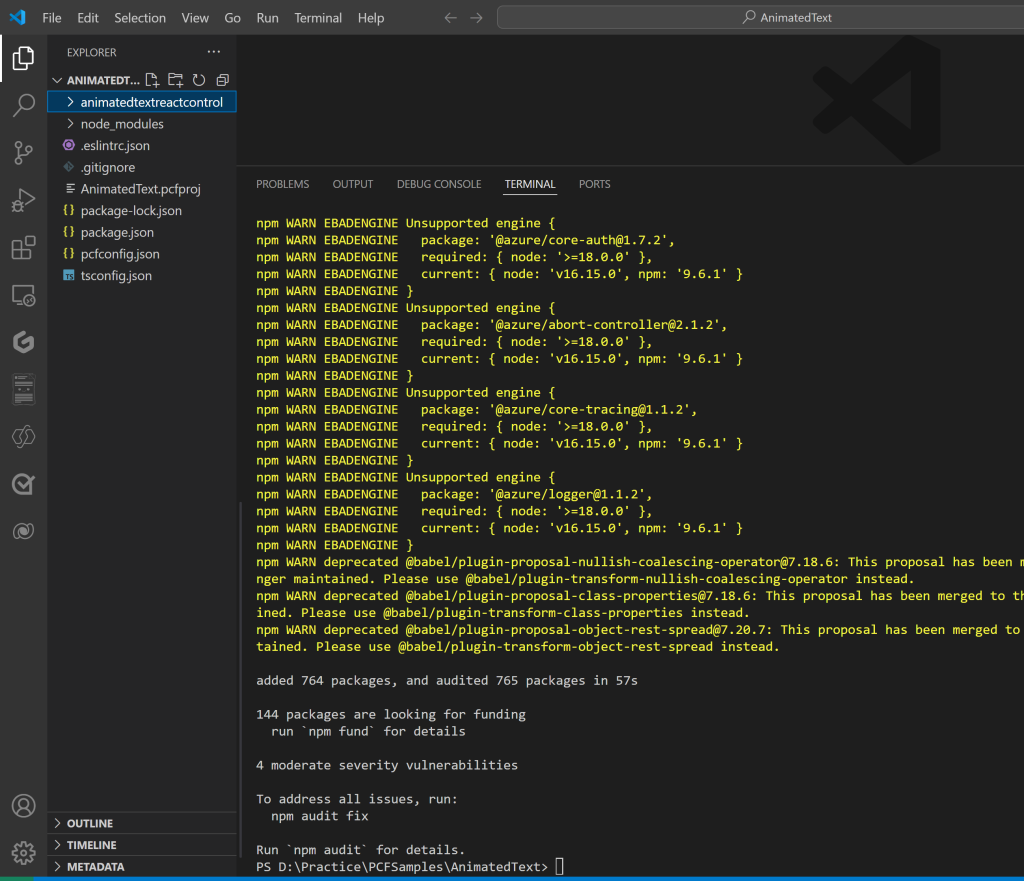
pac pcf init --namespace LearnReactPCF --name animatedtextreactcontrol --template field --framework react -npm- Above pac pcf init command may take a few seconds to complete execution. Once finished, you will see folders rendered as shown below. You can safely ignore any warnings and proceed with the next steps.
Understand the files of the project:
“Let’s understand the files that were created and the changes made in the index.ts file compared to a standard code component project.
- A new React class component file HelloWorld.tsx gets created, by default returns a simple ‘Label’ control.
- In the index.ts file, The ReactControl.init method for control initialization doesn’t have <
div>parameters because React controls don’t render the DOM directly. - Instead ReactControl.updateView returns a ReactElement that has the details of the actual control in React format.
- An important thing to notice is that an interface IHelloWorldProps will be available in both HelloWorld.tsx and index.ts files. This interface helps you to pass parameters to the react component, which you will see in next sections.
Now that we’ve understood the files and key points, let’s proceed with executing our scenario.
As mentioned in the Scenario section, our animation text component will have four parameters. Let’s start by defining these parameters in the ControlManifest.Input.xml file.
Define properties in ControlManifest.Input.xml file:
- Open the ControlManifest.Input.xml file, delete the default ‘sampleproperty’ node, and add our four parameters (i.e., textcontent,fontsize,fontcolor,animationpace) as shown below.
     <property name="textcontent" display-name-key="textcontent" description-key="content to be displayed" of-type="SingleLine.Text" usage="bound" required="true" />
    <property name="fontsize" display-name-key="fontsize" description-key="fontsize" of-type="SingleLine.Text" usage="input" required="true" />
    <property name="fontcolor" display-name-key="fontcolor" description-key="color of the font" of-type="SingleLine.Text" usage="input" required="true" />
    <property name="animationpace" display-name-key="animationpace" description-key="animation pace" of-type="SingleLine.Text" usage="input" required="false" />
Update the ‘IHelloWorldProps’ interface with new properties:
As we added the four new parameters in ControlManifest.Input.xml file, we need to update the IHelloWorldProps interface with new properties in both HelloWorld.tsx and index.ts files.
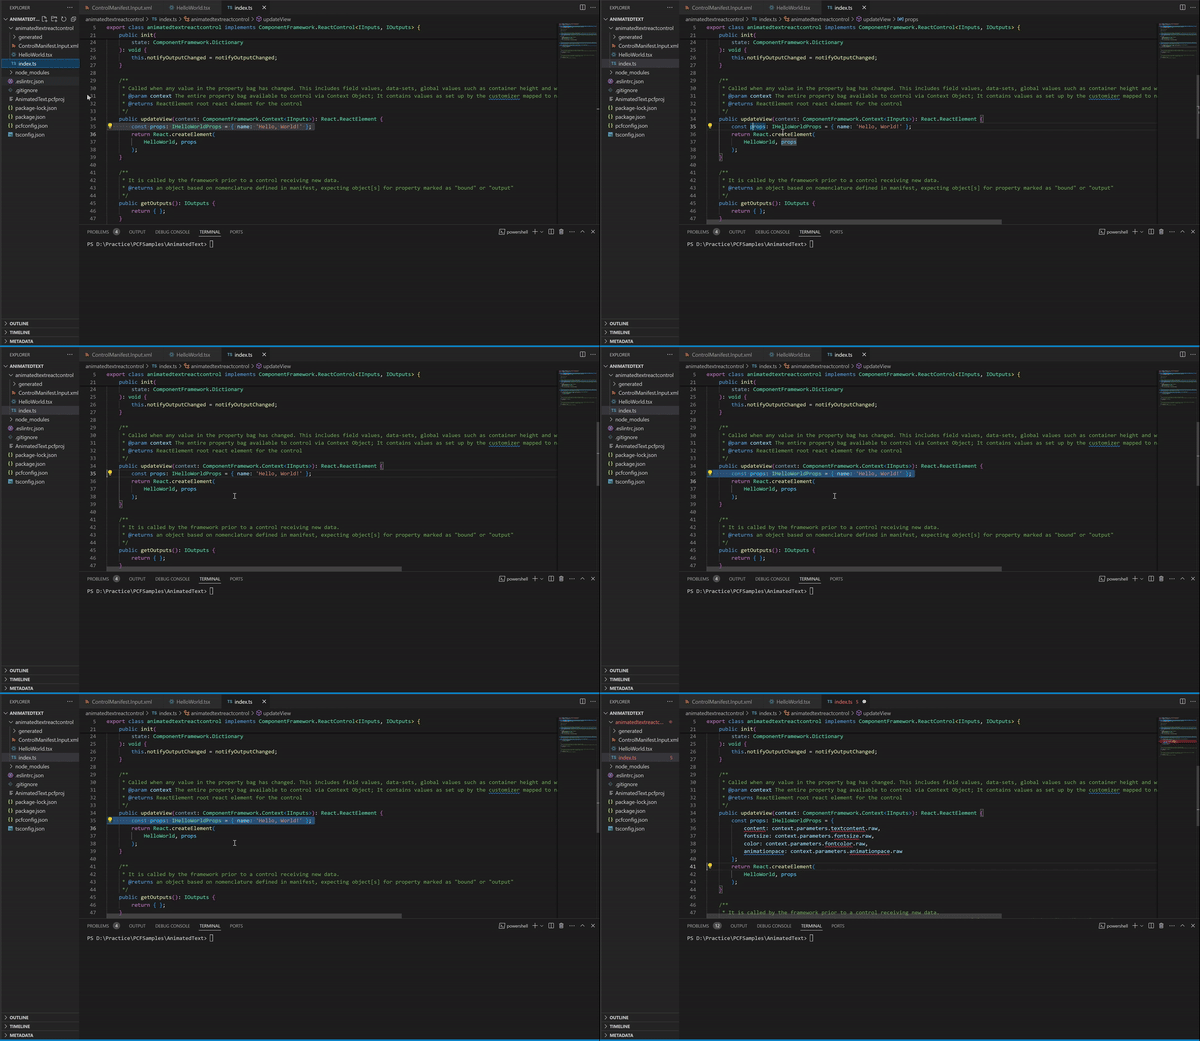
- Open the index.ts file and update the IHelloWorldProps interface with following code block.
    const props: IHelloWorldProps = {
        content: context.parameters.textcontent.raw,
        fontsize: context.parameters.fontsize.raw,
        color: context.parameters.fontcolor.raw,
        animationpace: context.parameters.animationpace.raw
    };
- Next, open the HelloWorld.tsx file and update the IHelloWorldProps interface with following code block.
export interface IHelloWorldProps {
  content?: any;
  fontsize?: any;
  color?: any;
  animationpace?: any;
}
Render the animated control in the react component:
Now that we defined properties, lets read the property values and render our React component.
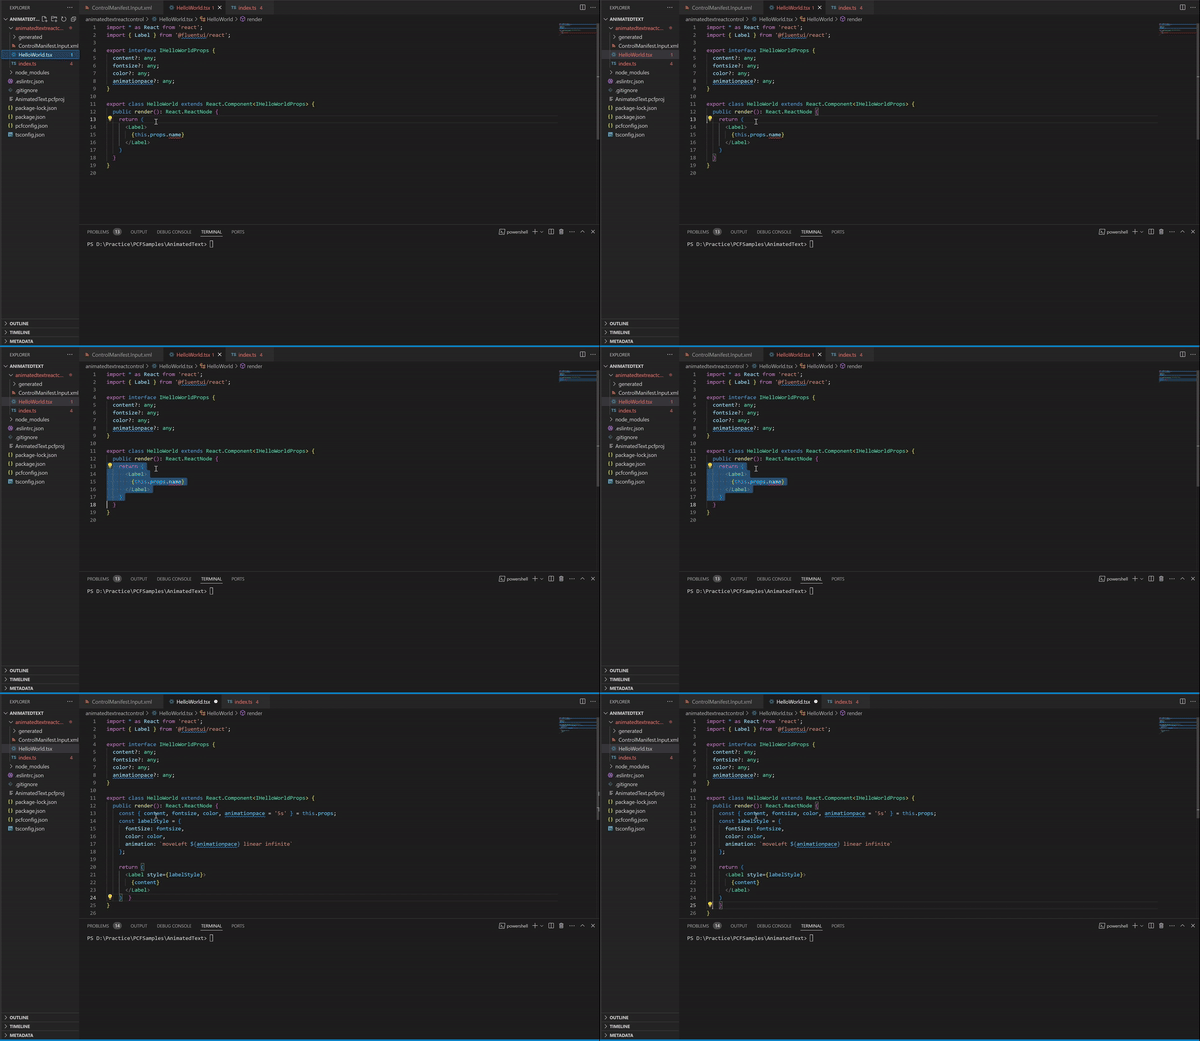
- Open the HelloWorld.tsx file and replace the default ‘Label’ render logic with below code block.
- In the below code, we have mapped all the four properties from this.props to four constants.
- Next, we defined labelStyle constant with the styling which we have used in <Label style={labelStyle}>
- Finally we are returning the <Label> control using return. This is a standard React component behavior, if you are familiar with React framework.
    const { content, fontsize, color, animationpace = '5s' } = this.props;
    const labelStyle = {
      fontSize: fontsize,
      color: color,
      animation: `moveLeft ${animationpace} linear infinite`
    };

    return (
      <Label style={labelStyle}>
        {content}
      </Label>
)- Notice that we are using ‘moveLeft‘ css class to achieve the animated effect. To do this, we need to add a new .css file to our project and define the ‘moveLeft‘ class in it.
Add a new .css file:
- If you open the ControlManifest.Input.xml file, under <resources> node, you will find a commented-out line for the <css> node. Uncomment the line as shown below. Your <resources> node should look like the following:”
    <resources>
      <code path="index.ts" order="1"/>
      <platform-library name="React" version="16.8.6" />
      <platform-library name="Fluent" version="8.29.0" />
      <css path="css/animatedtextreactcontrol.css" order="1" />
      <!-- UNCOMMENT TO ADD MORE RESOURCES
      <resx path="strings/animatedtextreactcontrol.1033.resx" version="1.0.0" />
      -->
</resources>- Now that we’ve uncommented the <css> node, our application expects a new animatedtextreactcontrol.css file under css folder.
- Create a new folder named ‘css’ and add a new file named ‘animatedtextreactcontrol.css’. Then, add the following CSS content to the file:
@keyframes moveLeft {
    0% {
      transform: translateX(0);
    }
    100% {
      transform: translateX(100%);
    }
  }
We are good with configuring the properties and rendering the component. Its time to test.
Build and Test the control:
- Build the project by trigger the npm run build command and ensure that it returns ‘Succeeded’ to confirm successful completion.
- Next trigger npm start watch command to test the control.
- The npm start watch command opens a browser window where you can test the control by providing values to its properties directly in the browser interface.
Packaging the code components:
Now that we built and tested the react virtual control, lets package it in to a solution which enables us to transport the the control to Dataverse.
- Create a new folder named Solutions inside the AnimatedText folder and navigate into the folder.
- Create a new Dataverse solution project by triggering the pac solution init command.
- The publisher-name and publisher-prefix values must be the same as either an existing solution publisher, or a new one that you want to create in your target environment.
pac solution init –publisher-name Rajeev –publisher-prefix raj
- After executing the above ‘pac solution init’ command, a new Dataverse solution project with a .cdsproj extension is created
- Now, we need to link our ‘react code component’ project location (i.e., pcfproj file location) to the newly created Dataverse solution project using pac solution add-reference command.
pac solution add-reference –path D:\Practice\PCFSamples\AnimatedText
- We left with one last pac cli command. Generate the Dataverse solution file, trigger following msbuild command.
msbuild /t:build /restore- Post successful build, generated Dataverse solution zip file will be located in the
Solutions\bin\debugfolder.- Note that the solution zip file name will be same as the root folder (i.e., Solutions)
As we successfully built the control and generated a Dataverse solution, lets import the solution to an environment and test the control using a Canvas app.
Import the solution to Dataverse:
- Connect to the Power Apps Maker portal.
- Select an environment and import the generated solution.
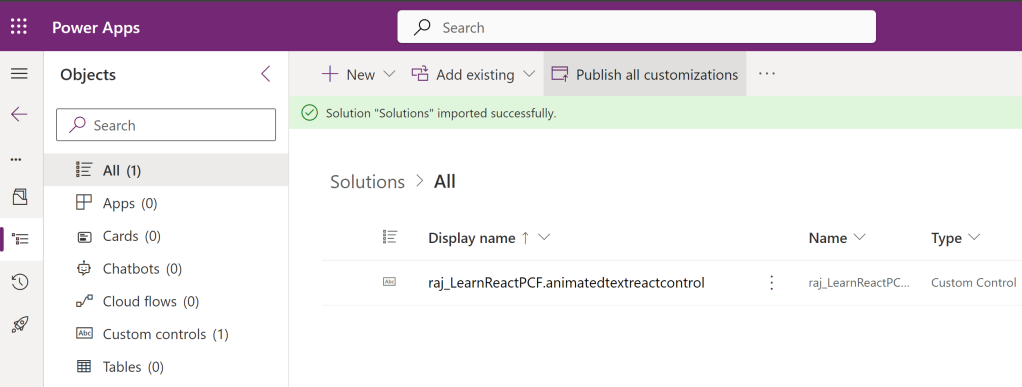
- Post the solution import, open the solution and click on Publish all customizations.
Test the component in Canvas App:
- Lets create a new Canvas app to test our react code component.
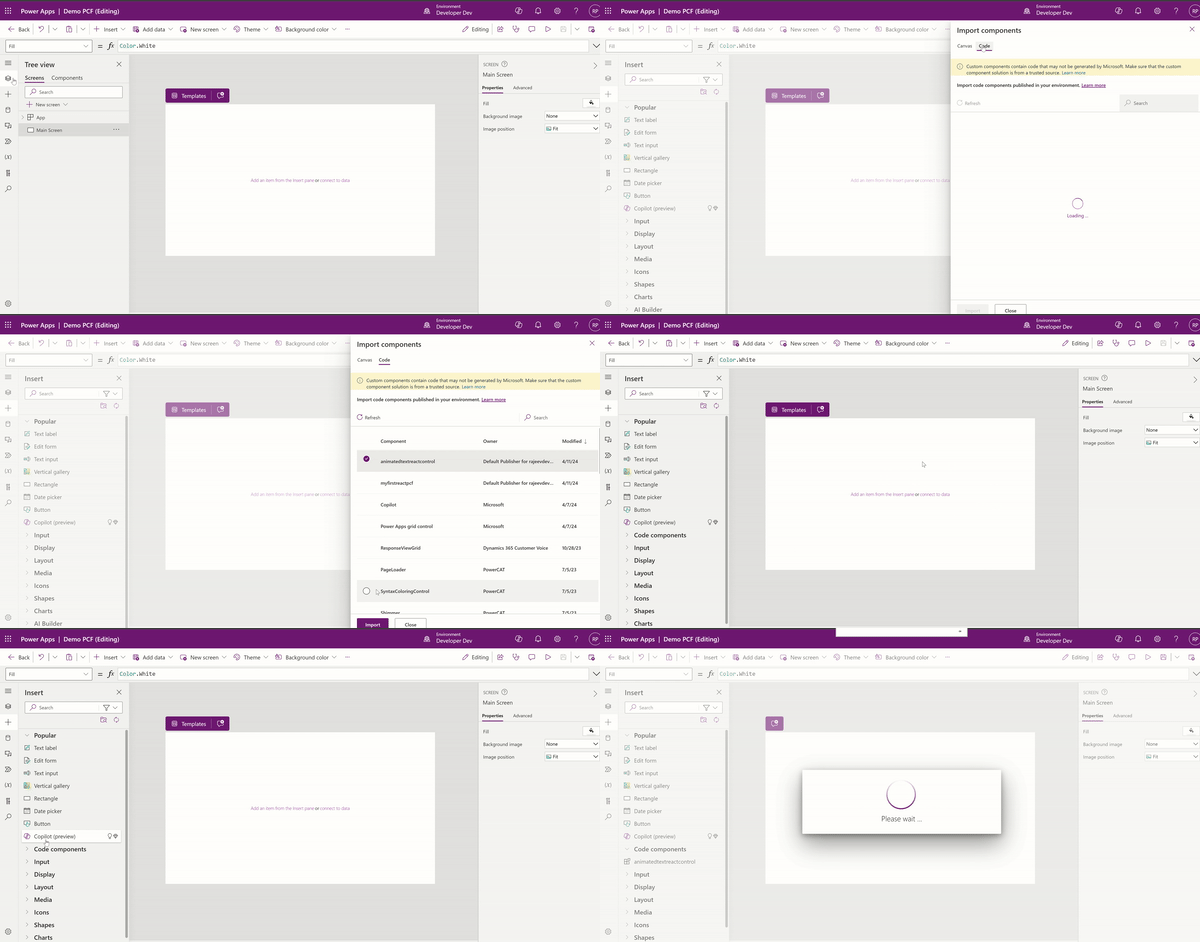
- From the new Canvas app, import our react code component as shown below.
- Test the control with different parameter values as shown below.
Test the component in Model Driven App (MDA):
We can add our ‘Animated Text’ react component to any of the table’s control. I am going to use Account table to test.
- Open the Account > Forms > Information form
- I am going to replace the default Account Name control with our React component.
- Select the Account Name control and map to our React component as shown below.
- Now go ahead and specify the properties and click on Done
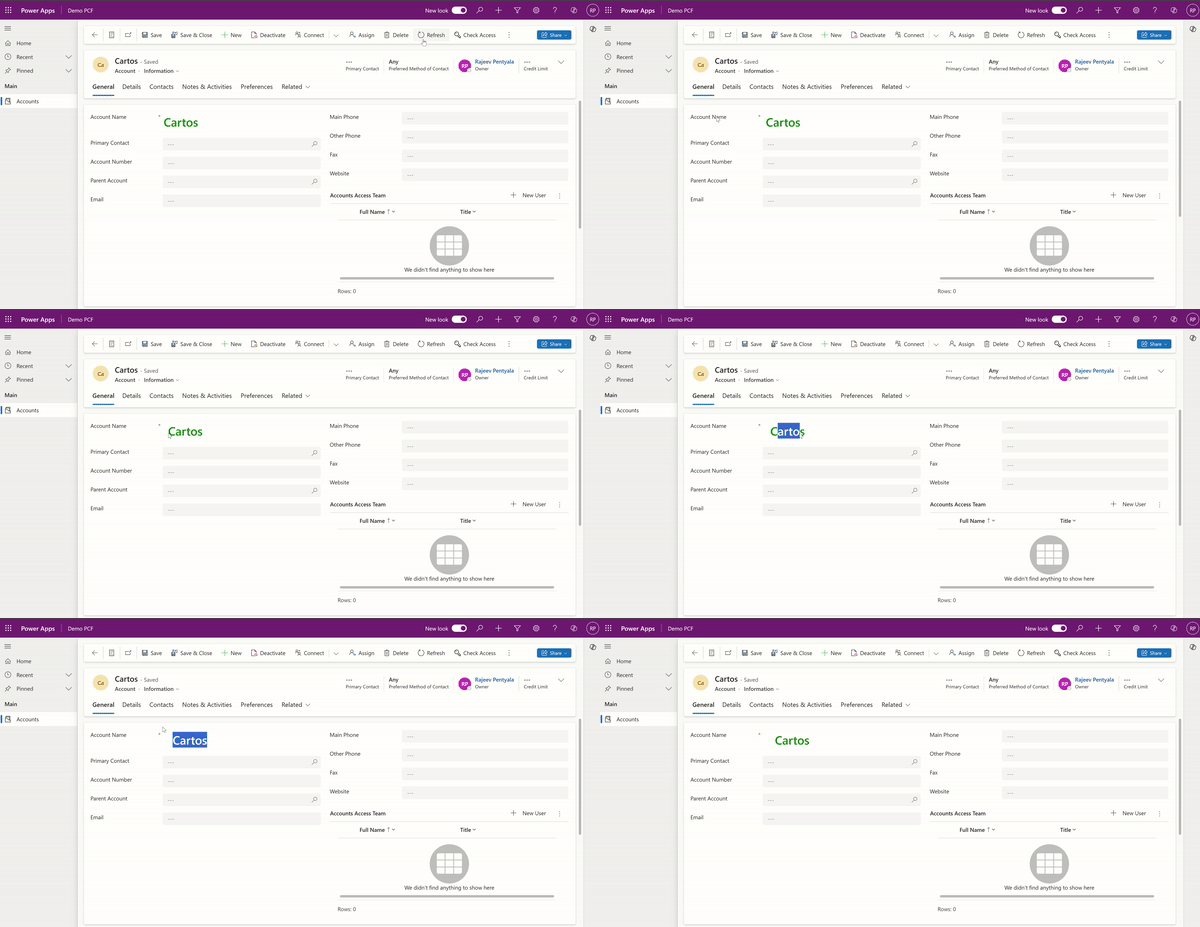
- Now, open any of the Account record and you will see the Account Name default control replaced with our animated React component.
That’s it. You can also add this component to Power Pages as well.
Hope you got the basics of creating React Virtual Code Component. Happy learning.
🙂
[Beginner’s Guide] Canvas App: Building Scrollable Screens
Let’s say you have a canvas app screen with two containers as shown below. Initially, both containers’ heights were set to 500 px, so they both fit into the screen.
Now lets make the ‘Container1’ height to 1000 px.
As you notice, ‘Container 1’ has taken up the entire screen, while ‘Container 2’ is missing.
Now, how do we get ‘Container 2’? If we bring the scroll bars to the screen, we could see both ‘Container 1’ and ‘Container 2’. In this article, let’s see how to build a scrollable screen.
I am going to explain two approaches to achieve scrollable screens.
Use Vertical Container:
- Add a new Vertical Container to the screen and set it’s X, Y, Width and Height properties. Also move the ‘Container1’ and ‘Container2’ inside the Vertical Container, as shown below.
- Next, select the ‘vertical container’ and set the Vertical Overflow = Scroll
- You will notice that the scroll bars have been added to the screen.
- Play the App, and you should see the scroll bar in action.
Now that you understand how to create a scrollable screen using the vertical container, let’s explore the second option.
Using ‘Scrollable’ screen template:
We can also achieve a scrollable screen using the Scrollable screen template.
- Add Screen > Scrollable and then add sections as shown below.
- Play the app and you will notice the screen with scroll bar.
That’s it for this blog. I hope you understand how to build scrollable screens in Canvas apps.
🙂
[Quick Tip] Canvas app : Using ‘Stock Images’
We all know that using Media you can add images, audio and video files to a canvas app. To add a media files, click Upload and then select the file(s) you want to add, as shown below..
However, did you know that you can utilize the Stock Images option? This feature allows you to select media from a readily available set of images, as shown below.
Once you select the Stock Image from the Media, you can use the image in the App as shown below.
Alternatively, instead of navigating to the Media tab, you can directly select the Stock Images option, as shown below.
🙂


