In this article, let’s explore how to connect the Dataverse MCP server to Claude Code.
Once configured, Claude Code can interact directly with your Dataverse environment using MCP tools. This allows Claude to retrieve schema information, query tables, and assist with Dataverse development tasks.
Prerequisites
Before using the Dataverse MCP server with Claude Code, ensure the following prerequisites are completed:
- Enable the Dataverse MCP server for the environment through Power Platform Admin Center (PPAC).
- Install the Dataverse MCP server local proxy in your machine.
- A Dataverse connection.
- Know the Tenant ID of your Dataverse environment.
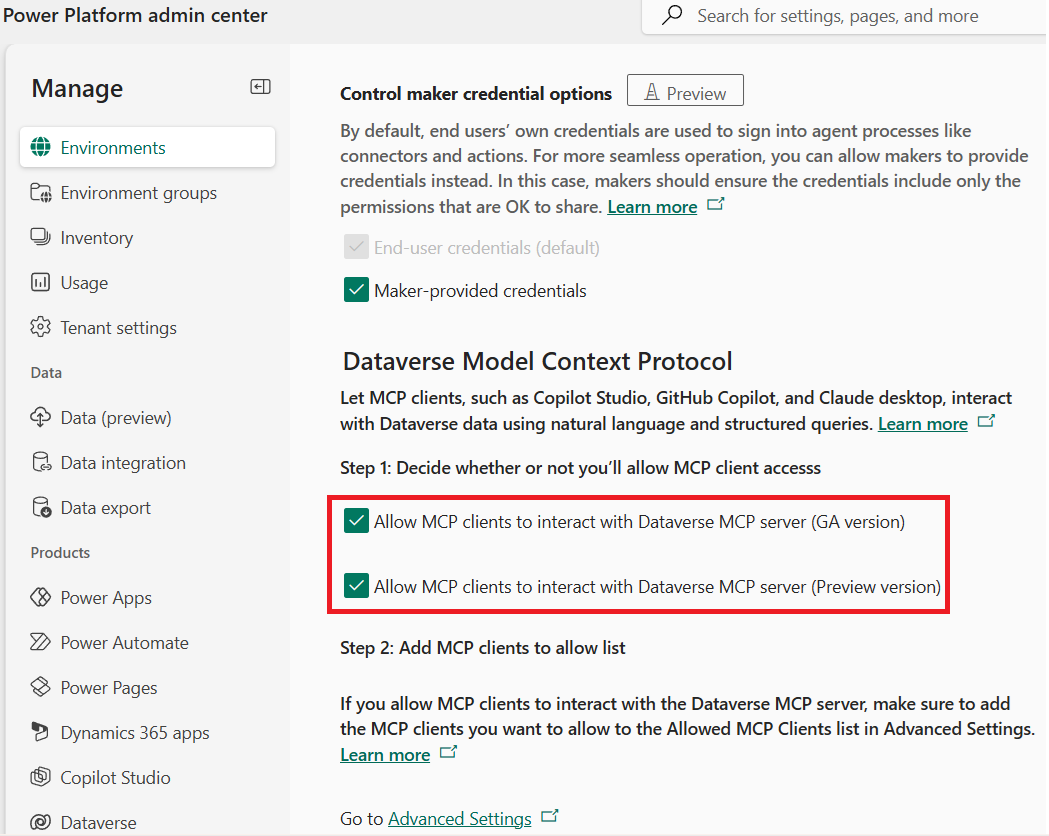
Enabling the Dataverse MCP server for the environment:
First, we must enable the MCP capability in the Dataverse environment.
- Go to Power Platform admin center.
- Select the Environment and then select Settings.
- Under Settings, select Product > Features.
- Locate Dataverse Model Context Protocol and make sure Allow MCP clients to interact with Dataverse MCP server is turned on.
- More information: Configure and manage the Dataverse MCP server for an environment
Install the Dataverse MCP server local proxy:
The Dataverse MCP local proxy must be installed on your machine. Claude Code communicates with Dataverse through this proxy.
Follow these steps.
Step 1 — Install .NET SDK
- Open Command Prompt
- Trigger the command:
winget install Microsoft.DotNet.SDK.8

- This command installs or upgrades the .NET 8 SDK, which is required to run the MCP proxy.
Step 2 — Install Dataverse MCP Proxy
- Run the following command:
dotnet tool install --global --add-source https://api.nuget.org/v3/index.json Microsoft.PowerPlatform.Dataverse.MCP
- This installs the Dataverse MCP local proxy as a global .NET tool.

- To confirm the installation, run:
dotnet tool list --global
- You should see the Microsoft.PowerPlatform.Dataverse.MCP tool listed.

Create a Dataverse Connection:
Next, we need a Dataverse connection that the MCP server will use for authentication. The important point is that you need to connect to Power Automate portal to perform below steps.
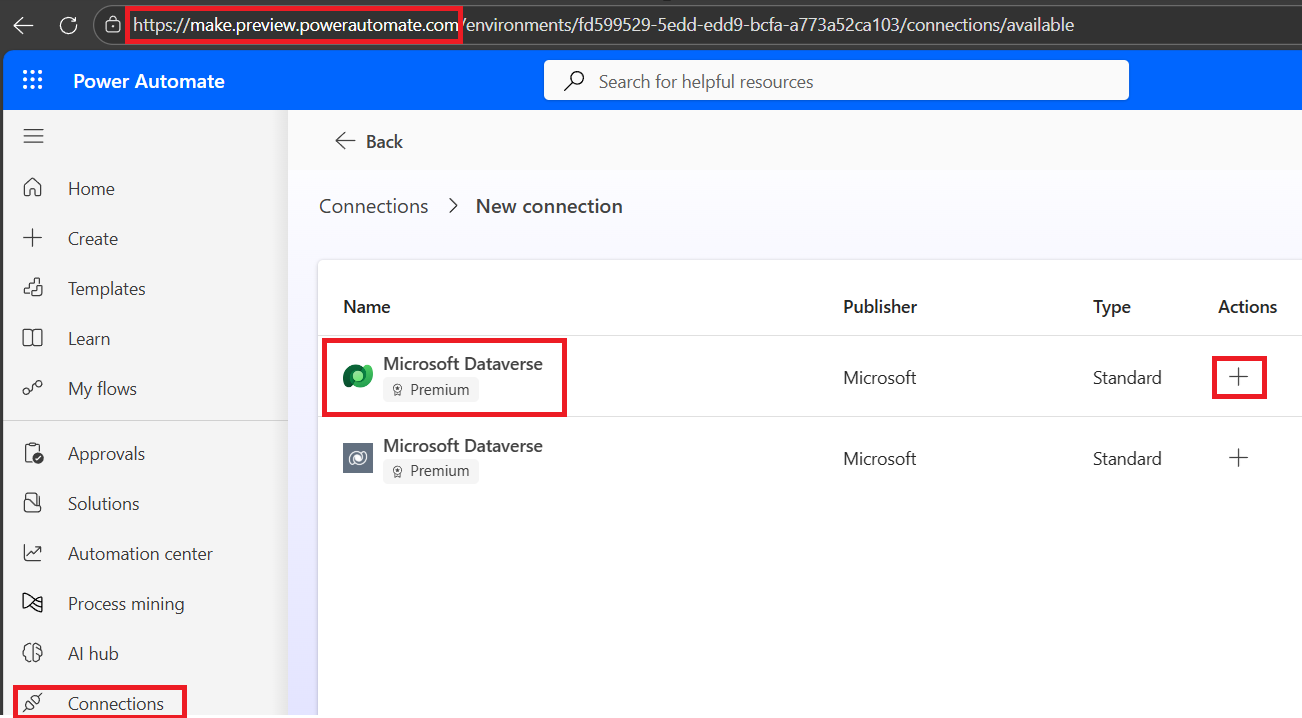
- Open the Power Automate portal.
- Navigate to Connections
- Create a new Microsoft Dataverse connection or use an existing one.
- Once the connection is created, open the connection details page.
- From the URL, capture the following values:
- Environment ID
- API Name
- Connection ID
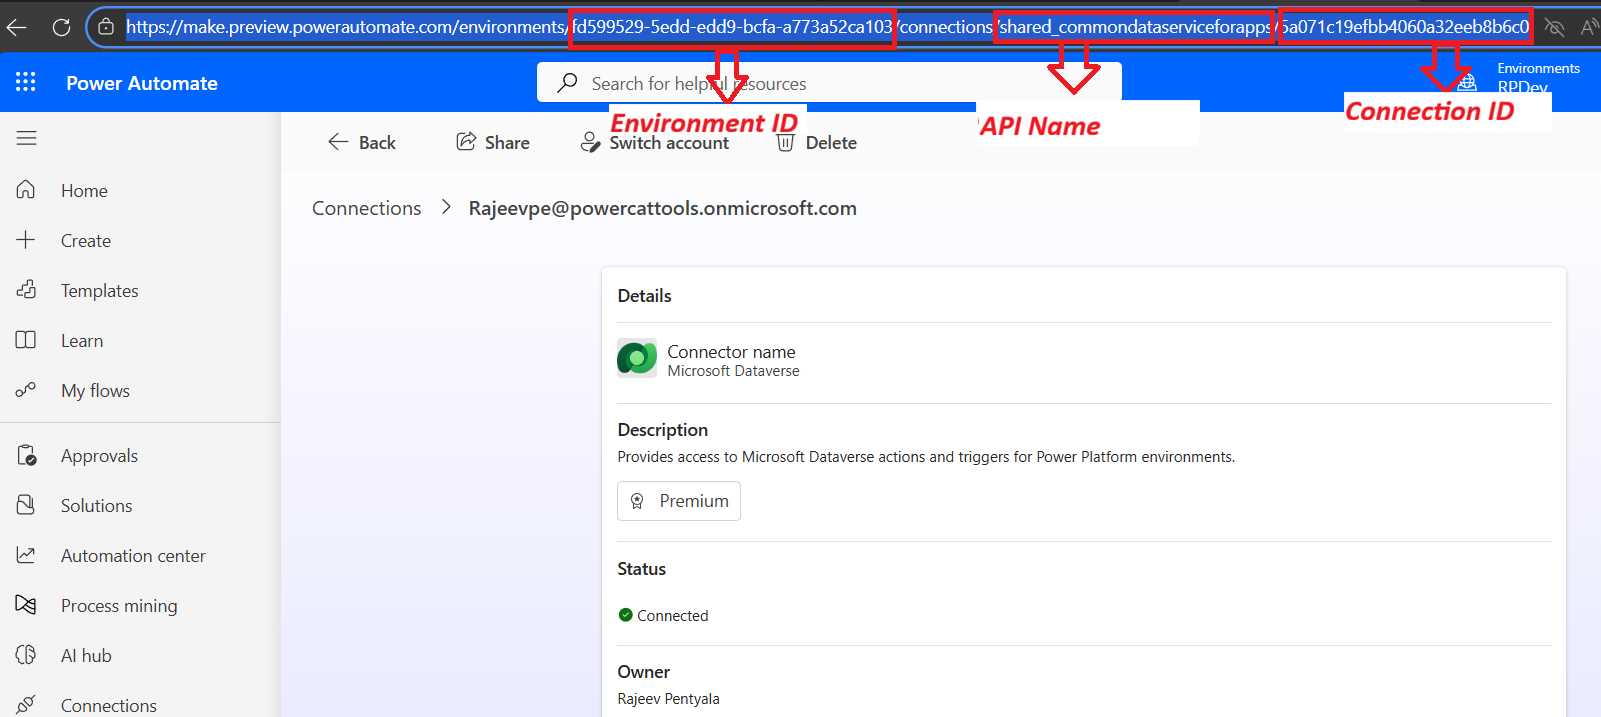
- Using the values above, construct the connection URL in the following format:
https://make.powerautomate.com/environments/<Environment ID>/connections?apiName=<API Name>&connectionName=<Connection ID>
- Example:
"https://make.preview.powerautomate.com/environments/fd599529-5edd-edd9-bcfa-a773a52ca103/connections?apiName=shared_commondataserviceforapps&connectionName=5a071c19efbb4060a32eeb8b6c0ec85b"
- Save this URL — it will be required in the next step.
Get the tenant ID of your Dataverse environment:
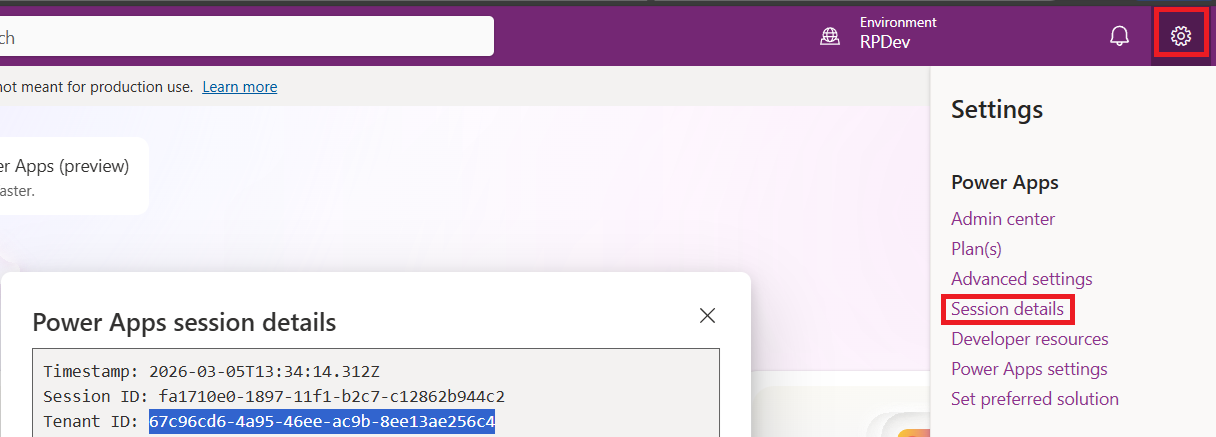
- Go to Power Apps.
- Select Settings (gear icon) on the top right, and then select Session details.
- Copy the value of the Tenant ID from the Power Apps session details
Add Dataverse MCP to Claude Code:
Now we will register the Dataverse MCP server with Claude Code.
You can run this command from either:
- a standalone terminal, or
- the VS Code terminal
I will be using VS Code Terminal for this example.
- Open VS Code > New Terminal
- Run the following command and replace the placeholders with your values.
- <Name> : Friendly name for the MCP server
- <Dataverse connection URL> : Connection URL created earlier
- <Tenant ID GUID> : Tenant ID copied from Power Apps
- Command:
claude mcp add <Name> Microsoft.PowerPlatform.Dataverse.MCP -- ` --ConnectionUrl "<Dataverse connection URL>" ` --MCPServerName "DataverseMCPServer" ` --TenantId "<Tenant ID GUID>" ` --EnableHttpLogging true ` --EnableMsalLogging false ` --Debug false ` --BackendProtocol HTTP
- Here is the example command with actual values:
claude mcp add RajeevDVMCP Microsoft.PowerPlatform.Dataverse.MCP -- ` --ConnectionUrl "https://make.preview.powerautomate.com/environments/fd599529-5edd-edd9-bcfa-a773a52ca103/connections?apiName=shared_commondataserviceforapps&connectionName=5a071c19efbb4060a32eeb8b6c0ec85b" ` --MCPServerName "DataverseMCPServer" ` --TenantId "67c96cd6-4a95-46ee-ac9b-8ee13ae256c4" ` --EnableHttpLogging true ` --EnableMsalLogging false ` --Debug false ` --BackendProtocol HTTP
- Executing this command registers the Dataverse MCP server with Claude Code.

Testing the Dataverse MCP Using Claude Code
Now let’s verify that Claude Code can interact with Dataverse.
- Open Claude Code in terminal.
- Enter a prompt such as: How many custom tables in my Dataverse
- Claude Code will automatically use the list_tables tool exposed by the configured MCP server.
- The MCP server queries Dataverse and returns the results, which Claude then presents in the terminal.
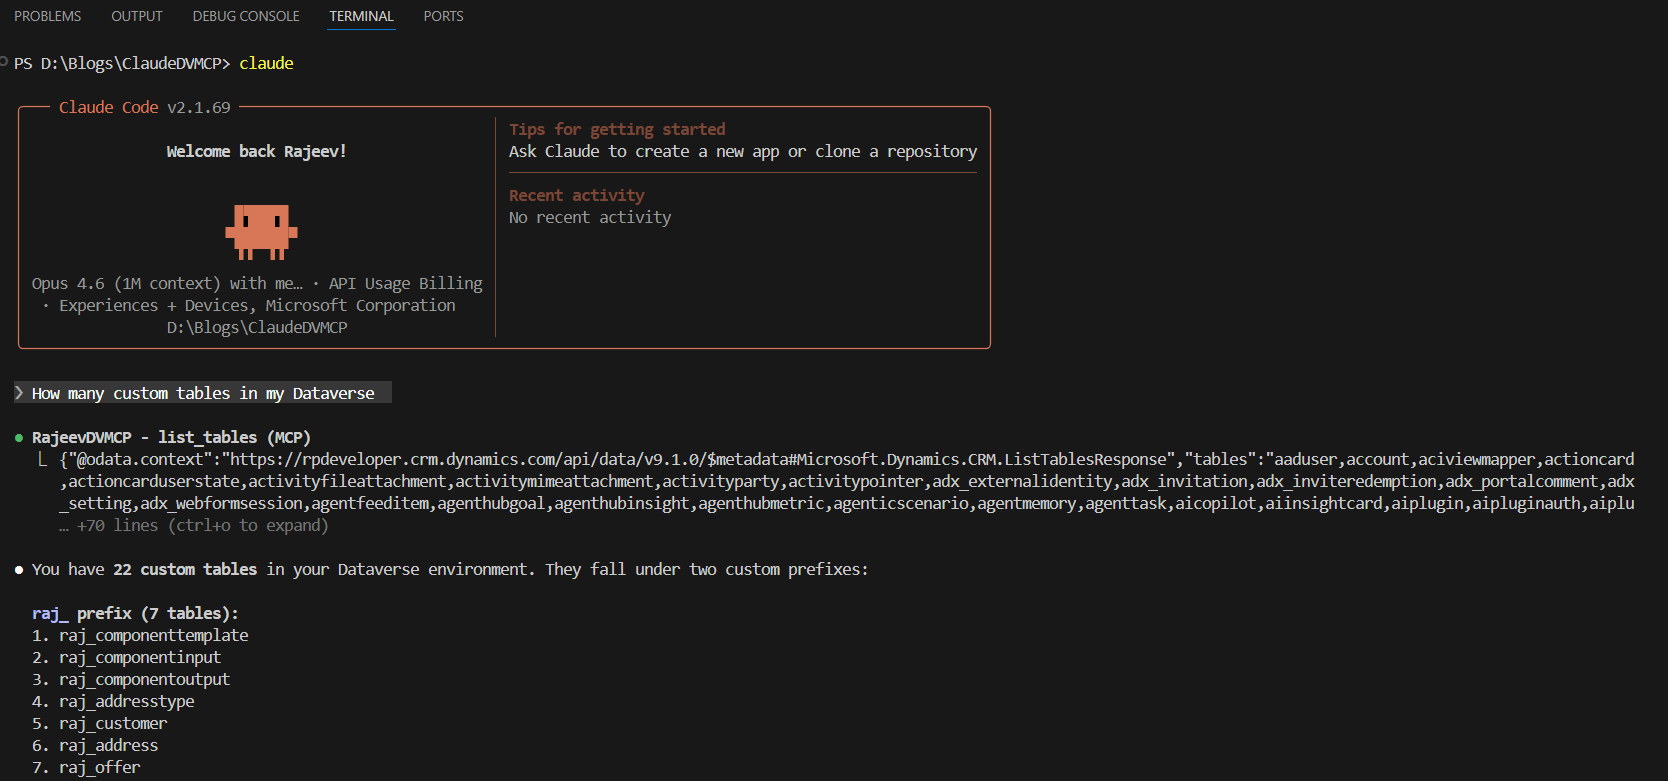
- This confirms that Claude Code is successfully connected to your Dataverse environment through MCP.
Hope this article helped you understand how to configure the Dataverse MCP server and connect it to Claude Code.
🙂


Leave a comment