If you’re new to Model Context Protocol (MCP), I recommend starting with the following blog posts:
- MCP using C# SDK: Create Your First Local MCP Server in VS Code
- [Step by Step] Using GitHub MCP Server with Copilot Agent in VS Code
What is Dataverse MCP Server:
- The Model Context Protocol (MCP) is an open protocol that enables seamless integration between LLM applications and external data sources and tools.
- Microsoft Dataverse can act as an MCP server, providing intelligent access to tables and records to various MCP clients like Copilot Studio agents, VS Code GitHub Copilot, Claude desktop, and many others.
In this article, lets learn, how to set up and use the Dataverse MCP server with Visual Studio Code (VS Code) GitHub Copilot as the MCP client
Prerequisites:
Before you begin, make sure you have the following in place:
- Tenant ID (GUID)
- A Dataverse Connection and the URL
- VS Code
Let’s Start by Setting Up the Prerequisites
Before we begin working with the Dataverse MCP server in VS Code, let’s get the required details in place.
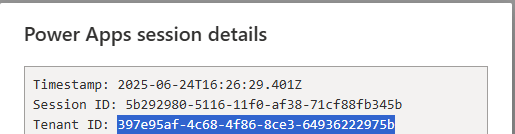
Get Tenant ID:
- Go to https://make.powerapps.com.
- Select Settings (gear icon) on the top right, and then select Session details.
- Copy the value of the Tenant ID from the Power Apps session details. Make a note of this GUID because it’s used in the configuration steps later.
- Refer this blog post for steps to fetch the Tenant ID.
Next get the Dataverse Connection URL.
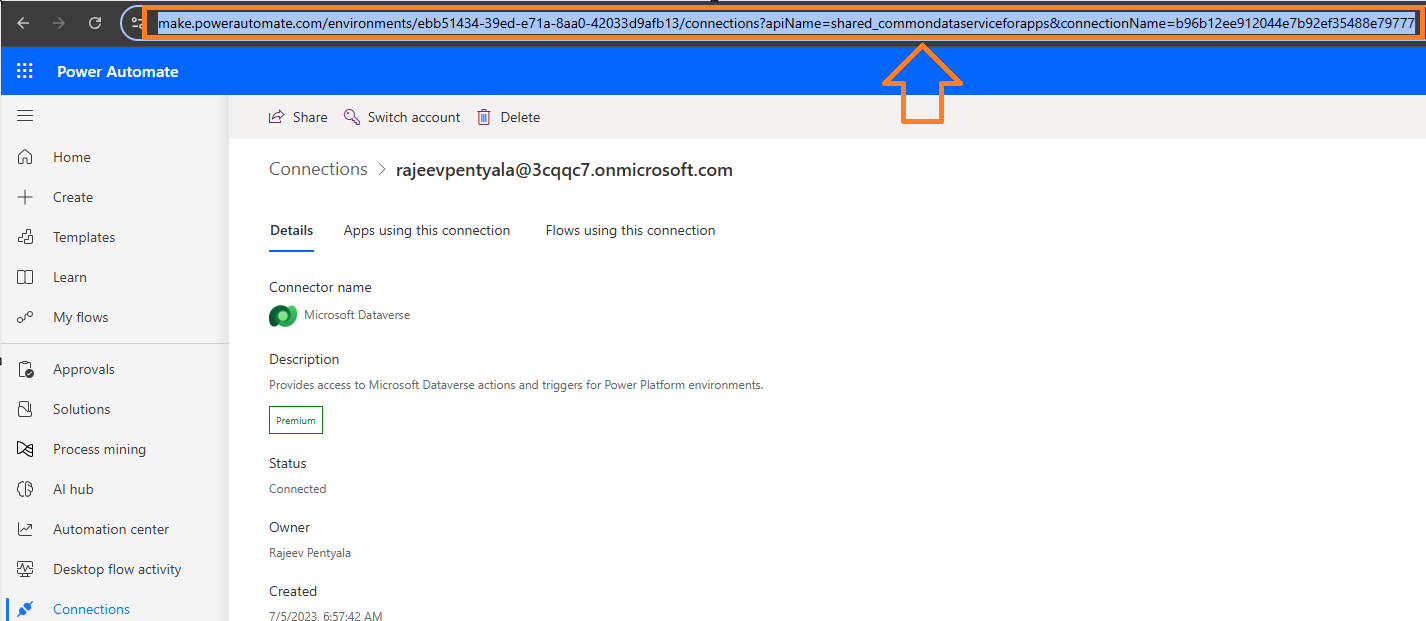
Dataverse Connection URL:
Dataverse MCP server requires the URL of a Dataverse connection in a specific format. Follow these steps to get the URL:
- Connect to Power Automate Portal
- Select Connections on the left navigation pane
- Create a new Connection or open an existing Dataverse Connection.

- Note the user name in the connection Name, this should be the same name that you used to create the environment earlier.
- Select the connection to open it and copy the entire URL from the browser and save it. You need this URL for VS Code MCP configuration.
Now that we’ve covered the prerequisites, lets proceed with installation of Dataverse MCP server local proxy and testing it with the prompts.
Install the Dataverse MCP server local proxy:
We need to install the Dataverse MCP server local proxy that is used by the MCP client, such as VS Code GitHub Copilot by following below steps.
- Open the Command Prompt
- Install the .NET SDK 8.0 using following command
winget install Microsoft.DotNet.SDK.8

- Install the Microsoft.PowerPlatform.Dataverse.MCP local proxy using following command:
dotnet tool install --global --add-source https://api.nuget.org/v3/index.json Microsoft.PowerPlatform.Dataverse.MCP

Configure and use your MCP client with VS Code
- Open the VSCode
- Create a new JSON file under .vscode folder and name it as mcp.json file
- Please refer MCP using C# SDK: Create Your First Local MCP Server in VS Code blog post if you are a beginner.

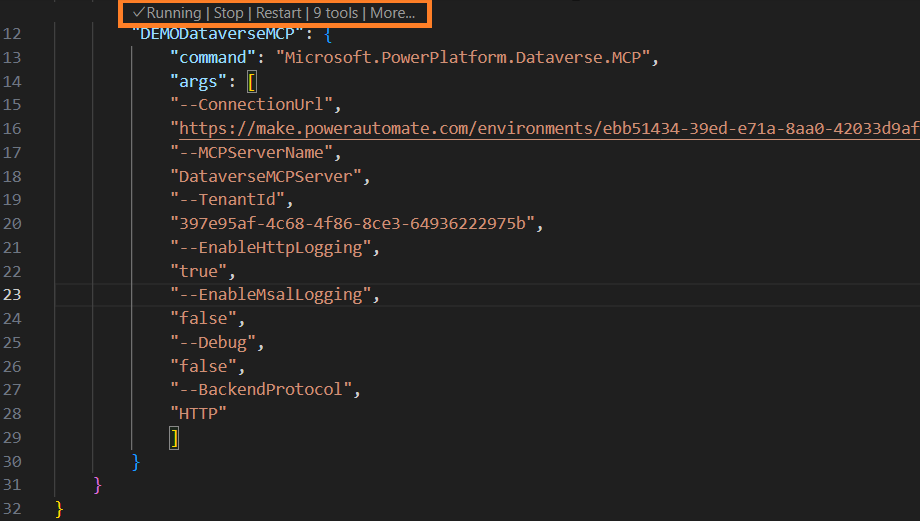
- Copy and Paste the following JSON content.
- Replace the following parameters with your details:
- –ConnectionUrl : The Dataverse Connection URL you copied previously from make.powerautomate.com
- –TenantId : GUID you copied from Tenant ID value of Settings at make.powerapps.com
{
    "servers": {
        "DEMODataverseMCP": {
            "command": "Microsoft.PowerPlatform.Dataverse.MCP",
            "args": [
            "--ConnectionUrl",
            "https://make.powerautomate.com/environments/ebb51434-39ed-e71a-8aa0-42033d9afb13/connections?apiName=shared_commondataserviceforapps&connectionName=b96b12ee912044e7b92ef35488e79777",
            "--MCPServerName",
            "DataverseMCPServer",
            "--TenantId",
            "397e95af-4c68-4f86-8ce3-64936222975b",
            "--EnableHttpLogging",
            "true",
            "--EnableMsalLogging",
            "false",
            "--Debug",
            "false",
            "--BackendProtocol",
            "HTTP"
            ]
        }
    }
}

- Save the file
- When the MCP server is configured correctly in mcp.json, you notice a status like Start. This means that syntactically, it’s correct and you can start the MCP server.
- Click Start which opens the Sign in popup.
- Complete the Sign in process.

- Status turns in to Running.
We’ve successfully completed the Dataverse MCP server setup, and you can now start interacting with it using natural language prompts.
Interact with Dataverse MCP server in VS Code GitHub Copilot
- In VS Code, open GitHub Copilot in Agent mode. Use CTRL+ALT+I to launch GitHub Copilot chat in VS Code.
- Click on Tools icon as shown below which opens List of tools available in Dataverse MCP server

- I prompted List me contact records where name starts with ‘R’
- GitHub Copilot routes this request to the Dataverse MCP server, which then triggers the
read_querytool to retrieve the data.

- Click Continue to get the response.

- You can also try other prompts like the examples below:

Tip:
If you have other MCP servers registered with GitHub Copilot, there are a few ways to help MCP Client to choose the appropriate MCP Server. Examples:
- Add “in Dataverse” to your prompt to be specific about which MCP server you’d like to use for your question, or
- At the beginning of the session, you can say “Use
<insert your MCP server name>for this session”.
Refer Connect to Dataverse with model context protocol article for more details.
🙂


Leave a comment