In this article, lets learn how to create a Custom API and trigger using Power Automate Cloud Flow along with Error Handling from a Canvas App.
What is a Custom API:
- Using Custom APIs we can create our own APIs in Dataverse.
- We can consolidate one or more operations into a Custom API which can called from either code or from Power Automate.
- For example, you can create a Custom API called “OnBoardNewCustomer’, where you can have following operations.
- Create a new ‘Account’ record.
- Create a new ‘Appointment’ record scheduled a week from now.
- Send an Email notification.
Now lets get started with Custom API creation. I am going to use ‘Onboard Customer’ scenario to explain the Custom API creation. I will be using 2 operation in my Custom API.
- Create an Account record by reading ‘Name’ as input parameter.
- Create an Appointment record for the newly created Account and schedule at 7 days from now.
Create a Custom API:
There are several ways you can create a custom API documented here. In this article, I will be taking 2 step approach.
- Write a C# plugin class file with logic and register using Plugin Registration Tool (PRT).
- Create a Custom API using forms from Power Apps Maker portal and link the plugin created in previous step.
Steps to create Custom API in plugin class and register using PRT:
- Open Visual Studio and create a plug-in project as detailed in this document here.
- Add an .snk file to the project.
- Create a new plugin class file with logic to create Account and Customer.
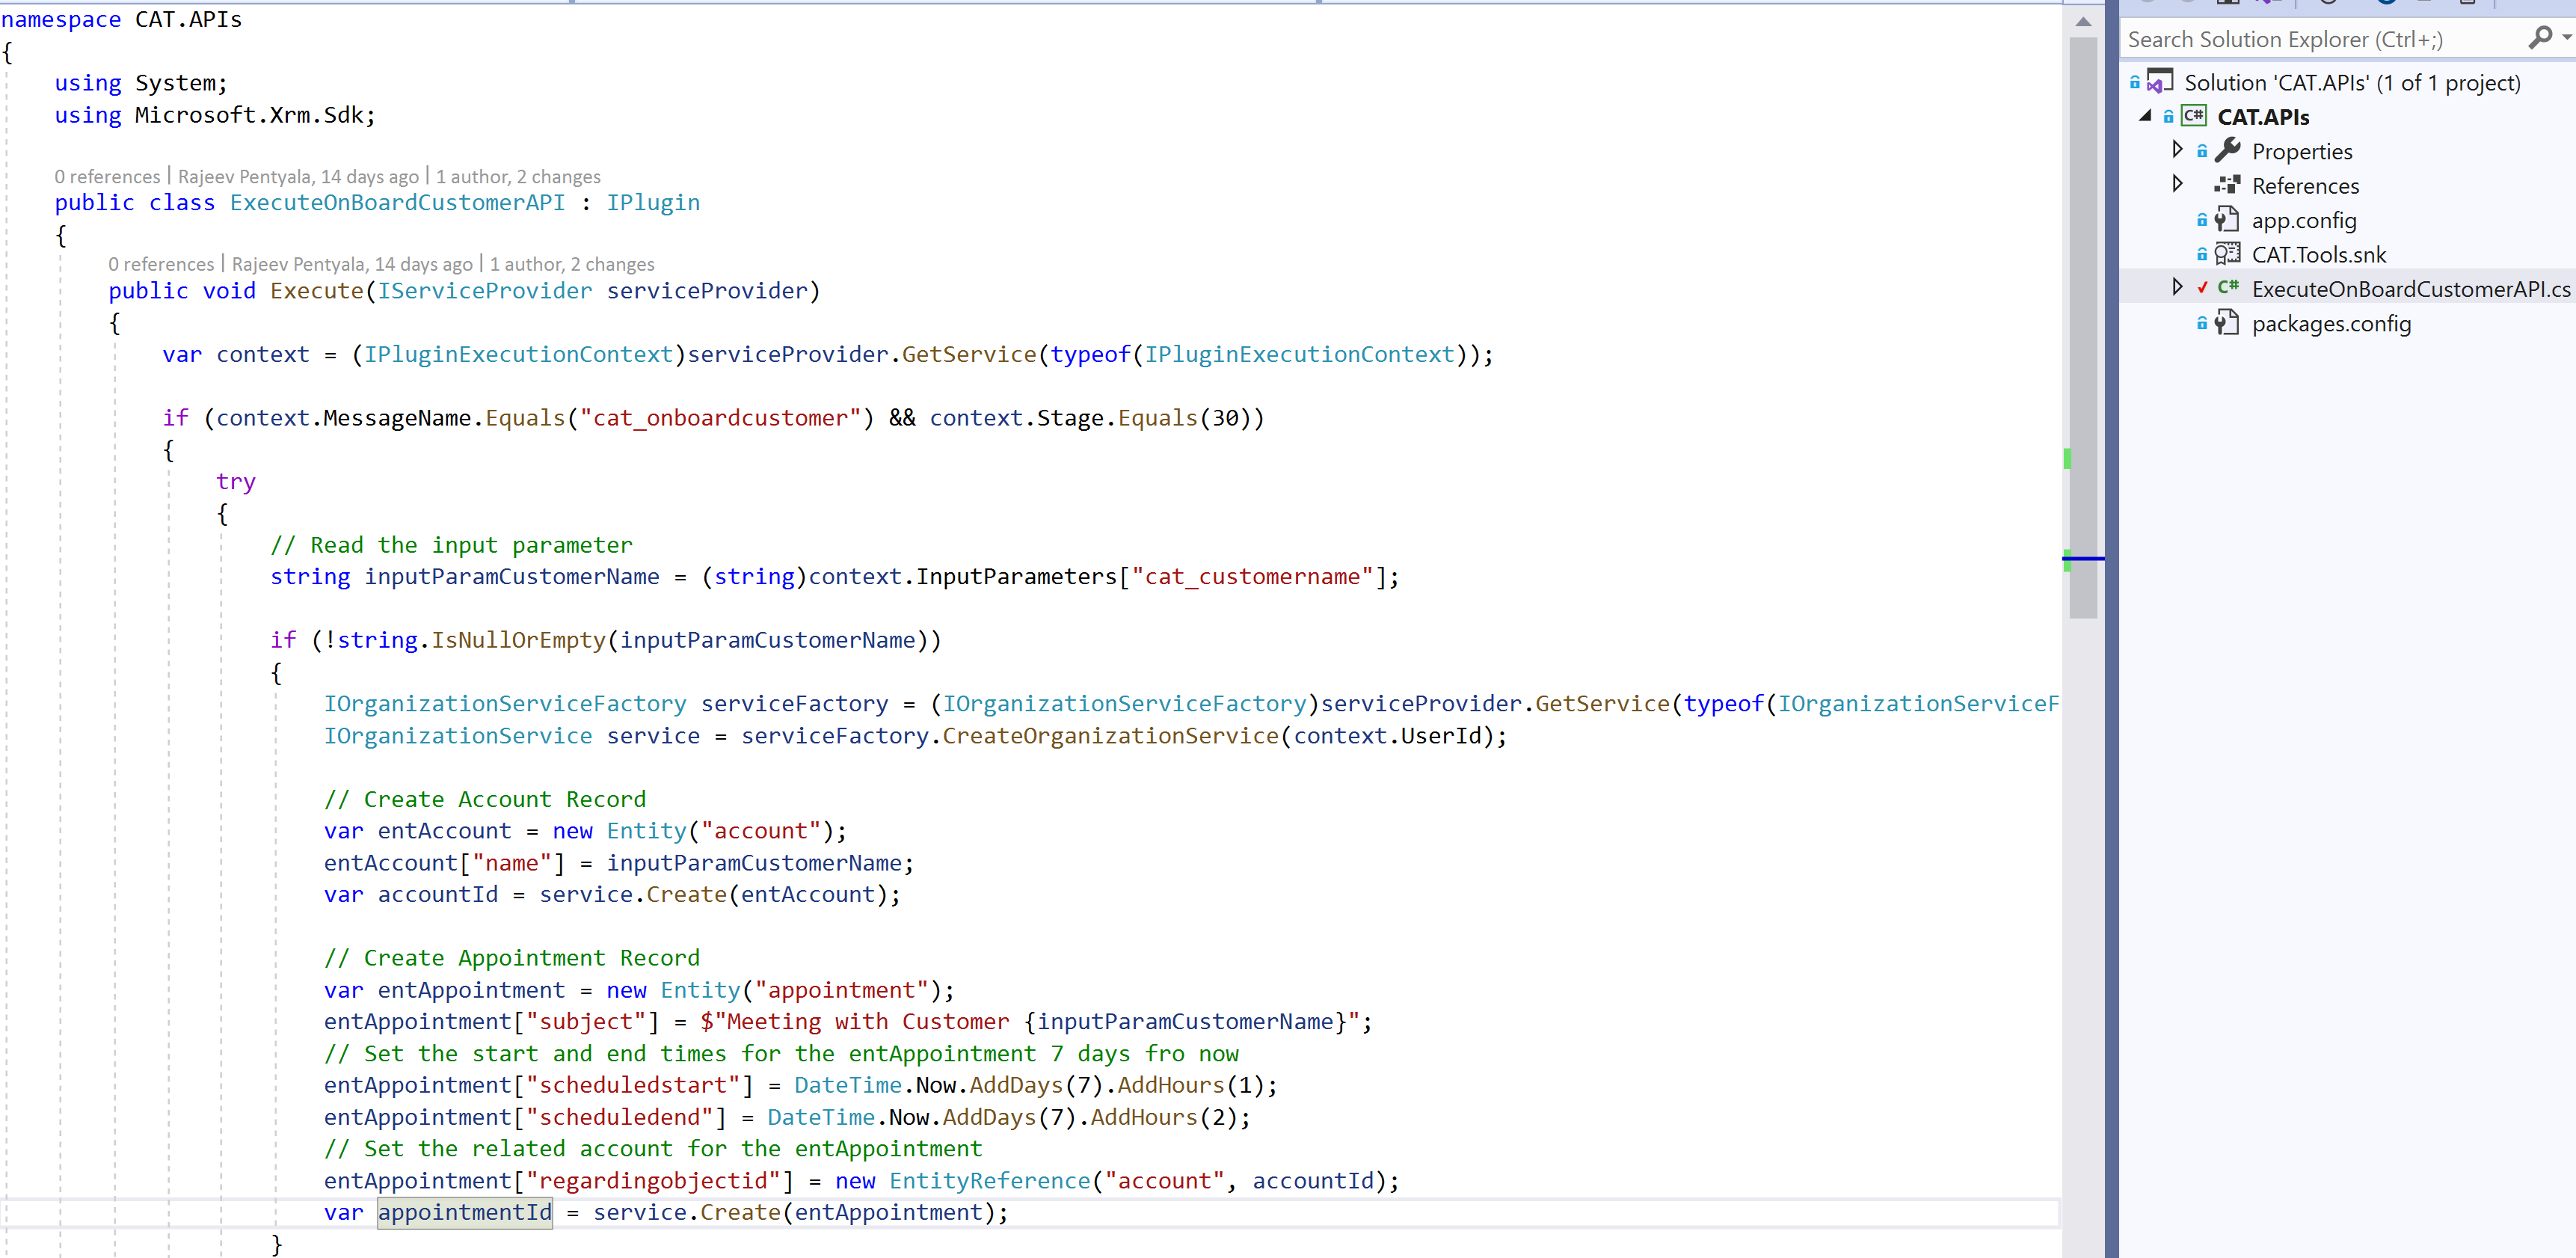
- Final code in the class file looks as below.
        public void Execute(IServiceProvider serviceProvider)
        {
            var context = (IPluginExecutionContext)serviceProvider.GetService(typeof(IPluginExecutionContext));

            if (context.MessageName.Equals("cat_onboardcustomer") && context.Stage.Equals(30))
            {
                try
                {
                    // Read the input parameter
                    string inputParamCustomerName = (string)context.InputParameters["cat_customername"];

                    if (!string.IsNullOrEmpty(inputParamCustomerName))
                    {
                        IOrganizationServiceFactory serviceFactory = (IOrganizationServiceFactory)serviceProvider.GetService(typeof(IOrganizationServiceFactory));
                        IOrganizationService service = serviceFactory.CreateOrganizationService(context.UserId);

                        // Create Account Record
                        var entAccount = new Entity("account");
                        entAccount["name"] = inputParamCustomerName;
                        var accountId = service.Create(entAccount);

                        // Create Appointment Record
                        var entAppointment = new Entity("appointment");
                        entAppointment["subject"] = $"Meeting with Customer {inputParamCustomerName}";
                        // Set the start and end times for the entAppointment 7 days fro now
                        entAppointment["scheduledstart"] = DateTime.Now.AddDays(7).AddHours(1);
                        entAppointment["scheduledend"] = DateTime.Now.AddDays(7).AddHours(2);
                        // Set the related account for the entAppointment
                        entAppointment["regardingobjectid"] = new EntityReference("account", accountId);
                        var appointmentId = service.Create(entAppointment);
                    }
                }
                catch (Exception ex)
                {
                    throw new InvalidPluginExecutionException("An error occurred in cat_onboardcustomer.", ex);
                }
            }
        }
- Build the project and register the plugin assembly using PRT.
- Post registration it should look as below from PRT.

Now that we completed the step 1 of creating and registering plug-in class file. Lets proceed with step 2 where we will create a Custom API entry.
Create a Custom API using forms from Power Apps Maker portal:
- Connect to Power Apps maker portal.
- Create a new solution or open any existing solution.
- Click on New -> More -> Other -> Custom API

- It opens up a new ‘Custom API’ form and fill the details.
- To understand the columns in depth, refer here.
- What is important for this example are:
- Unique Name : Unique name for the custom API. (Its cat_onboardcustomer we used in our plug-in class)
- Name : The primary name of the custom API.
- Plugin Type : Plugin we registered in previous section.

- Save and Close.
- As we need to pass a parameter to our ‘Custom API’, next add a new ‘Custom API Request Parameter’.

- Fill the details by selecting ‘Custom API’ we created in previous step and ‘Unique Name’ as cat_customername, which we used in our plugin class.

- Save and Close.
With this we successfully created ‘Custom API’ along with an input parameter. Lets see how to trigger API using Power Automate Cloud Flow from a Canvas App.
Steps to trigger Custom API from Canvas App:
- Create a new Canvas App.
- Go to Flows tab and click on ‘Create new flow’ and choose ‘Create from blank’.

- In the flow designer, add ‘Initialize Variable’ action and rename to ‘varCustomerName’. In the ‘Value’ select ‘Ask in PowerApps’.
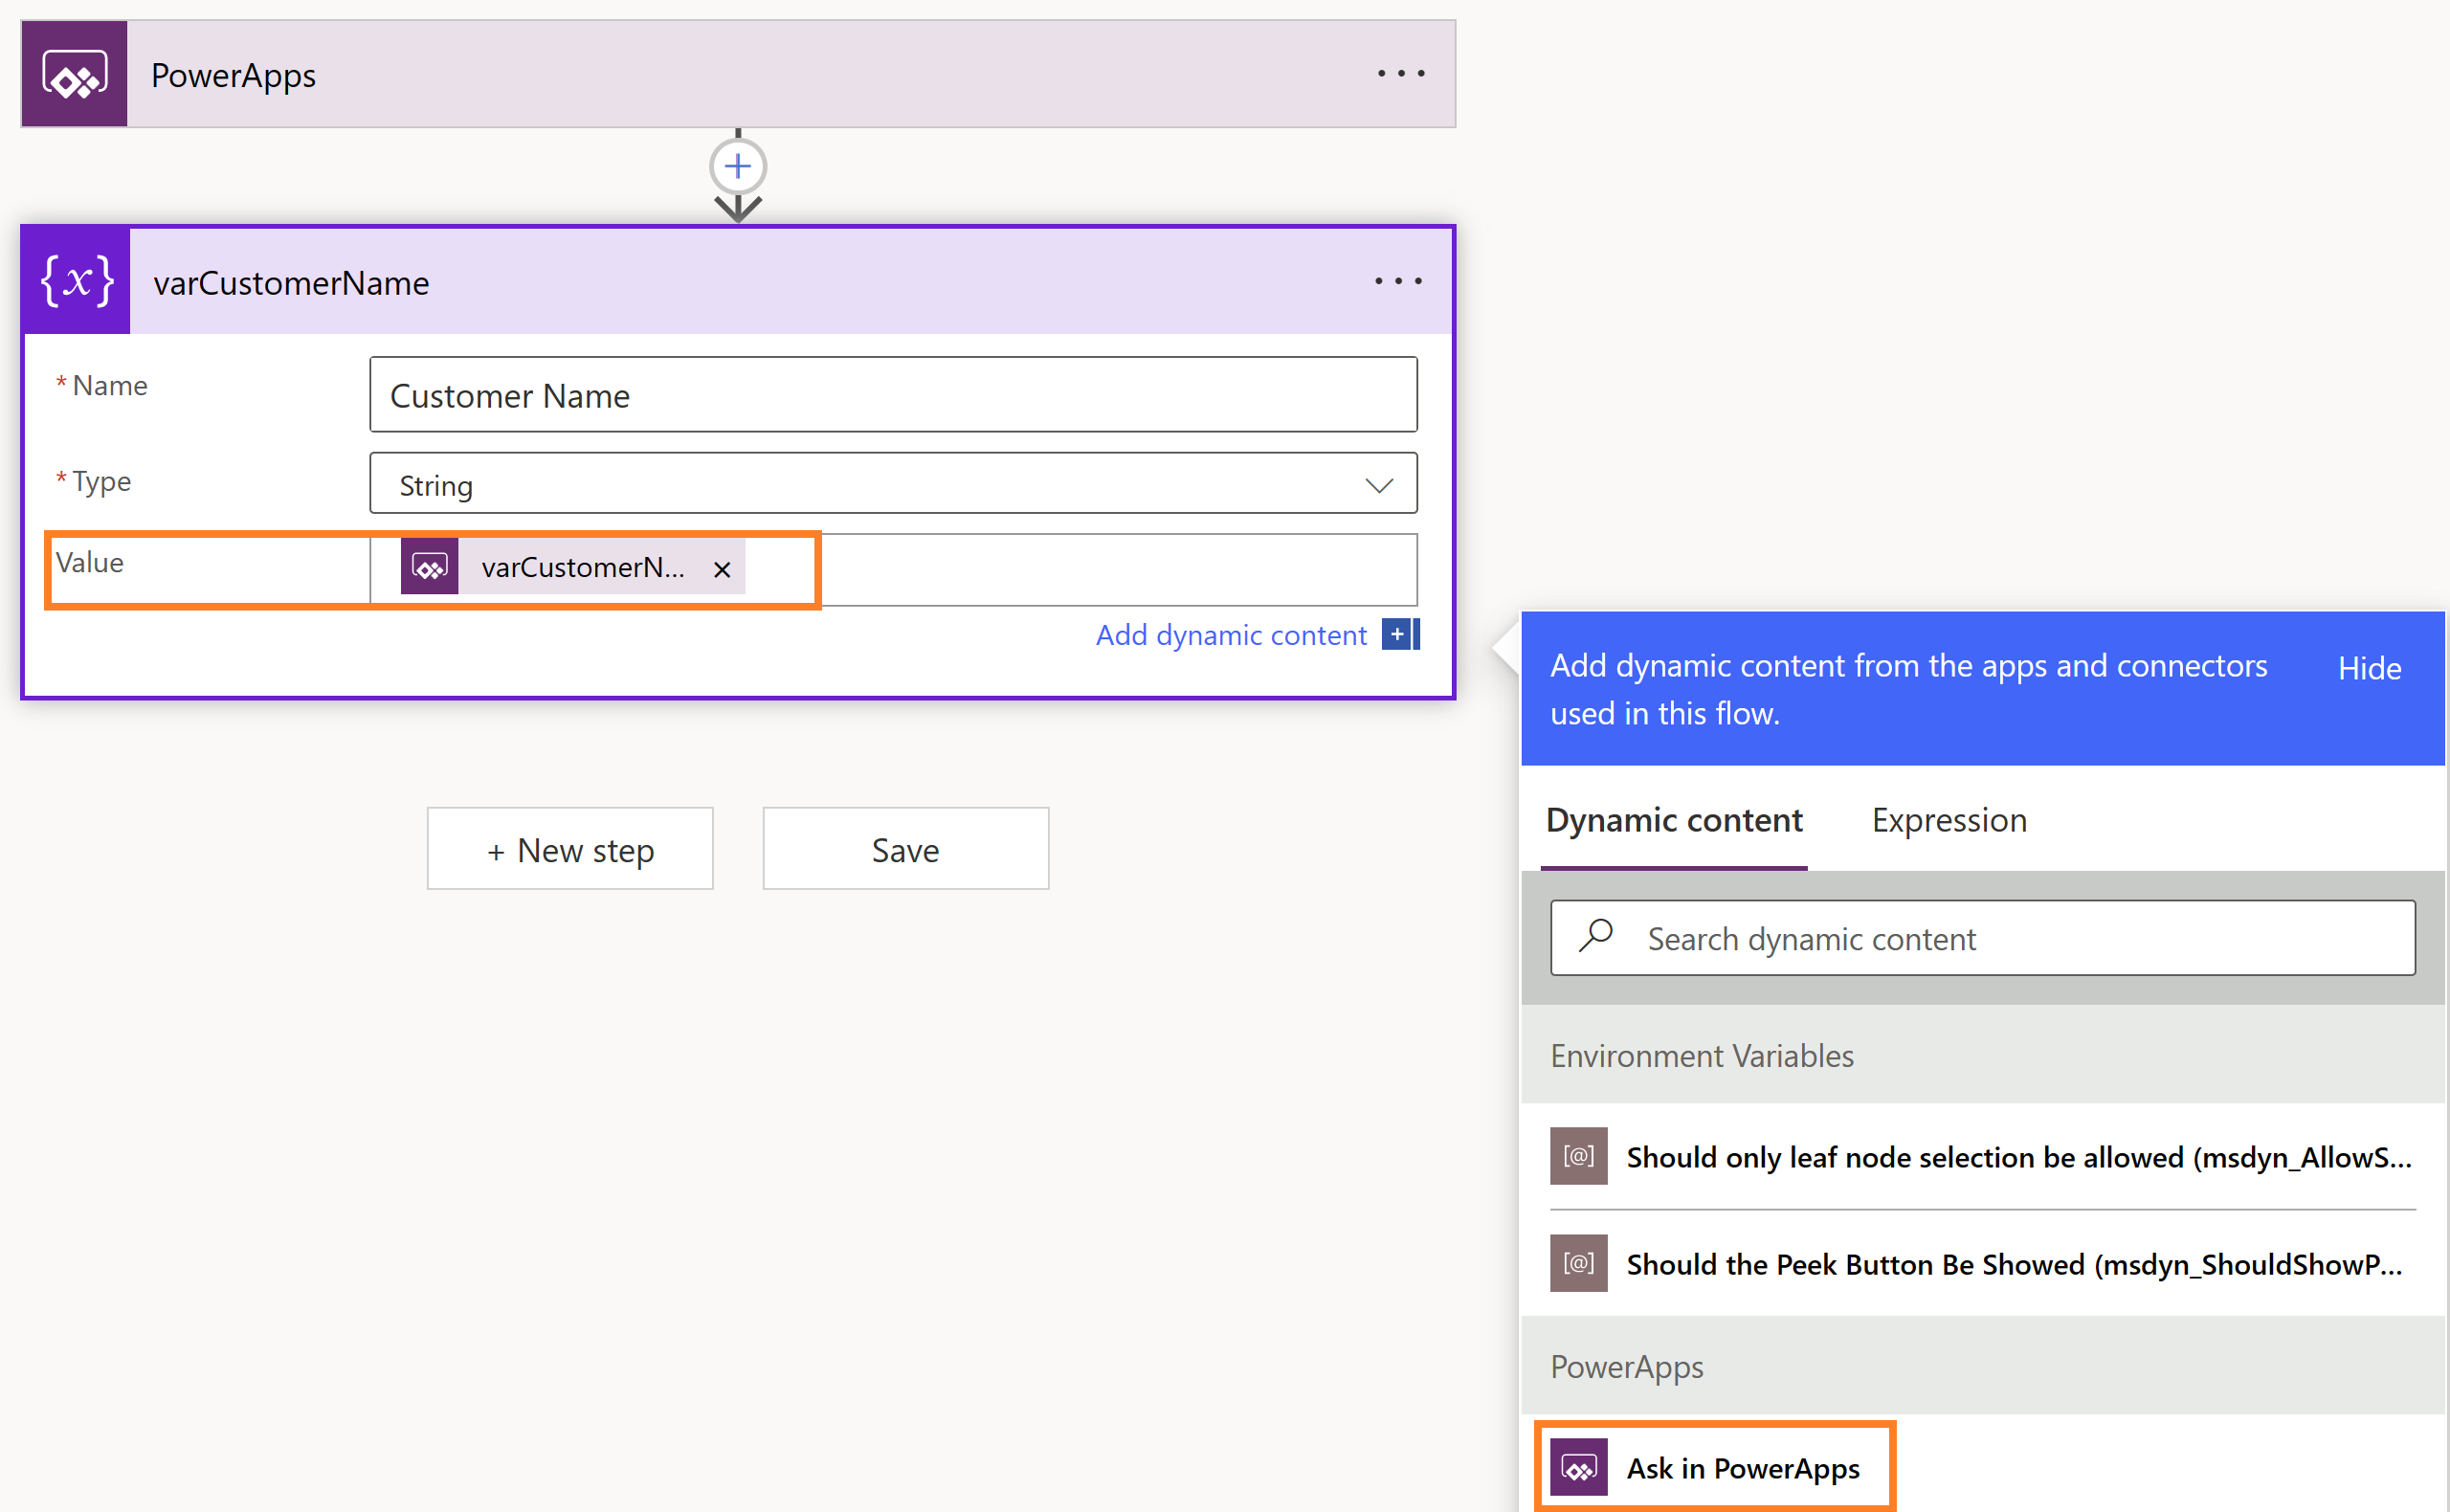
- Next add Dataverse ‘Perform an unbound action‘ action which helps us to trigger our ‘Global’ custom API.
- Select ‘Action Name’ as our Custom API name cat_onboardcustomer
- In the cat_customername pass ‘Customer Name’ which was the variable declared in above step.

- If you dont want exception handling, you can save the flow which can trigger the cat_onboardcustomer.
Exception Handling:
Lets learn a basic error handling. Please note that you can use ‘Scope’ for more complex scenarios but for basic exception handling following process should suffice.
- Add another ‘Initialize Variable’ action and rename it to ‘varExceptionDetails’ and set Type as ‘String’.
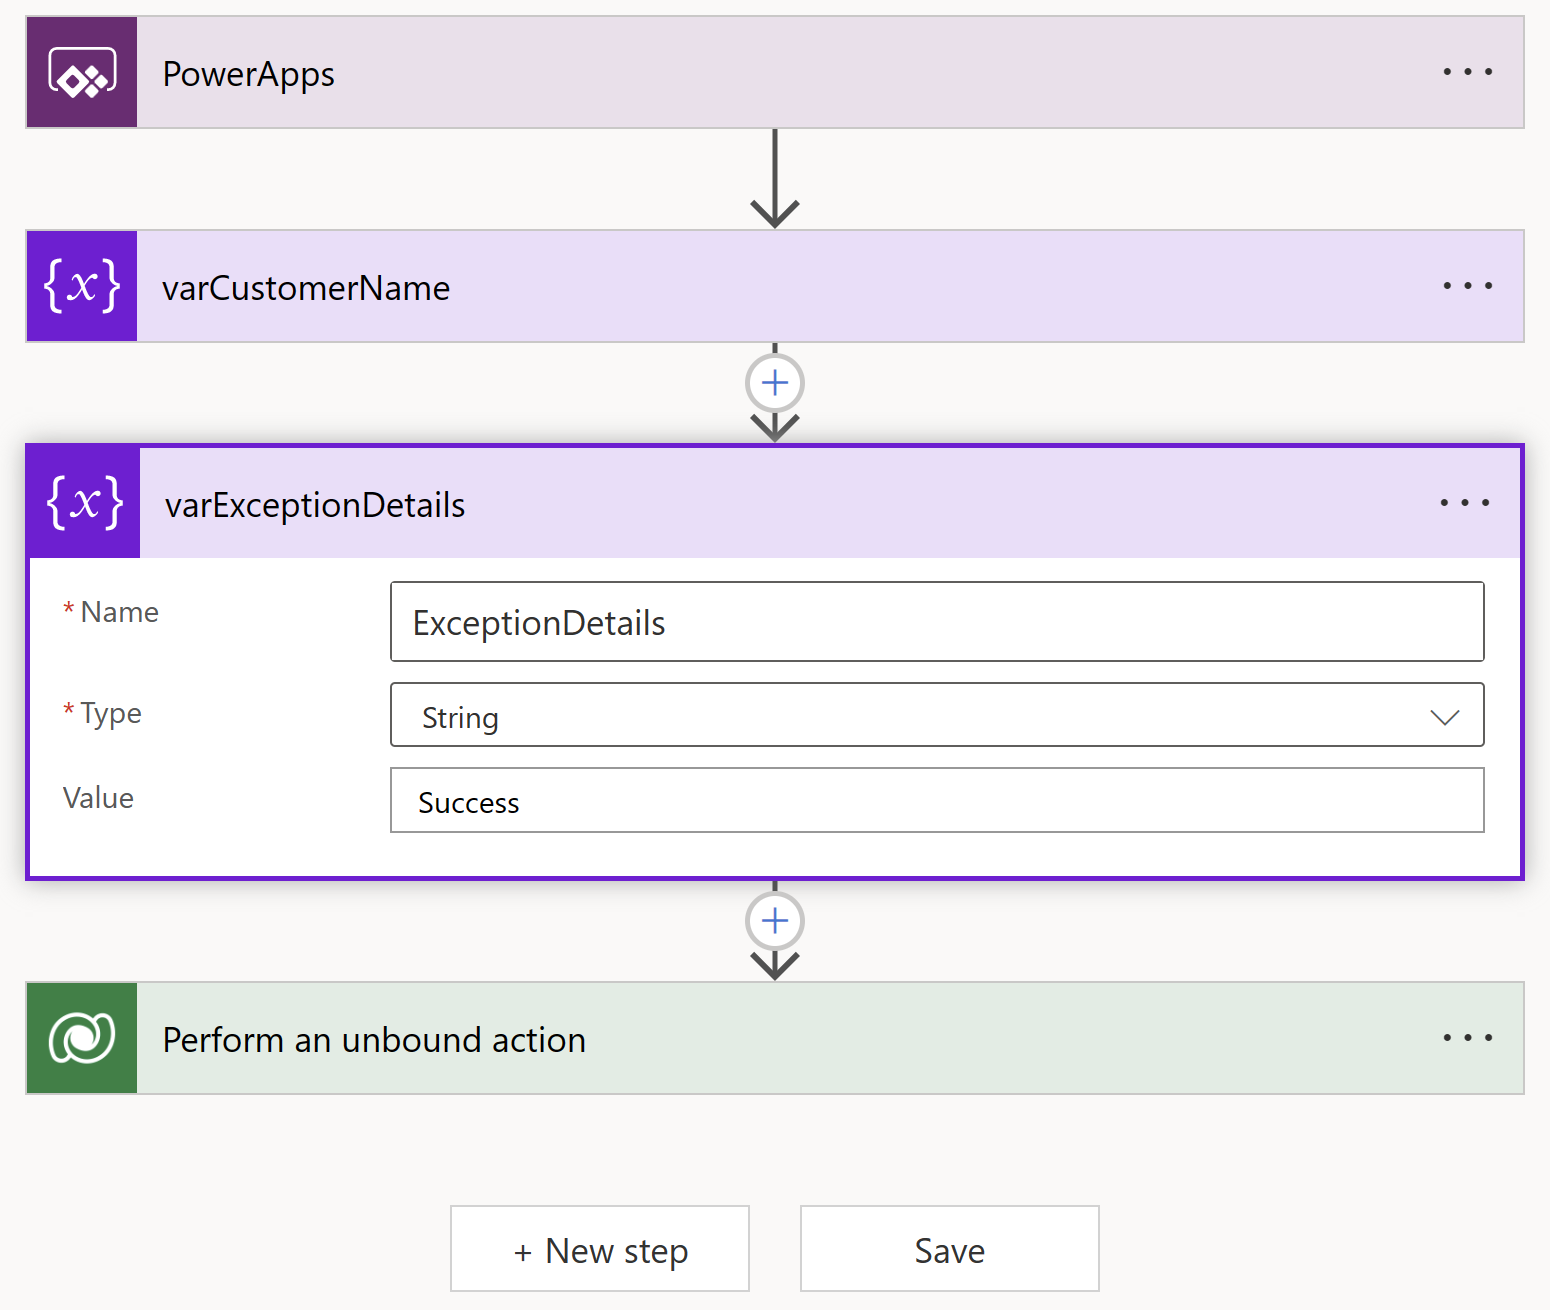
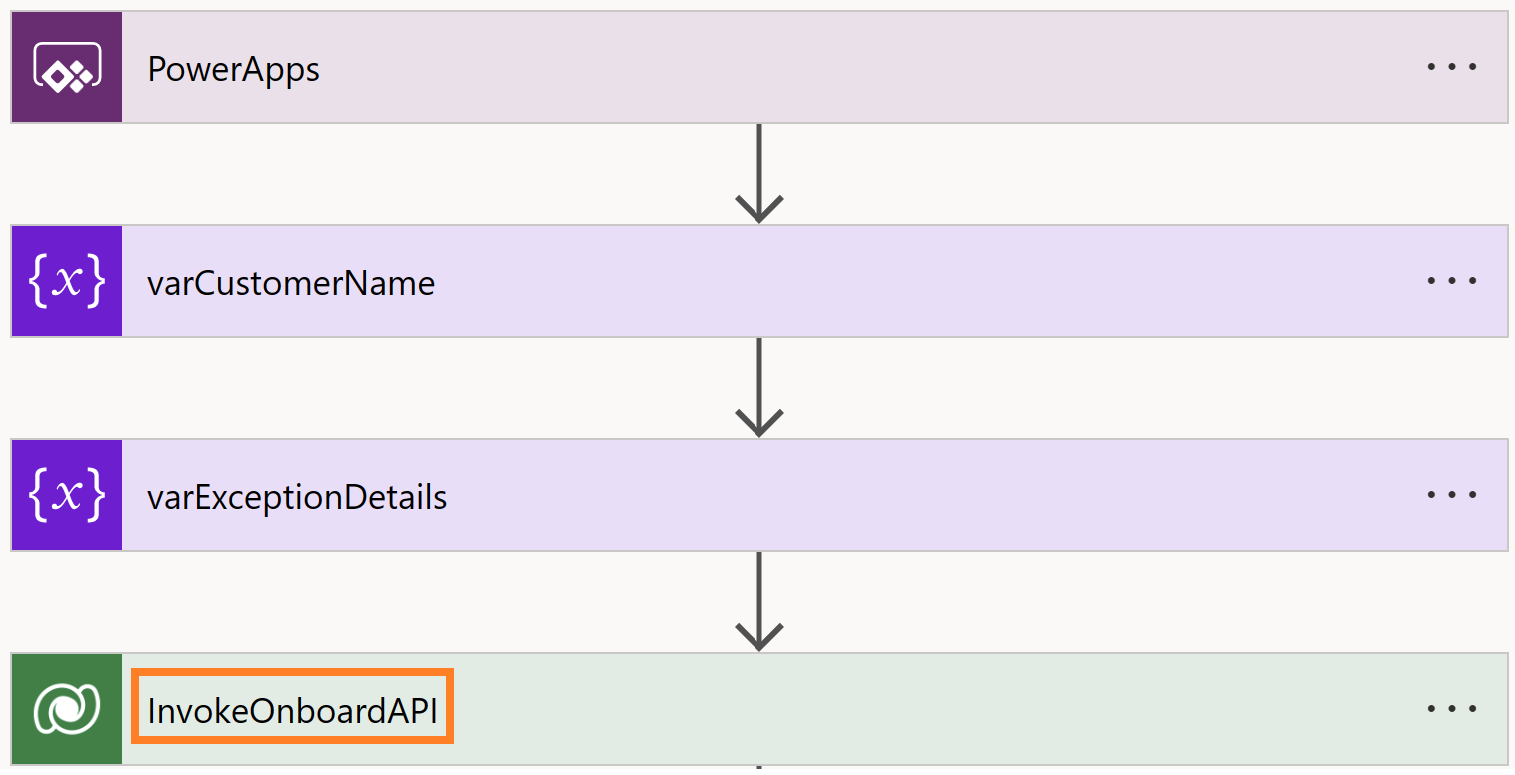
- Rename the ‘Perform an unbound action’ to ‘InvokeOnboardAPI’
- Add a ‘Set Variable’ action ‘setExceptionDetails’ to capture the exception.
- Select the Name as ‘ExceptionDetails‘ and click on ‘Configure run after’. (This is needed as we want this ‘setExceptionDetails’ to execute even the above ‘InvokeOnboardAPI’ action fails or timeout.
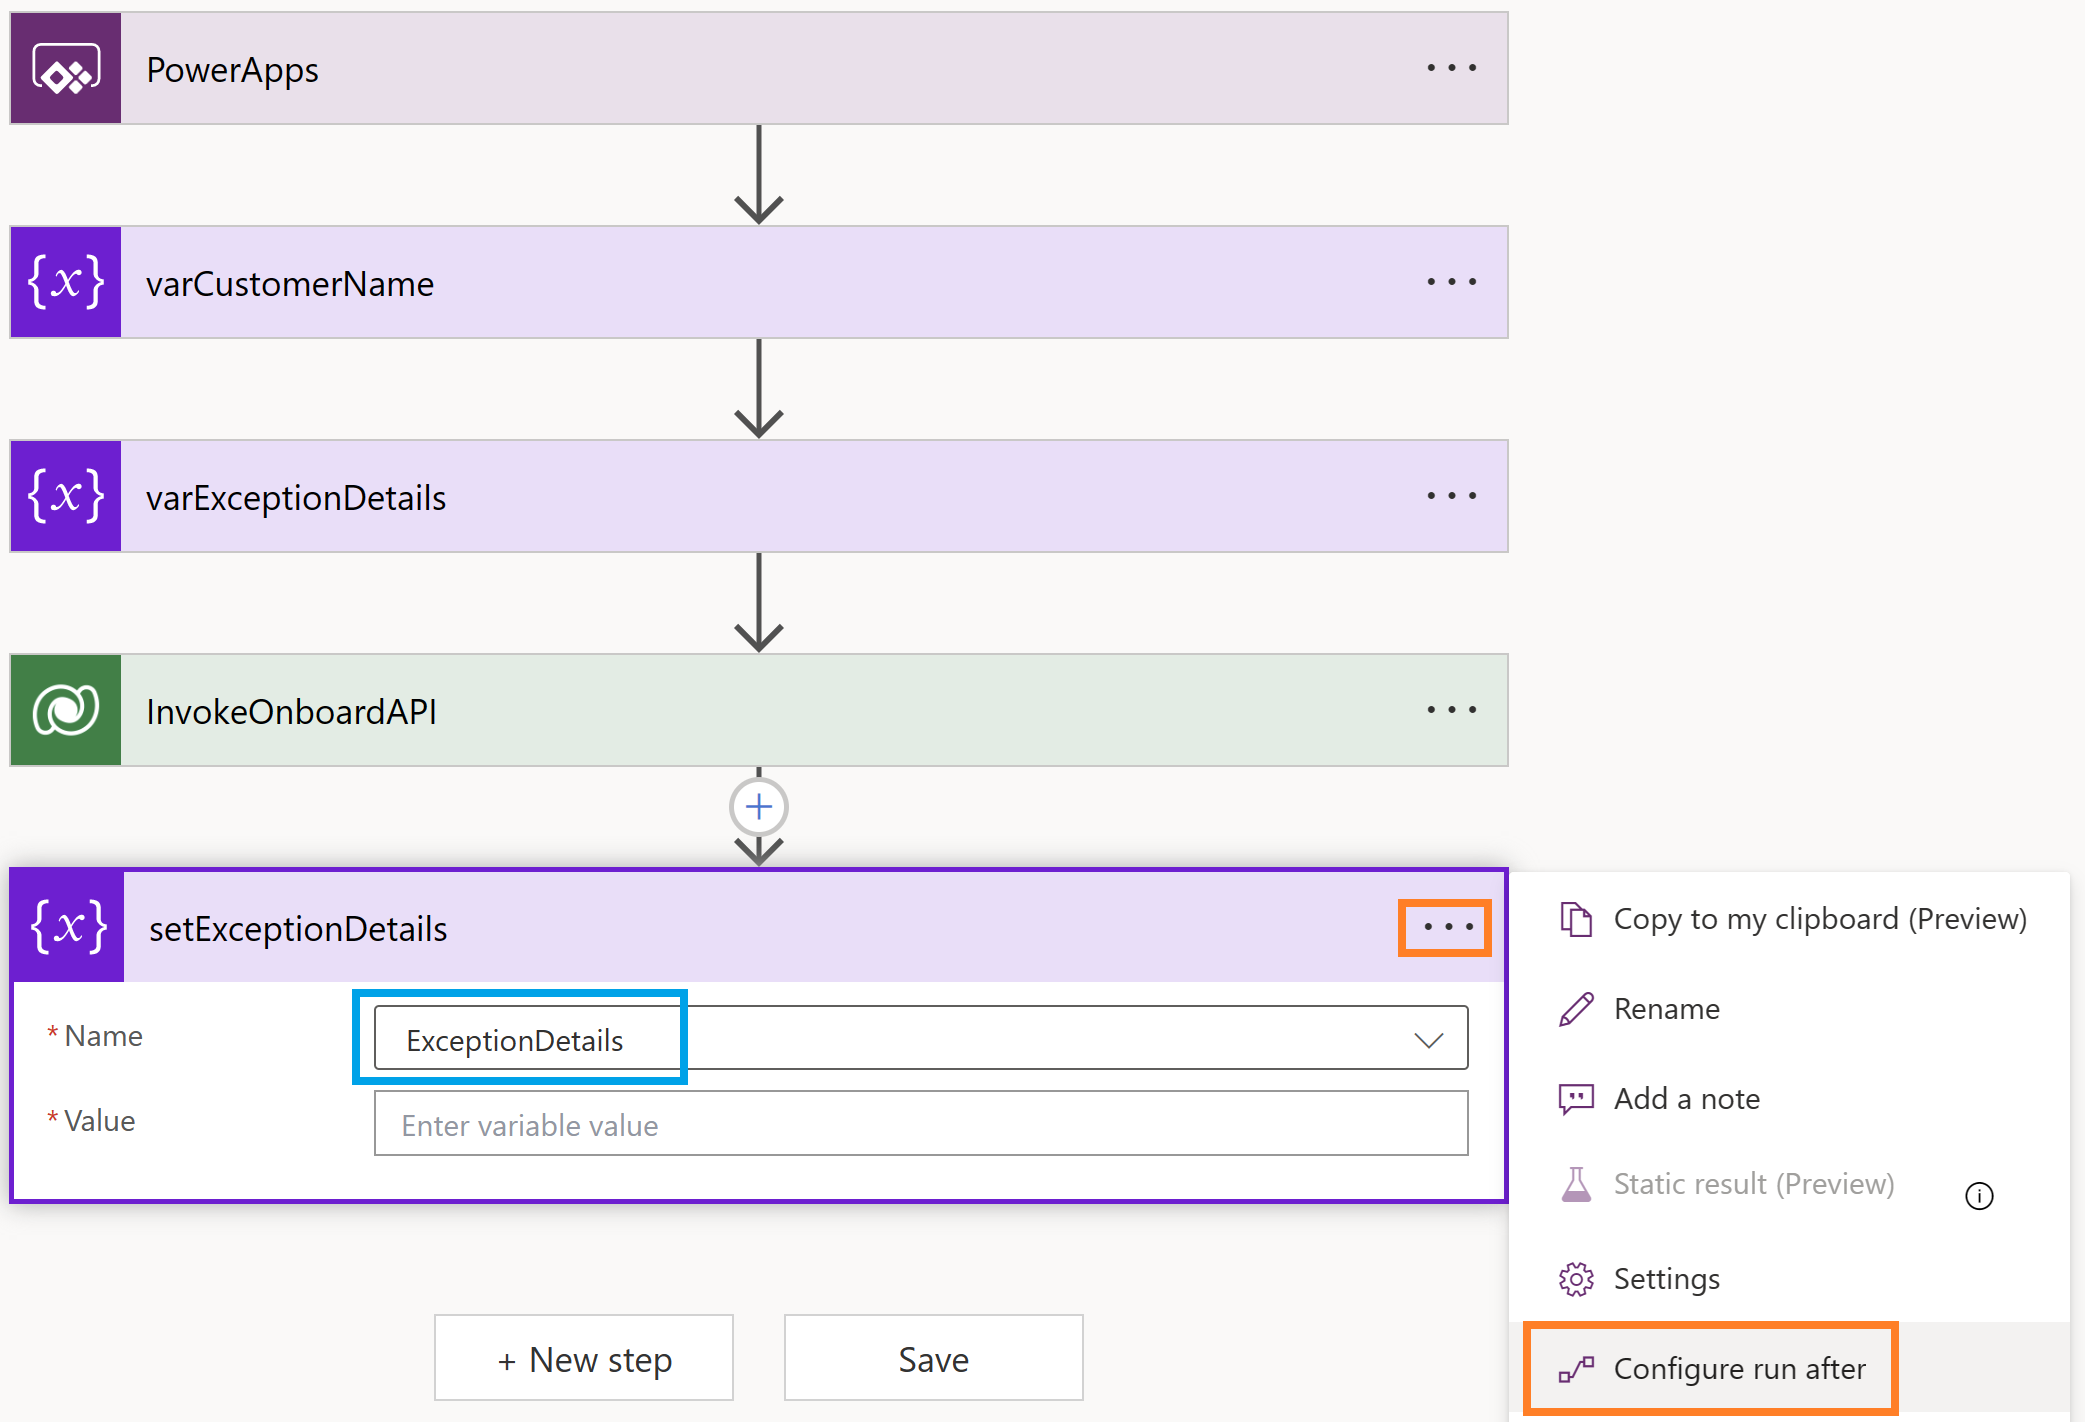
- Select following options.
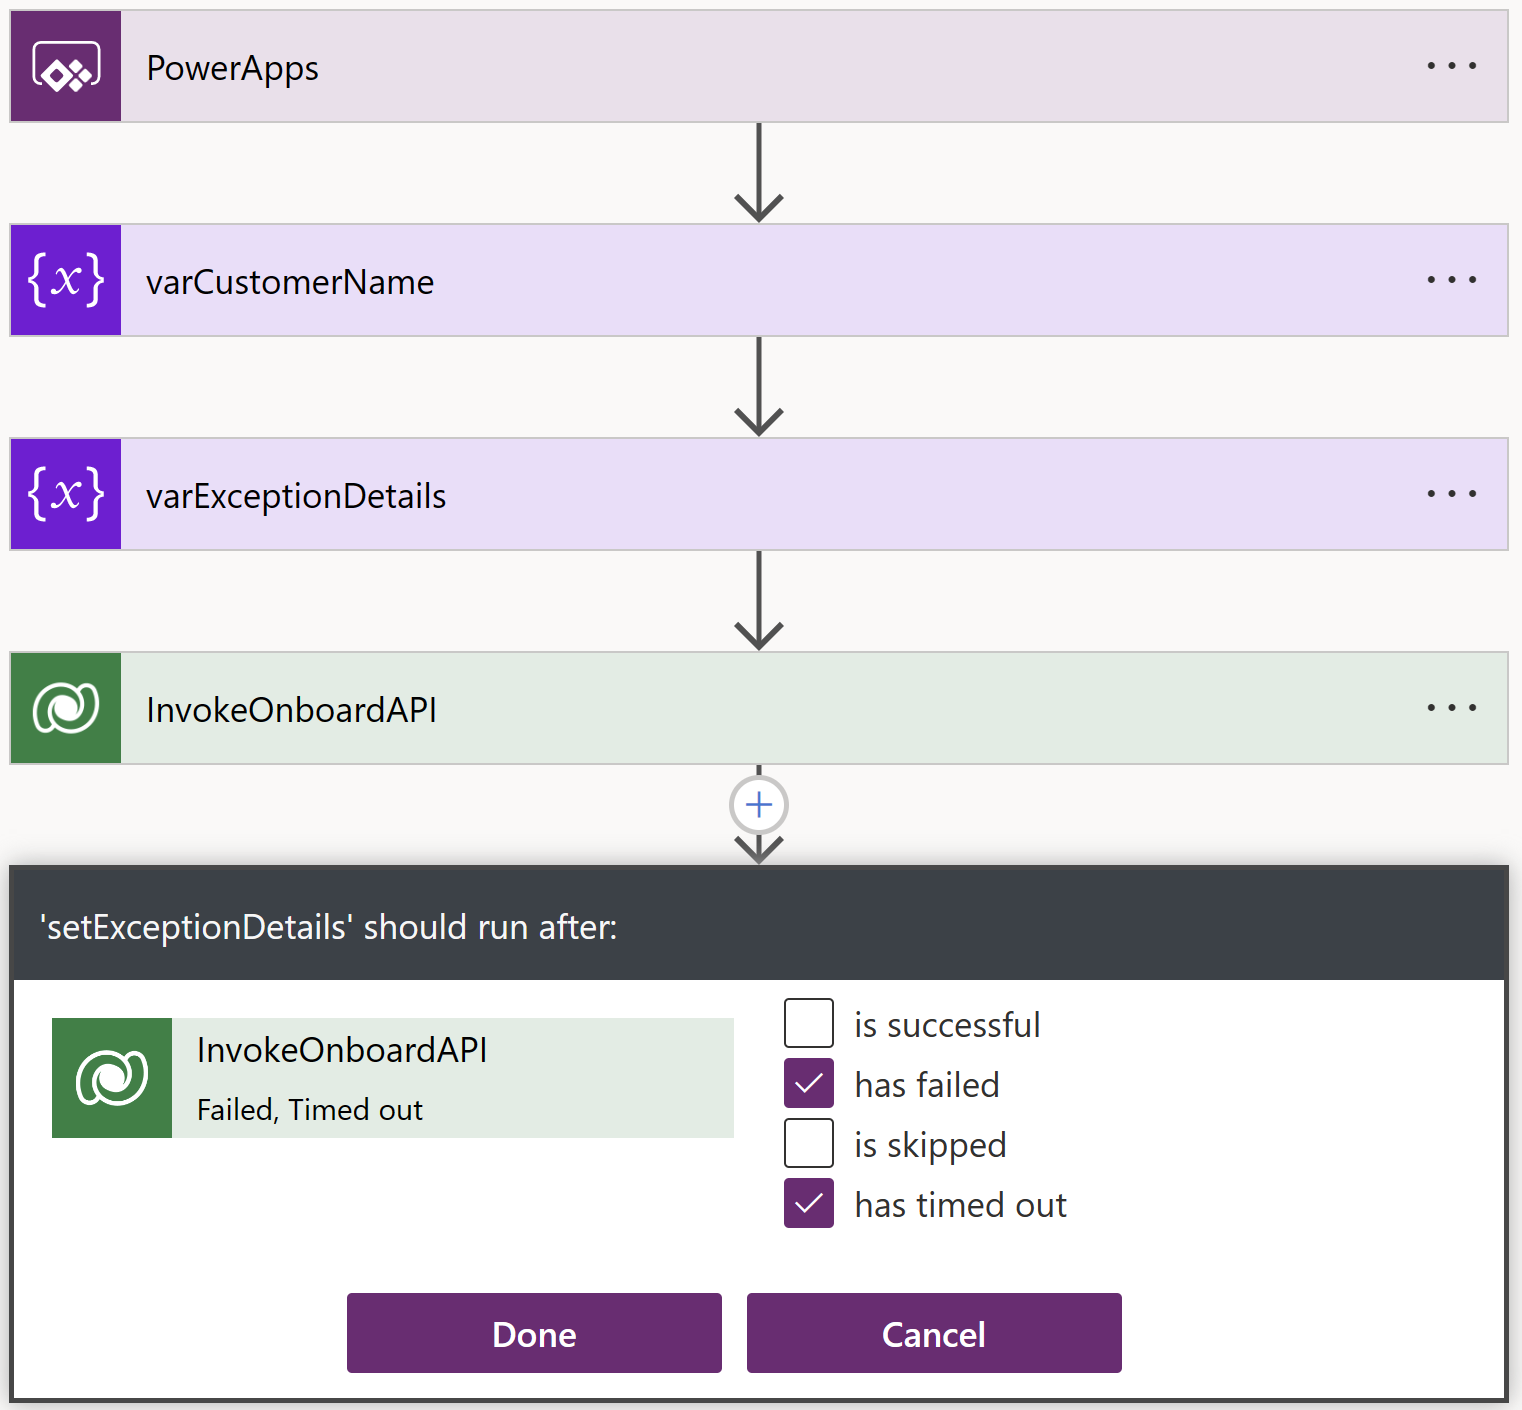
- In the ‘Value’ select ‘Expression’ and paste following expression.
- actions(‘InvokeOnboardAPI’)?[‘outputs’]?[‘body’]?[‘error’]

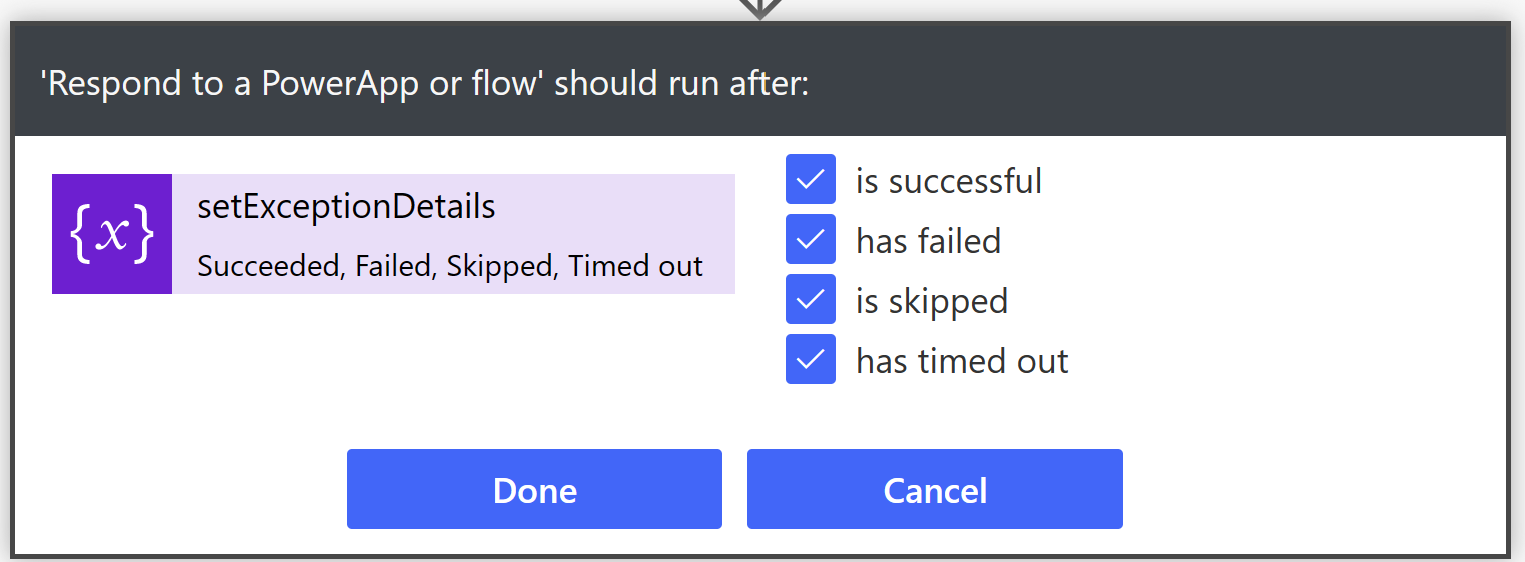
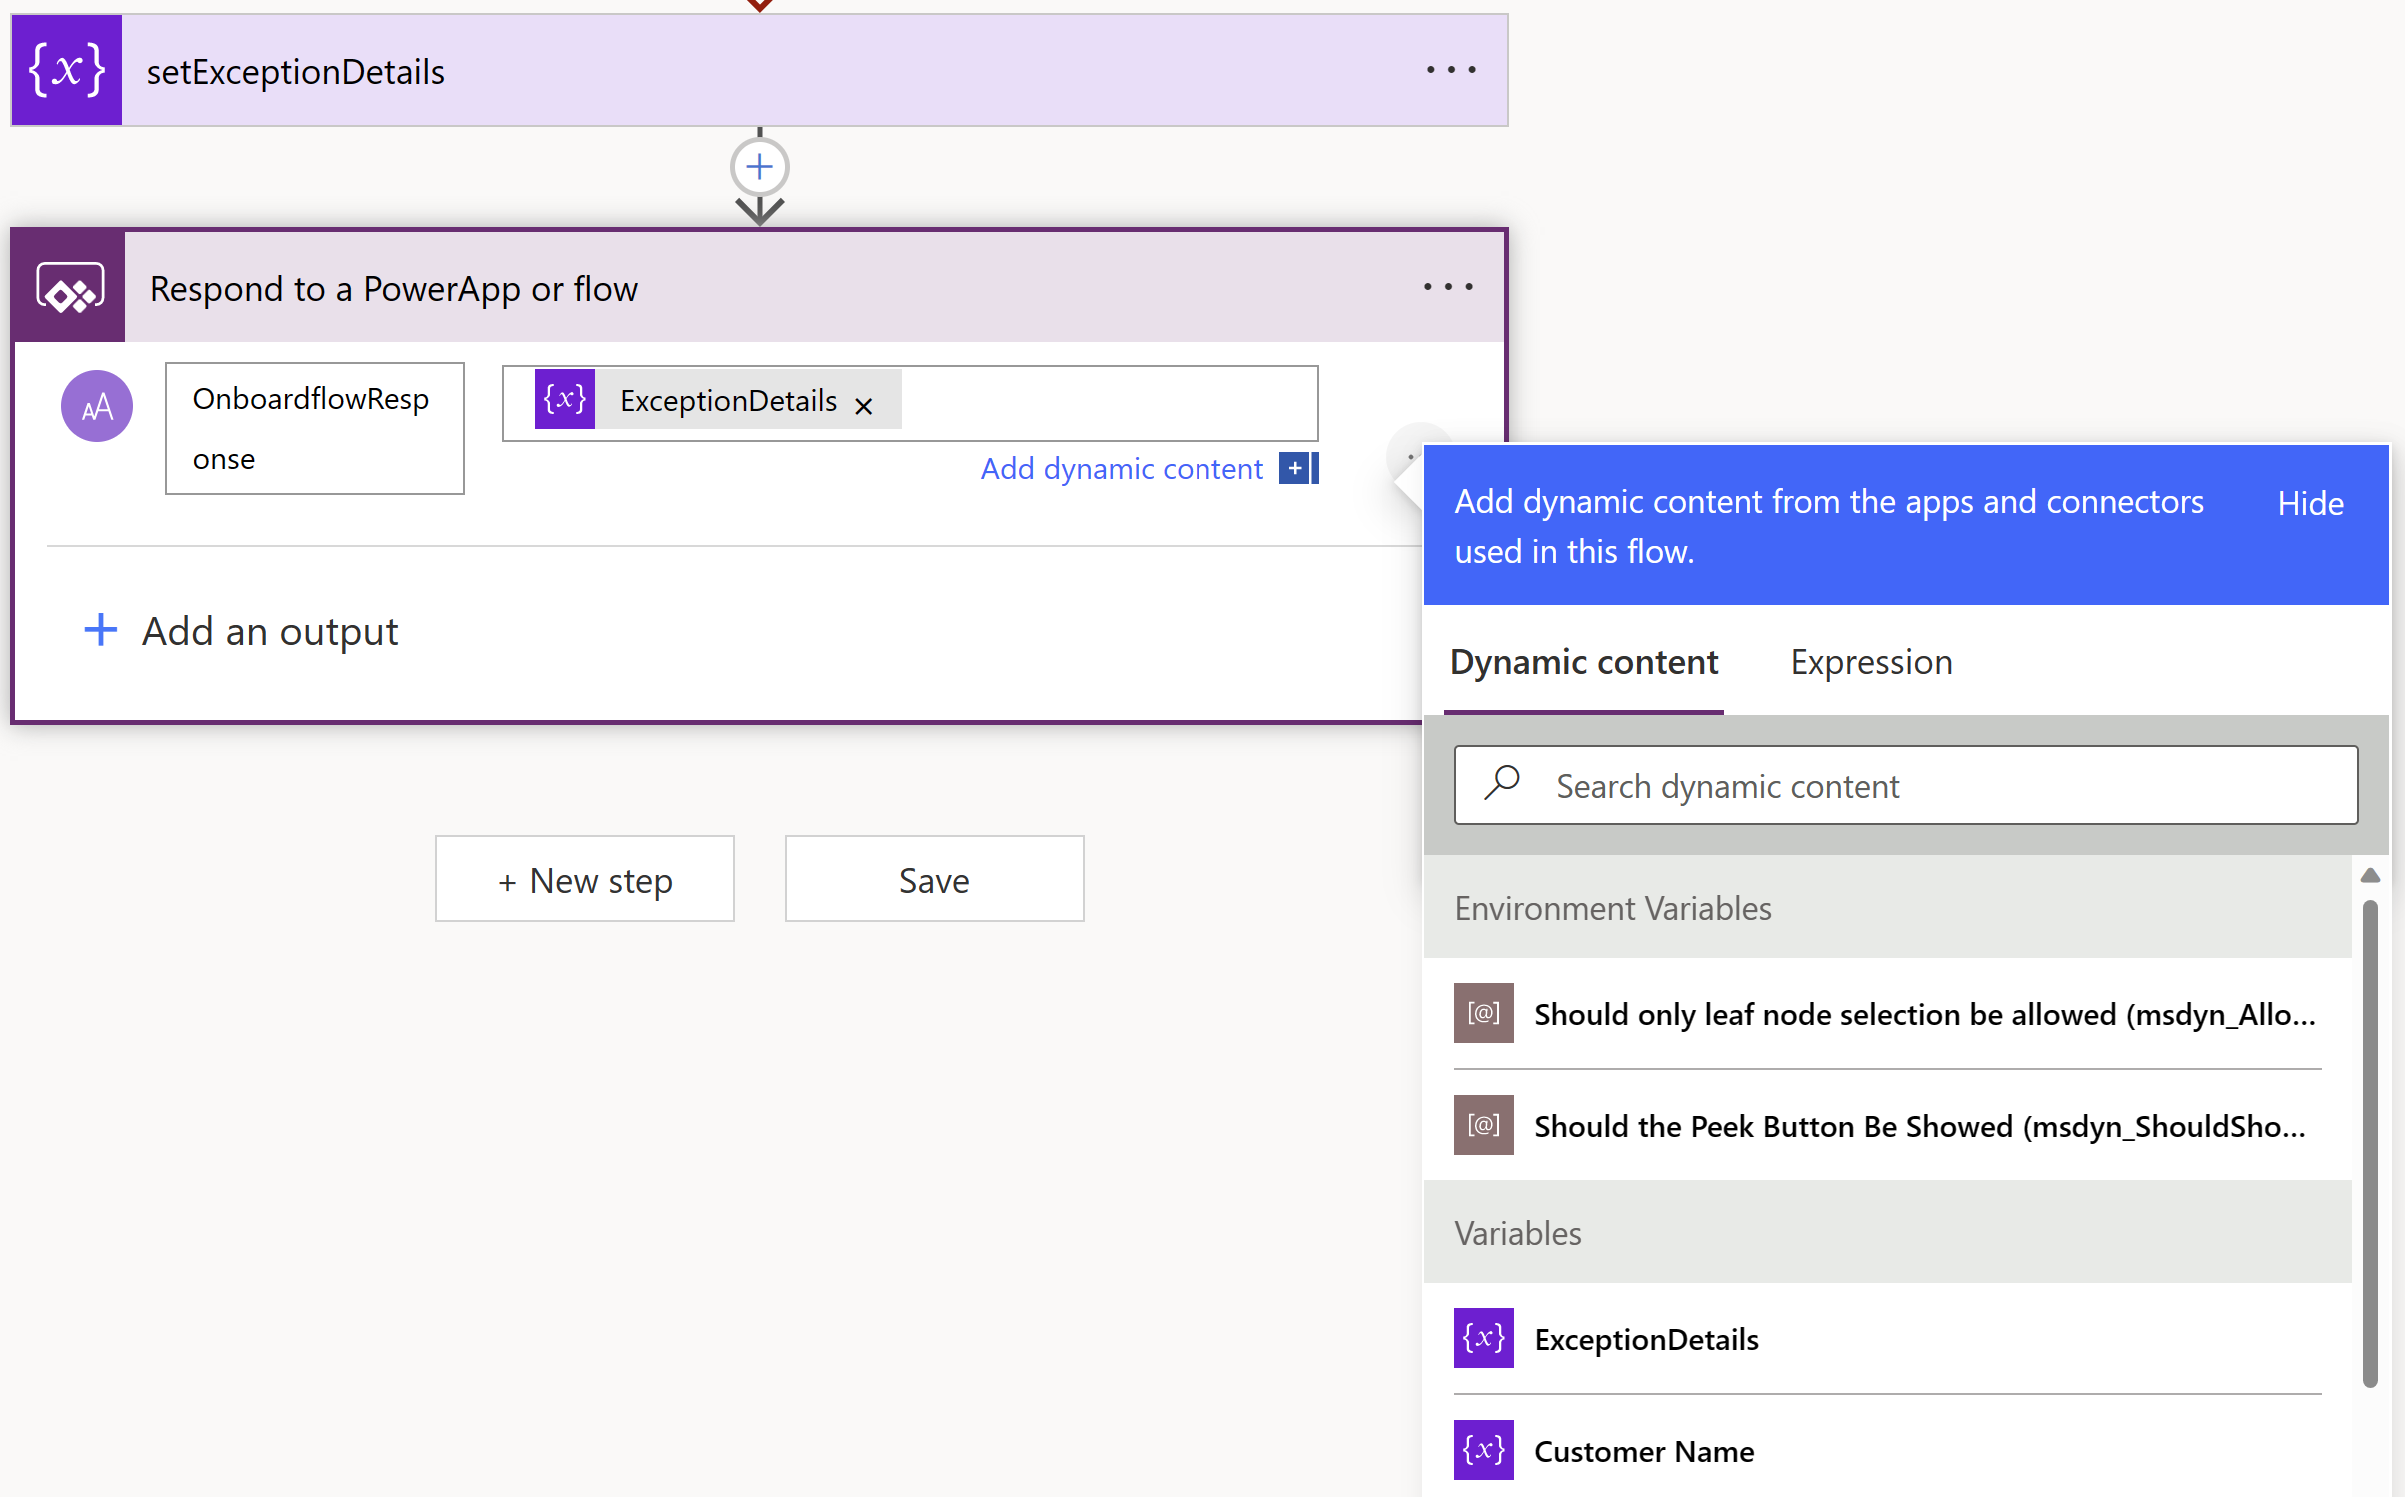
- Finally to send the response from flow to Canvas app, add ‘Respond to a PowerApp of flow’ action and click on ‘Configure run after’, select following options and click ‘Done’.
- and define an output variable OnboardflowResponse and set the value as ExceptionDetails.
- Save the flow and you should see the flow in your Canvas App.

- To trigger the flow, add a button to the screen and OnSelect write following formula.
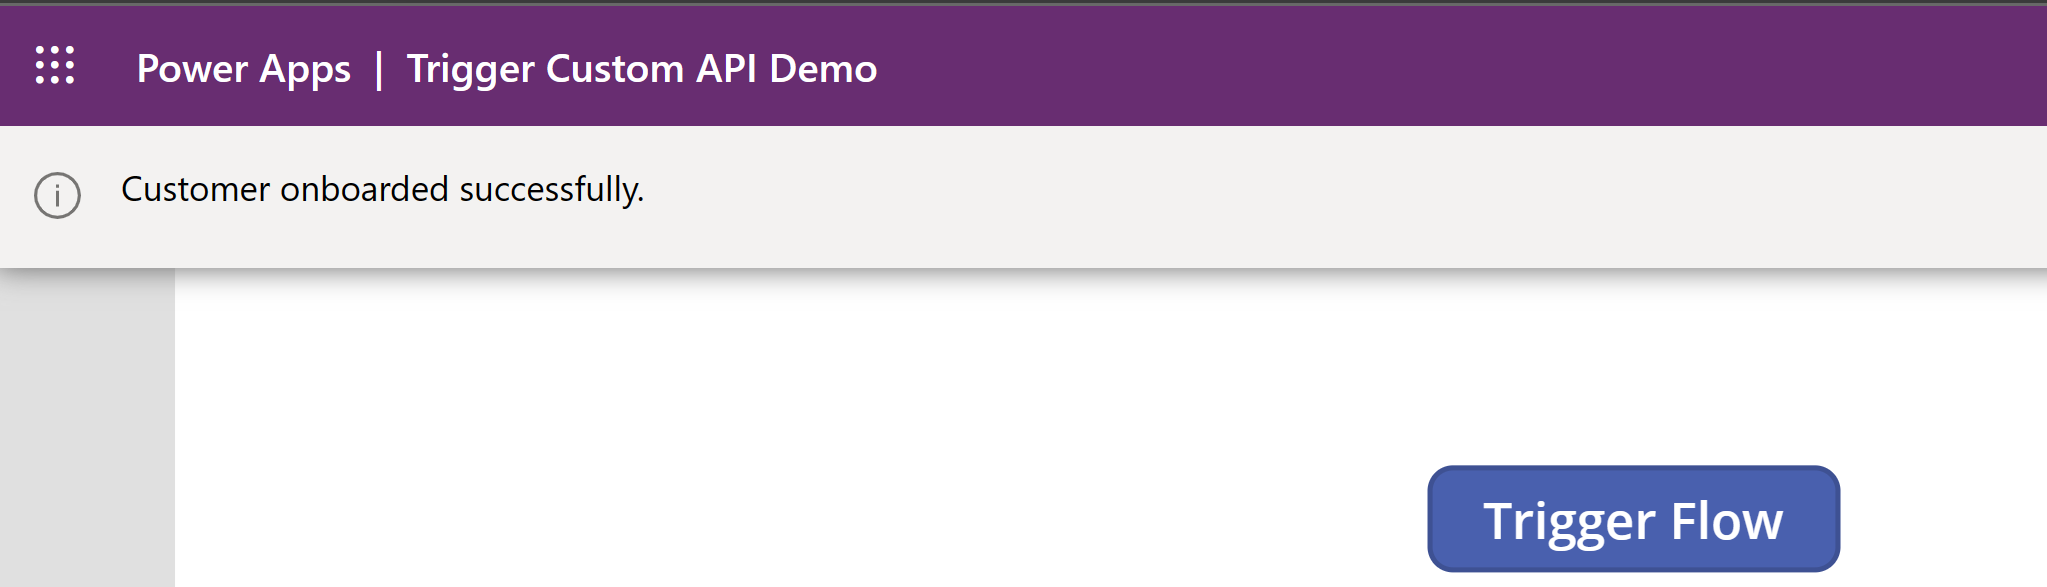
Notify("Triggering User Onboard...");
UpdateContext({ResponseOnBoardFlow: CustomerOnboardFlow.Run("Rajeev Pentyala").onboardflowresponse});
If(
    ResponseOnBoardFlow = "Success",
    Notify("Customer onboarded successfully."),
    Notify("Error while onboarding. Details - " & ResponseOnBoardFlow)
)
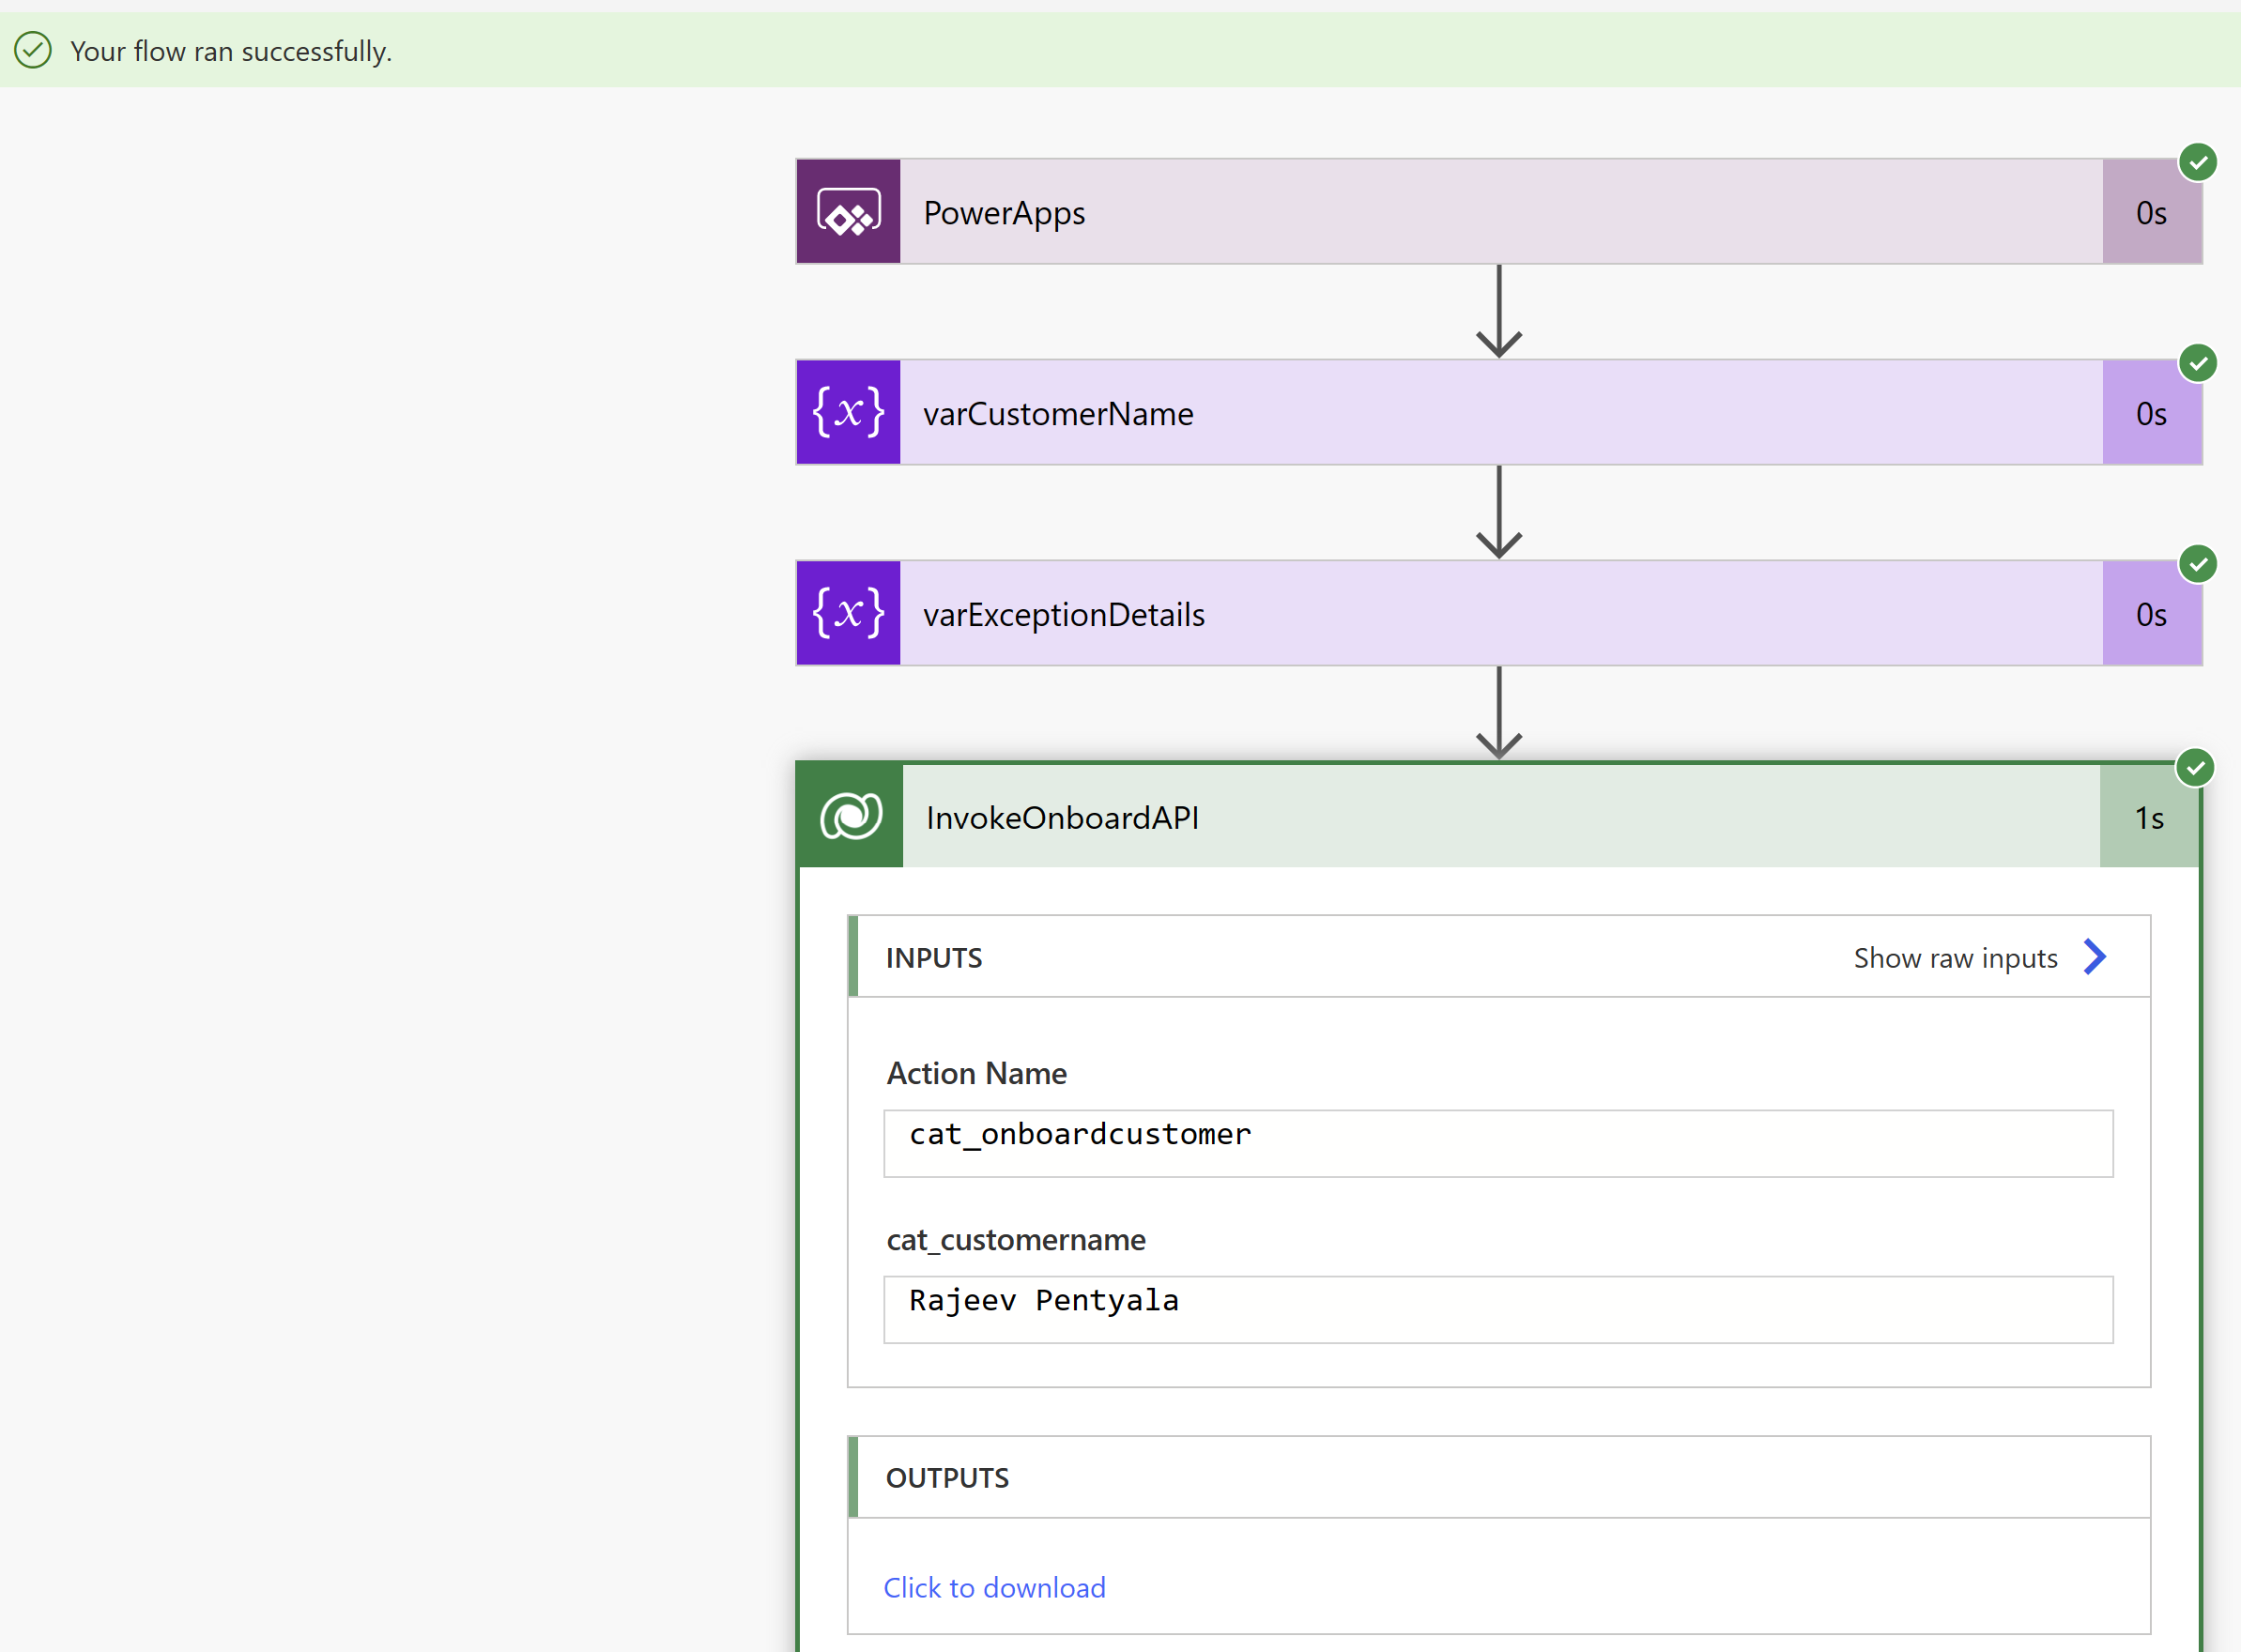
- Run the App and click the button.
- Open Dataverse and you should see the new Account and Appointment records. You can also check the flow run history.
🙂


Leave a reply to thomas Cancel reply