In my previous article, I’ve explained Create Your First Local MCP Server in VS Code, where we built a C# console application with a few custom methods (also called Tools) and hosted it locally on our machine.
In this article, let’s explore how to leverage the built-in GitHub MCP Server in Visual Studio Code using GitHub Copilot in Agent Mode.
What is the GitHub MCP Server?
- The GitHub MCP Server is a Model Context Protocol (MCP) server that provides seamless integration with GitHub APIs, enabling advanced automation and interaction capabilities for developers and tools.
Before we begin, let’s make sure you have the necessary tools:
Prerequisites:
- Docker Desktop : Required to run the GitHub MCP Server in a container.
- You don’t need to be a Docker expert—just install Docker Desktop on your machine.
- GitHub Personal Access Token : You will need to Create a GitHub Personal Access Token to allow the server to connect securely to your GitHub account.
We’ll start with installing Docker Desktop in the next section.
Install Docker Desktop:
As mentioned earlier, you don’t need to be an expert in Docker. Simply install Docker Desktop on your machine.
- Since I’m using a Windows machine, I downloaded the software from here

- Once the installation is complete, ensure that Docker is running. Confirm it’s in the “Running” state as shown below.

Generate a GitHub Personal Access Token (PAT):
- To connect the GitHub MCP Server to your GitHub account, you’ll need to generate a PAT. This token is used for authentication and allows the MCP server to securely access GitHub APIs on your behalf.
- Generate token from here : Generate PAT token and copy the token and store it somewhere safe, as you won’t be able to view it again after creation.

With all prerequisites completed, you’re now ready to use the GitHub MCP Server in Visual Studio Code.
Usage of the GitHub MCP server in VSCode:
The easiest way to get started is by using one of the one-click install buttons. These buttons automatically launch the GitHub MCP Server in a Docker container and configure it for use with Copilot in Agent Mode.
- Navigate to documentation
- Click on VS Code button, as shown below.

- In the popup, click on Open Visual Studio Code

- Visual Studio Code opens up as shown below

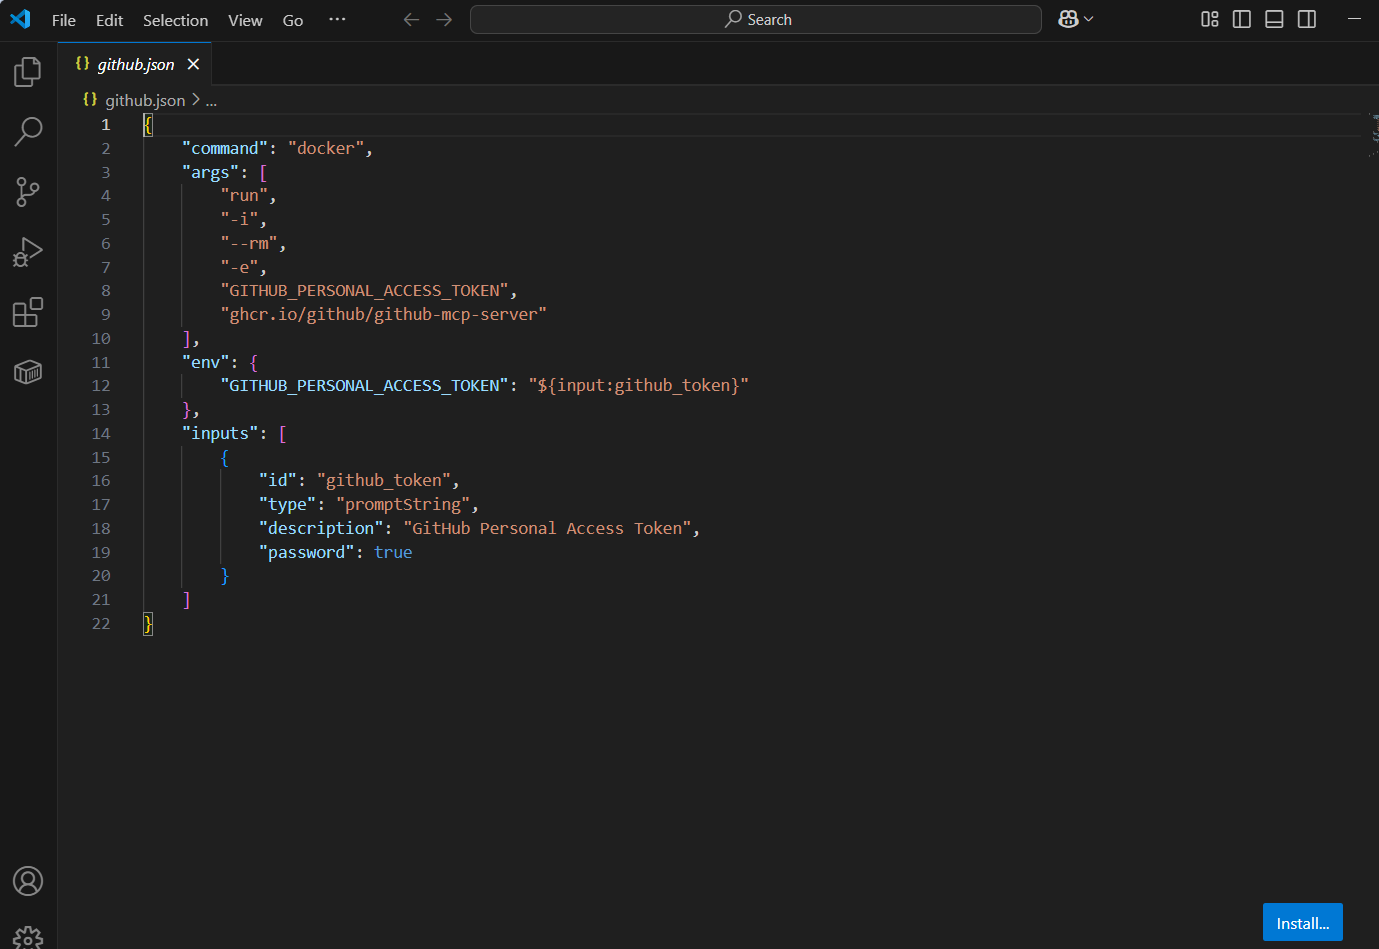
- Choose Show Configuration which opens up a github.json file as shown below:
- Select the github_token text. You will be prompted to provide PAT token as shown below.

- Provide the GitHub PAT token and press Enter. The settings.json file looks as below.

Now that everything is configured, you can start using the GitHub MCP Server with Copilot in Agent Mode.
Test the GitHub MCP Server with Copilot
- Open the Copilot and change the mode to Agent. Click on Tools (🛠️) icon and you should now see the GitHub MCP Server tools listed and ready to use.

- Now that the GitHub MCP Server is running, you can start interacting with it using natural language. For example, try asking:
- List all my repositories
- Any pending Pull requests
- How can I create a new Repo

For more details, refer to the official documentation: GitHub-MCP-Server
What Happens in Docker (Optional)
If you’re curious about what’s going on behind the scenes:
- Open the Docker Desktop > Containers
- You’ll see a container running for the GitHub MCP Server created with Image

- You can explore inside the container—view Logs, inspect Files, and better understand how the server operates.

I hope this article helped you understand how to leverage the GitHub MCP Server, hosted in Docker, within Visual Studio Code and Copilot Agent Mode.
🙂


Leave a comment