In this article, I’ll explain the concept of Model Context Protocol (MCP) from a C# developer’s perspective and walk you through building your first MCP server using the C# SDK.
I will cover the following topics:
- What is MCP?
- Components of MCP
- MCP C# SDK
- Build MCP Server using C# console application
- Configure mcp.json File
- Test the MCP Server using VS Code and Copilot
- Conventional API vs MCP
What is MCP?
- MCP is an open standard that defines how applications can expose tools and context to large language models (LLMs), like Copilot or ChatGPT.
- You may have come across that definition before and thought, “Okay, but what does it actually mean in practice?”
- Let’s simplify it with a real-world example—my stock investment scenario using Zerodha.
Real-Life Scenario: Stocks, Zerodha, and AI
- I use Zerodha, a popular investment platform in India, to buy and sell stocks. Through the Zerodha Kite app, I monitor live market prices and place trades based on current trends.
- Now imagine I want help from an AI assistant—like ChatGPT or Copilot—to tell me:
- “Is this a good time to buy TCS stock?”
- “Alert me when Reliance stock crosses ₹2,800.”
- The problem? LLMs like ChatGPT are trained on static data and don’t have real-time access to external systems. They can’t tell you the current stock price of TCS or place trades in Zerodha—unless they’re connected to something that can.
Filling the Gap with MCP (Zerodha MCP Example):
Zerodha provides a full set of API Endpoints, as below, that can be wrapped into an MCP Server using C#. These API end points are called as Tools in MCP terminology.

Components of MCP
Now that you’ve seen the Zerodha use case and understand the gap, we will learn how the MCP fills the gap. Let’s break down the key components of MCP—using the Zerodha analogy to make it easier.
- A custom app that wraps Zerodha APIs : MCP Server
- Methods like
get_holdings,place_order: MCP Tools - Copilot : MCP Client
- VS Code : MCP Host
Here is the terminology:
- MCP Server: The app you build in C# that defines and exposes tools.
- MCP Tools: The functions (like
Echo,GetQuote, etc.) - MCP Client: The LLM, such as Copilot, that discovers and calls tools.
- MCP Host: The environment where the client runs—like Visual Studio Code (VS Code).

MCP C# SDK:
- The official C# SDK for the Model Context Protocol, enables .NET applications, services, and libraries to implement and interact with MCP clients and servers.
- You can refer to the API documentation for more details
I hope you now have a clear understanding of what MCP is and how its different components work together.
In the next section, we’ll build an MCP server using a simple C# console application. We’ll define three C# methods—also known as tools in MCP—and see how they can be discovered and invoked by Copilot, with VS Code acting as the host environment.
Build MCP Server using C# console application
If you are not familiar with creating C# projects in VS Code, refer to this steps to create and run C# console application in VS Code.
Steps to Get Started:
- Create a new C# console project in VS Code (Note: You can also use Visual Studio if you prefer a full IDE)

- Next add following nuget packages:
ModelContextProtocolMicrosoft.Extensions.Hosting

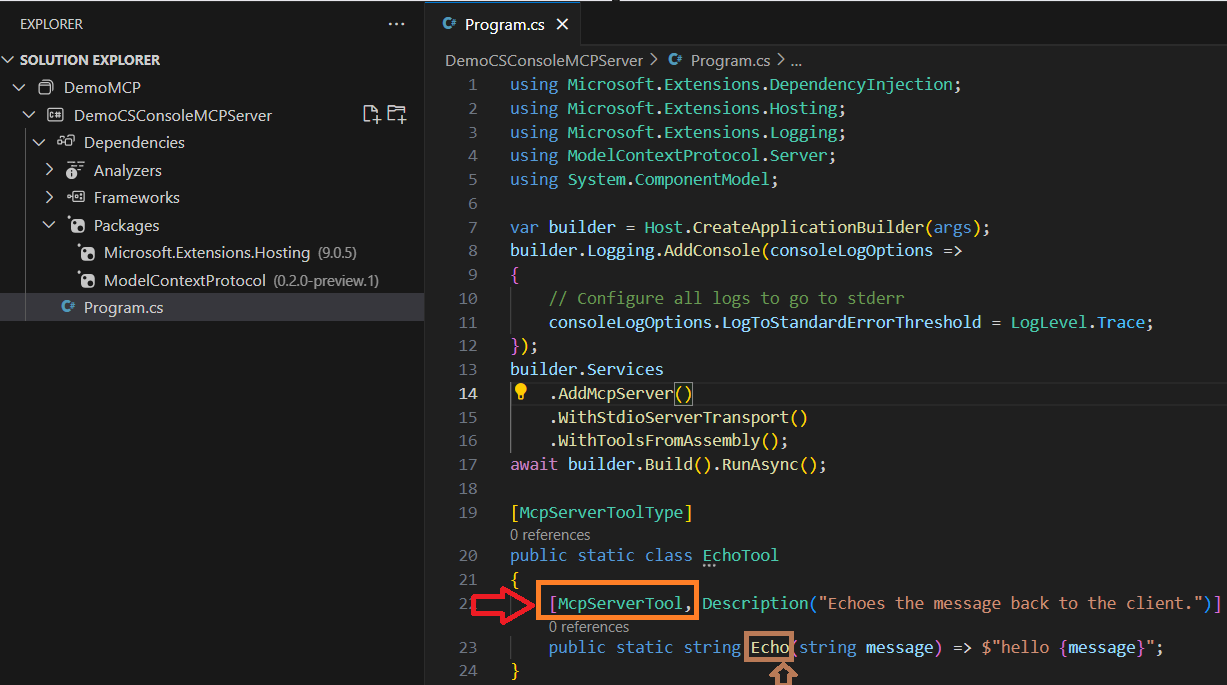
- Once installed, you should see the Packages as shown below.

- Next, navigate to GitHub MCP C# Framework and copy the sample server code.
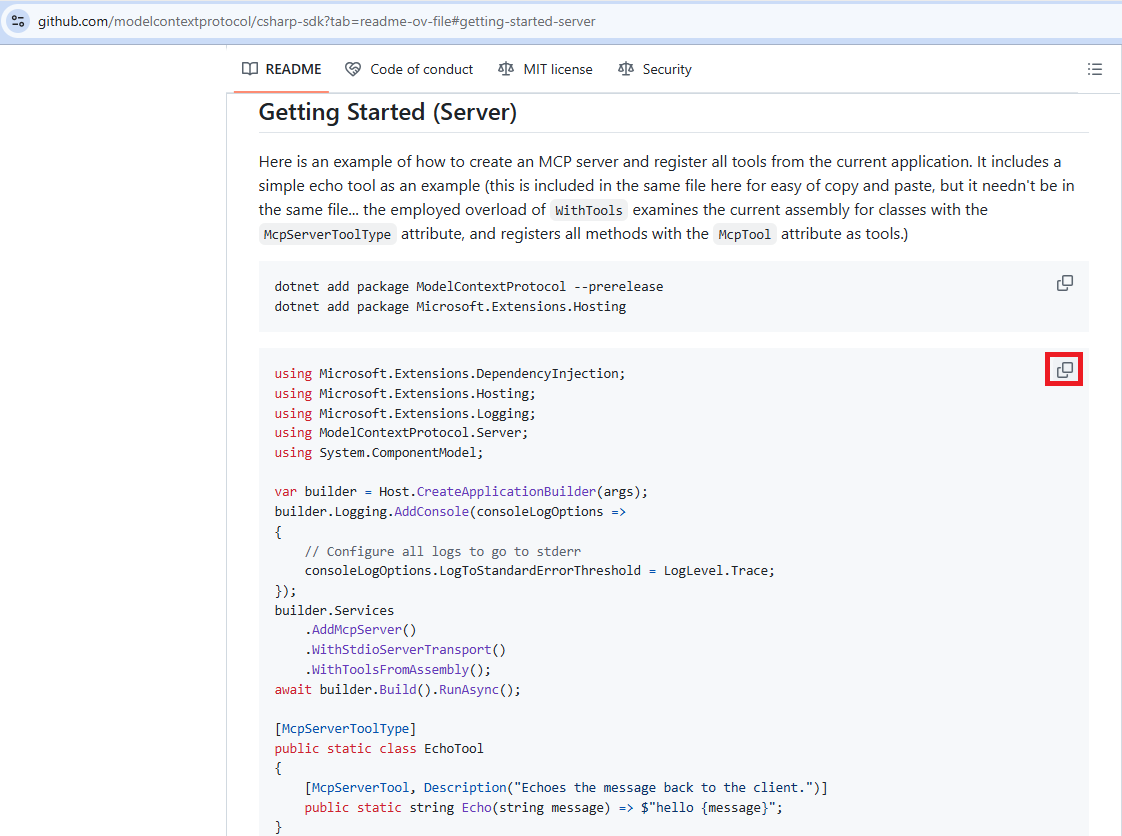
- Paste it in Program.cs file.
- If you look at the code, you’ll notice a method named
Echo, which is decorated with the[McpServerTool]attribute. As we discussed earlier in the MCP Components section of this blog, this is how we define tools in MCP
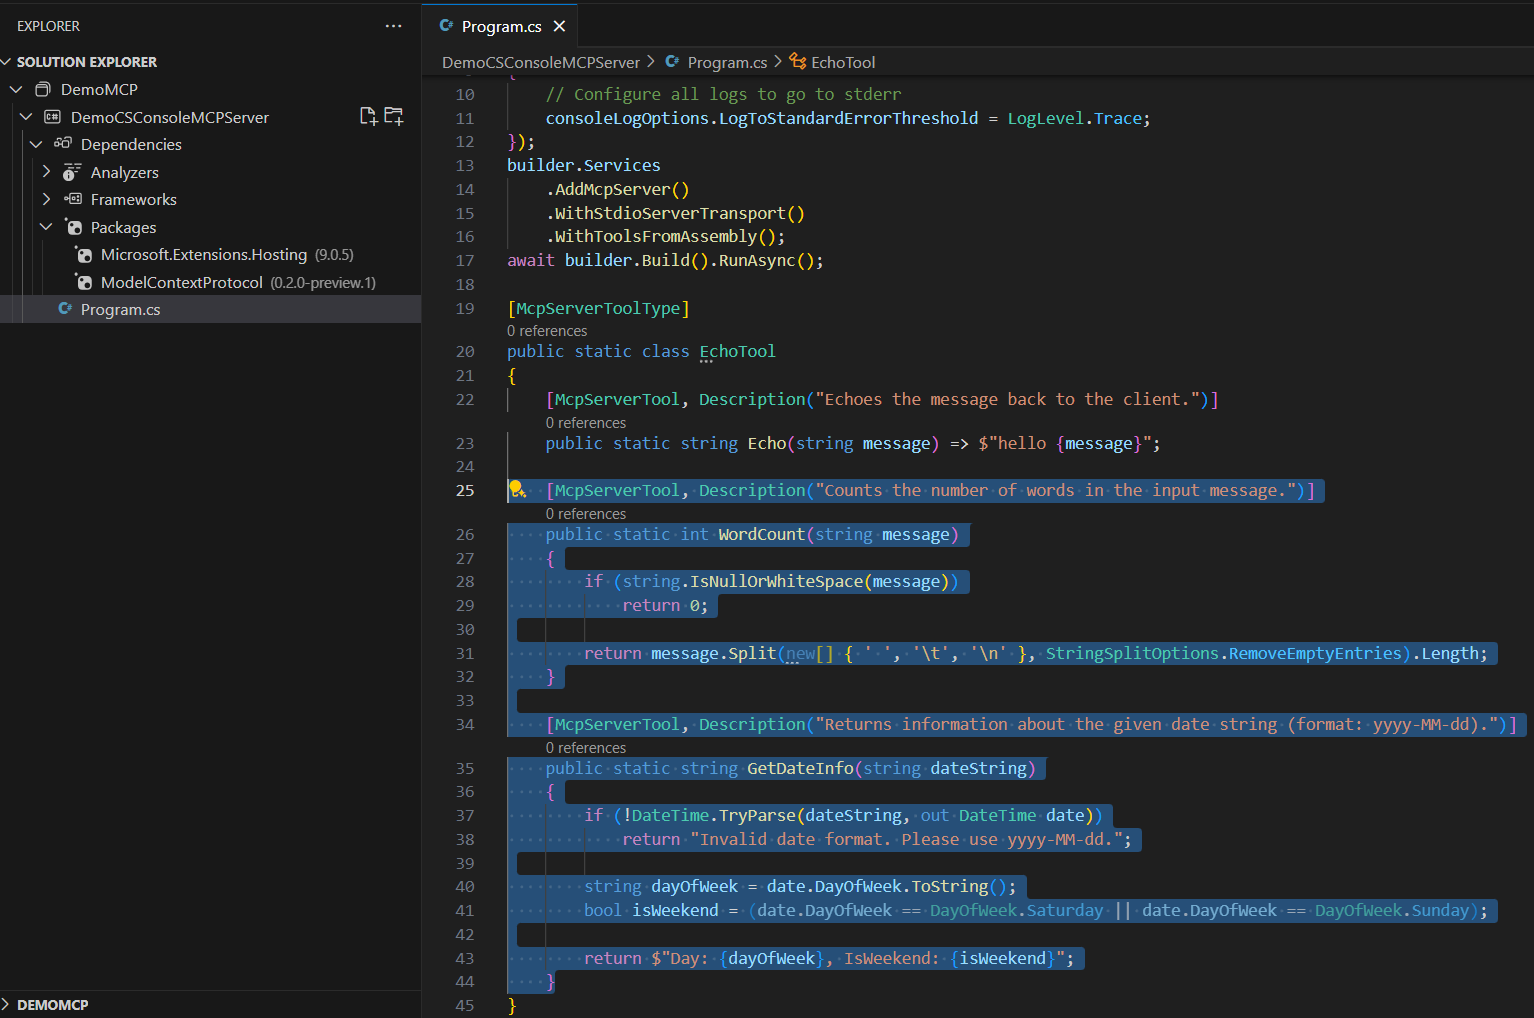
- In addition to
Echo, I’ve added two more methods to demonstrate how you can build useful tools:WordCount– counts the number of words in a given stringGetDateInfo– returns the day of the week and whether the given date is a weekend
- The Description attribute is crucial it plays a key role in helping the MCP host (such as Copilot in VS Code) understand what each tool does. This description guides the AI to select the most relevant method based on the user’s natural language prompt.
    [McpServerTool, Description("Counts the number of words in the input message.")]
    public static int WordCount(string message)
    {
        if (string.IsNullOrWhiteSpace(message))
            return 0;

        return message.Split(new[] { ' ', '\t', '\n' }, StringSplitOptions.RemoveEmptyEntries).Length;
    }

    [McpServerTool, Description("Returns information about the given date string (format: yyyy-MM-dd).")]
    public static string GetDateInfo(string dateString)
    {
        if (!DateTime.TryParse(dateString, out DateTime date))
            return "Invalid date format. Please use yyyy-MM-dd.";

        string dayOfWeek = date.DayOfWeek.ToString();
        bool isWeekend = (date.DayOfWeek == DayOfWeek.Saturday || date.DayOfWeek == DayOfWeek.Sunday);

        return $"Day: {dayOfWeek}, IsWeekend: {isWeekend}";
    }
- That’s all we need for this simple example.
- Now, build the project and make sure it compiles without errors.
With this, we’ve completed the setup of our MCP Server using a C# Console Application, next we will start mapping the MCP server to our MCP Host (i.e., Copilot).
To do that, we need to create and configure a file named mcp.json.
Configure mcp.json File:
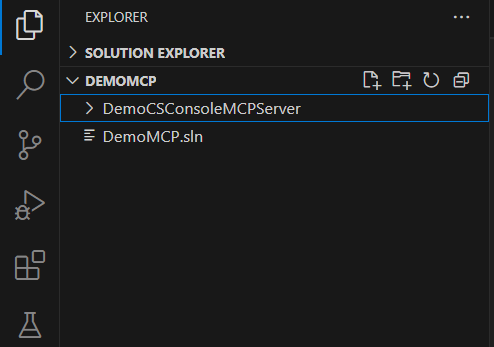
- Switch from SOLUTION EXPLORER to Project Explorer
- Create a new folder named .vscode and add a blank new file named mcp.json

- Click on Add Server… button and choose stdio as the transport type.
- This stands for standard input/output, which is the required communication method for our C# console-based MCP server.

- Next enter command as dotnet run

- Next provide a name to the MCP Server. I named it as DemoCSConsoleMCPServer
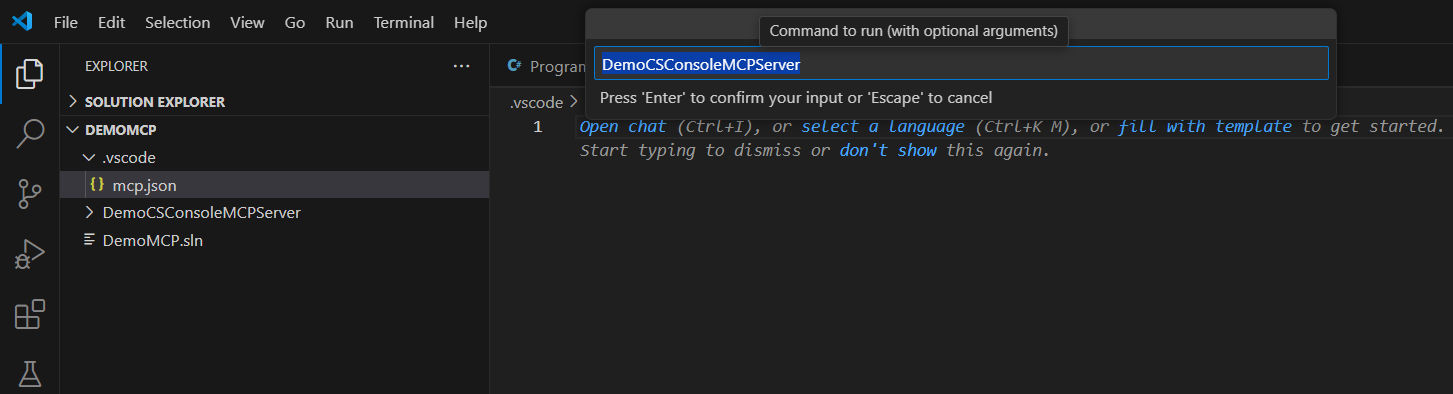
- Press Enter and you will get the JSON rendered as shown below.

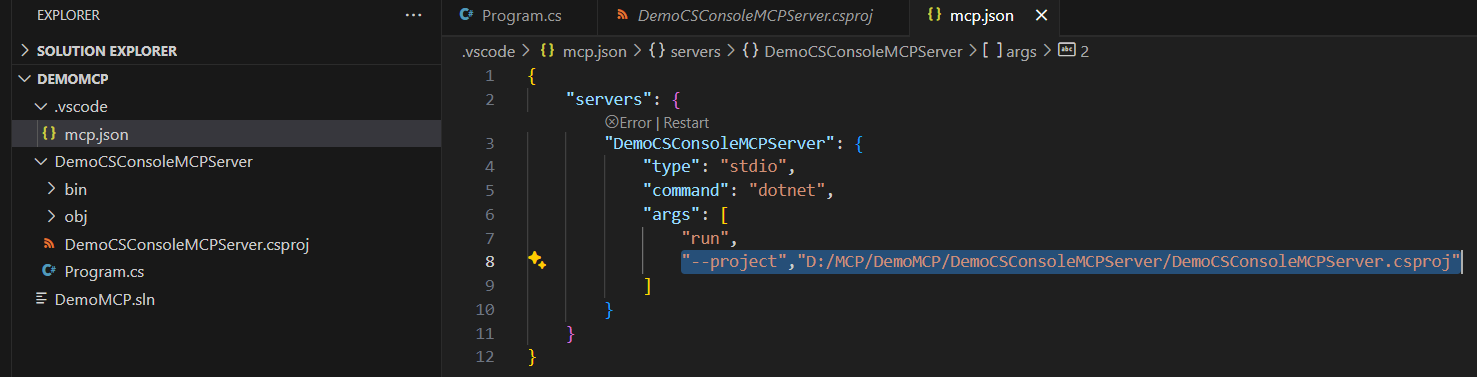
- Next we need to point the servers to our C# console project’s .csproj file, by adding “–project” argument as shown below:
- Ensure the path has forward slashes (/)
{
    "servers": {
        "DemoCSConsoleMCPServer": {
            "type": "stdio",
            "command": "dotnet",
            "args": [
                "run",
                "--project","D:/MCP/DemoMCP/DemoCSConsoleMCPServer/DemoCSConsoleMCPServer.csproj"
            ]
        }
    }
}
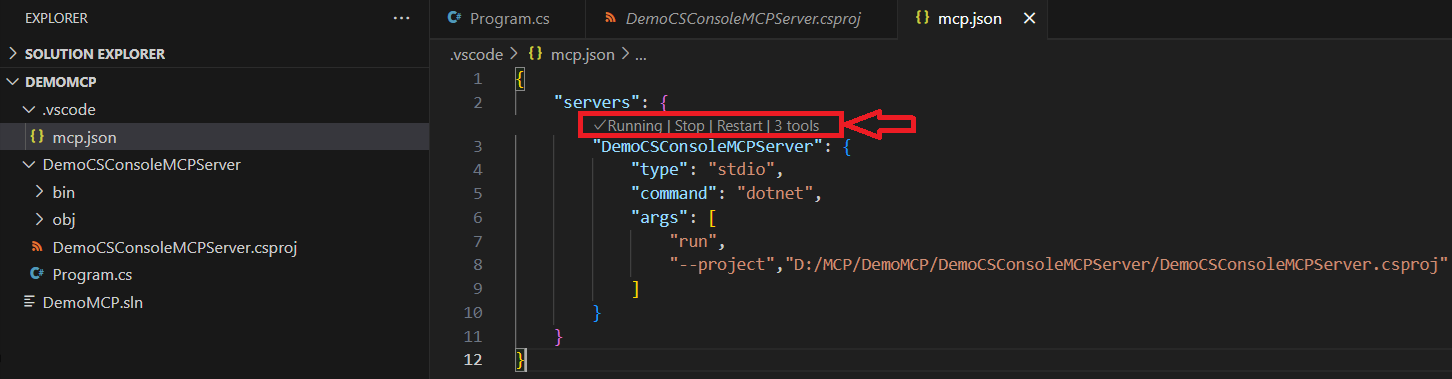
- Hit the Restart link in the mcp.json file above the DemoCSConsoleMCPServer.
- Once the server starts, you should see the status change to “Running”, along with a list of 3 tools—which corresponds to the three methods we defined in the
Program.csfile of our console application (i.e., our MCP server).
We’ve now completed the setup of our MCP server and the mcp.json configuration. It’s time to test it with Copilot inside VS Code.
Test MCP Server using VS Code and Copilot:
- Open the Copilot Chat panel in VS Code and change the mode to Agent.
- In VS Code, if you switch the Copilot Chat to Agent mode, it becomes an MCP client. In this mode, Copilot uses the
mcp.jsonconfiguration.
- In VS Code, if you switch the Copilot Chat to Agent mode, it becomes an MCP client. In this mode, Copilot uses the

- Copilot auto detects the mcp.json file and reads the Tools (i.e., methods)

- Next, test the WordCount tool by prompting Copilot with the following message:
- Testing my first MCP in Copilot and VS Code.
- Copilot understands the intent behind this prompt and automatically identifies the appropriate tool to invoke. In this case, it suggests:
- Running
'WordCount‘
- Running
- Click Continue

- Returns the output : The phrase “Testing my first MCP in Copilot and VS Code” contains 9 words.

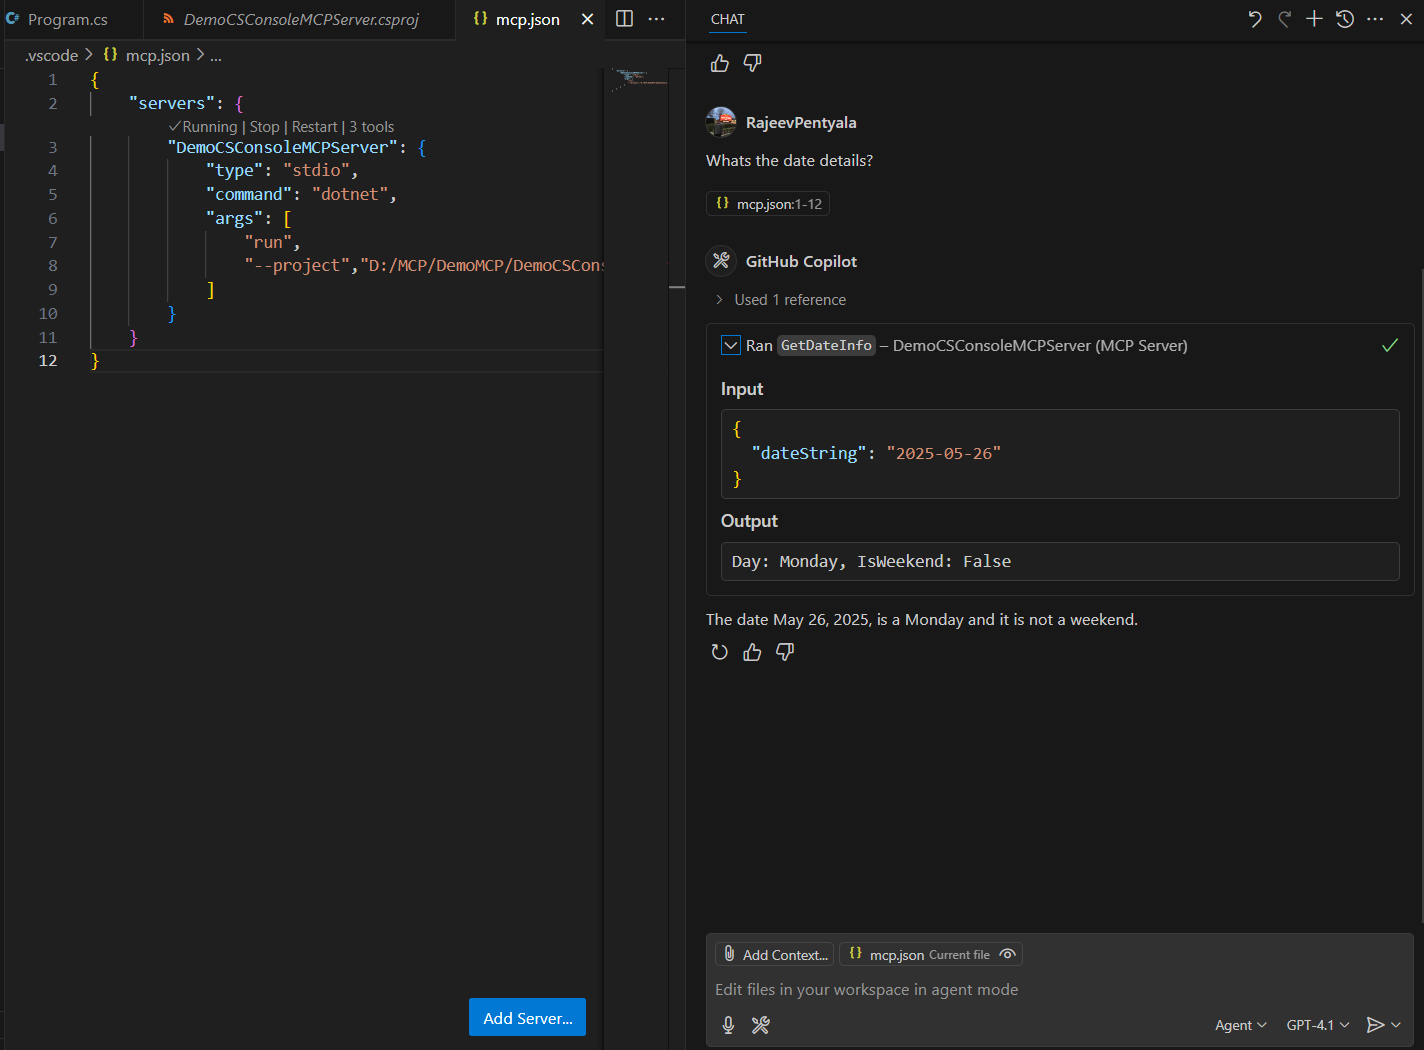
- Similarly, you can test the other tools (i.e., methods) using natural language prompts.
- Copilot will recognize the intent and invoke the
GetDateInfomethod, returning the day of the week and whether it’s a weekend.
With that, we’ve built a simple C# console based MCP server with three Tools and tested them using Copilot inside VS Code.
Conventional API vs MCP:
Based on my current understanding of MCP, here’s a simple comparison between conventional API usage and the MCP approach.
- In a conventional API, if you have 10 different endpoints, it’s up to you (the developer) to decide:
- Which endpoint to call
- When to call it
- What parameters to pass
- However, with MCP, as you’ve seen in our example, the MCP server exposes tools (i.e., methods), and the Copilot client automatically decides which tool to invoke—based on the natural language prompt.
- Also Copilot maintains the context, like, it knows what was your previous prompt and carry forward the knowledge to the current prompt.

Refer this blog post for more details.
In my next article, I’ll walk you through testing the Zerodha MCP server and its tools using Copilot.
🙂


Leave a comment