Did you know that, CreateMultiple and UpdateMultiple plug-in messages are available? All tables that support Create and Update will eventually support CreateMultiple and UpdateMultiple.

What are the CreateMultiple and UpdateMultiple messages?
- It’s recommended to write plug-ins for the
CreateMultipleandUpdateMultiplemessages with tables where records may need to be created or updated in bulk, or when performance in creating and updating large numbers of records is important.
What changed in terms of writing plugin code?
- There are few fundamental changes to the way we write plug-ins using the
CreateMultipleandUpdateMultiplemessages.
- For example,
CreateMultipleandUpdateMultiplemessages has aTargetsparameter that’s an EntityCollection rather than aTargetparameter that’s a single Entity
In this article, let’s learn how to write a simple plug-in for CreateMultiple and UpdateMultiple messages.
Steps to create a Plug-in for CreateMultiple:
We will create a ‘Pre-Account CreateMultiple’ plug-in, where we will suffix some text to the ‘name’ of the Account records.
- Create a new plug-in project using pac cli as shown below.
pac plugin init -o D:\Practice\DemoMultipleMessagesPlugin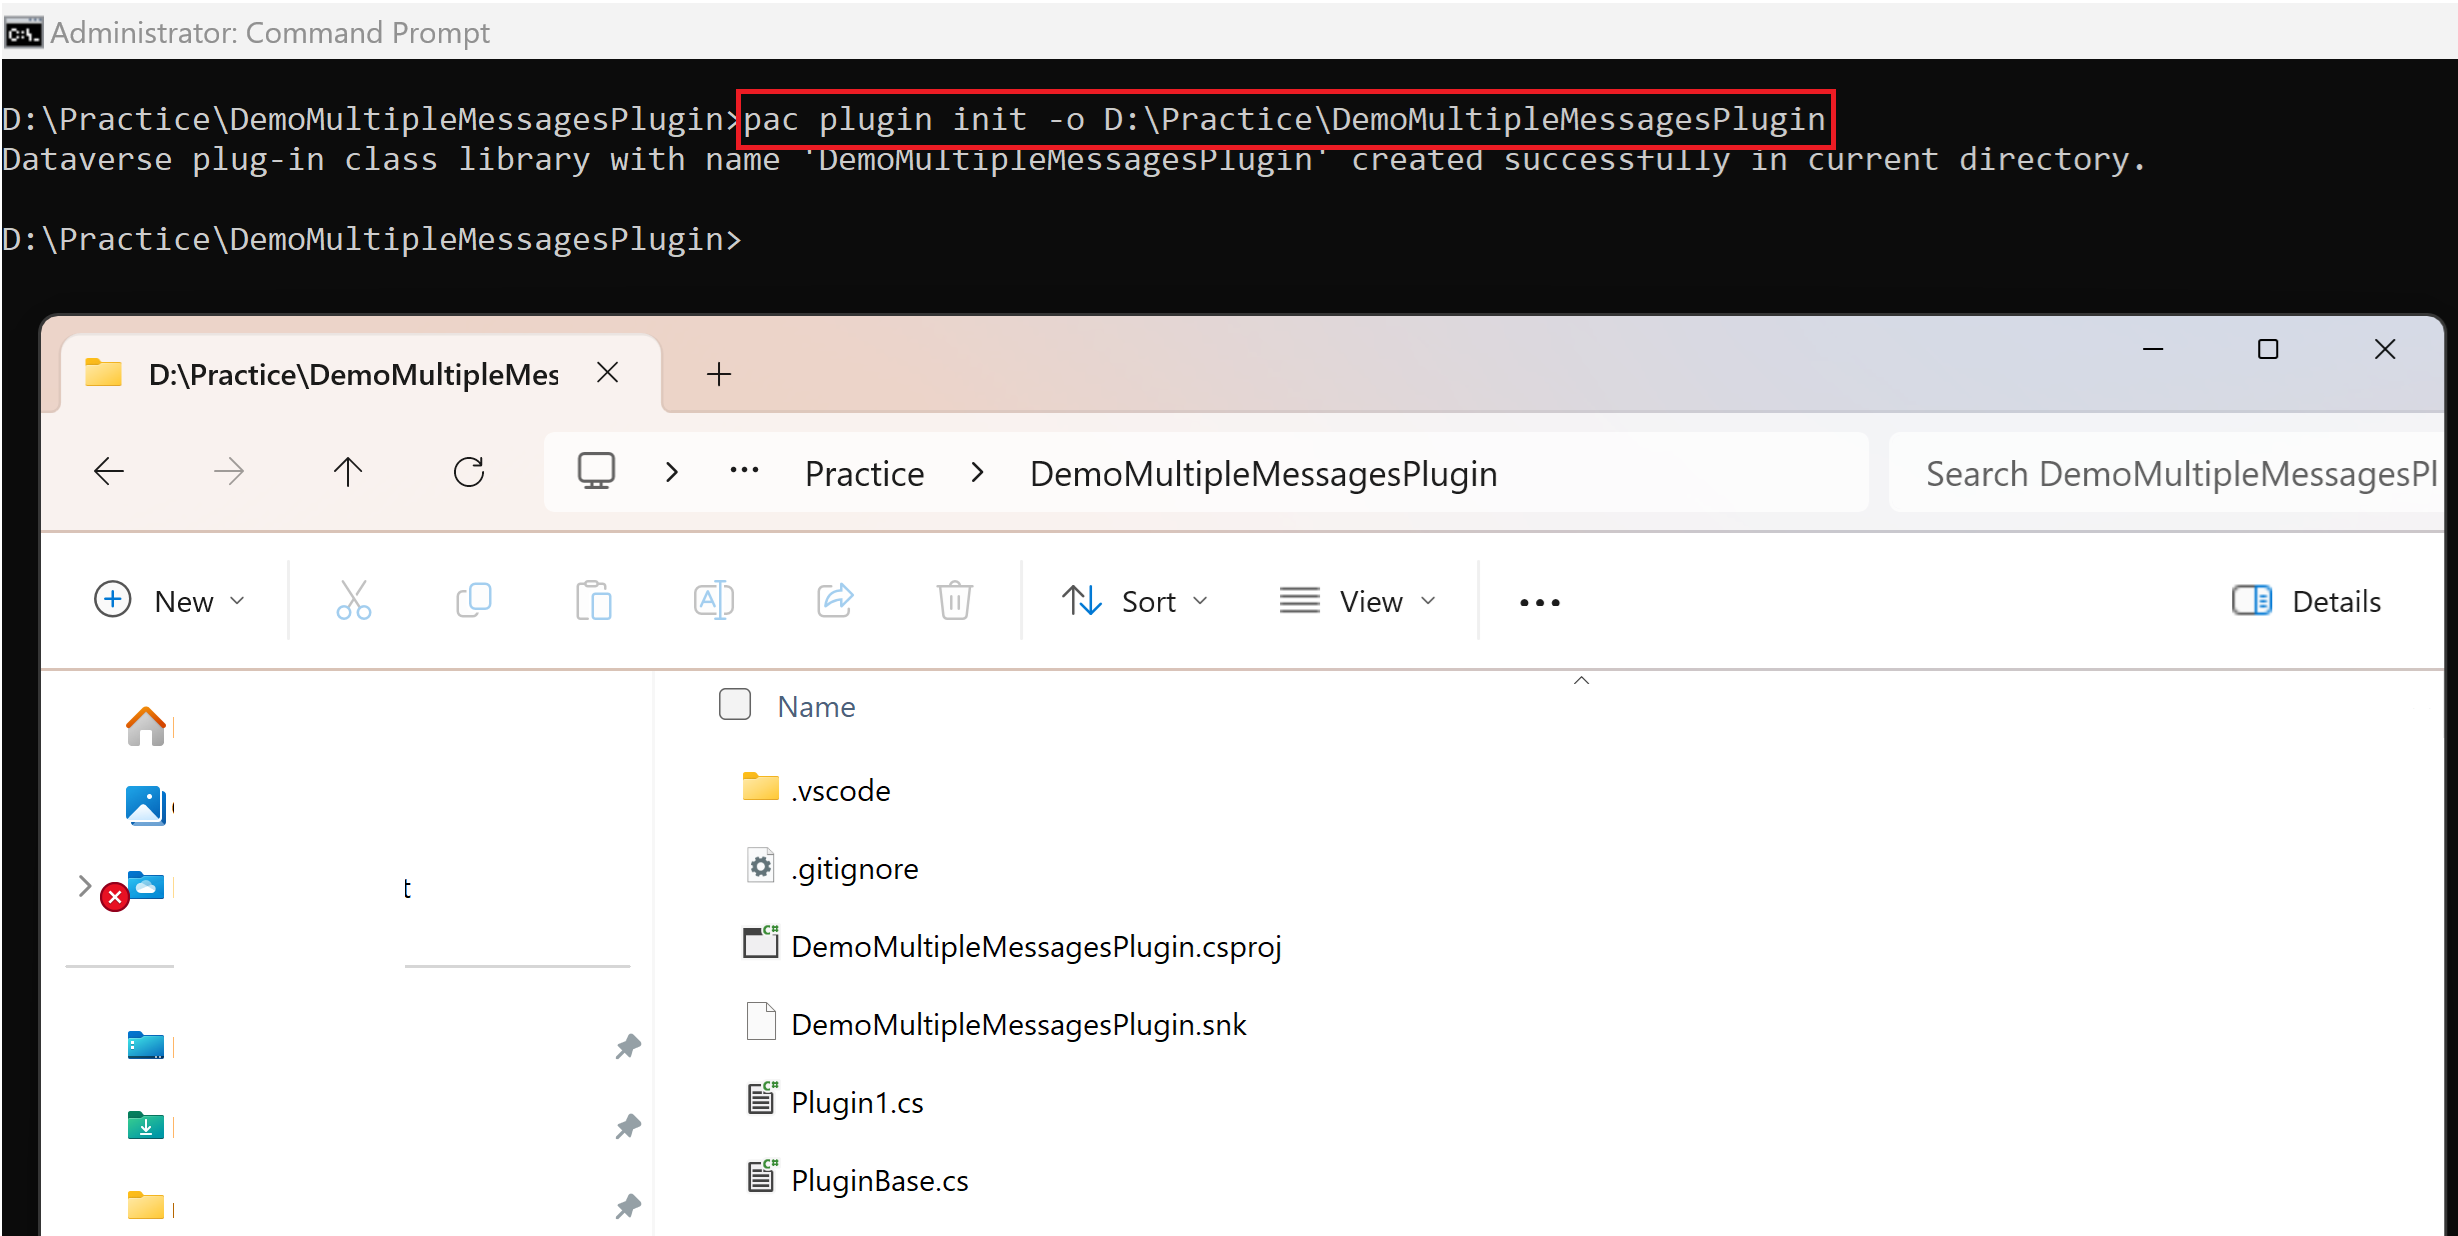
- A new plugin project gets created in the target folder as shown below.
- Open the .csproj file using Visual Studio.
- Rename the default Plugin1.cs file and build the solution as shown below.
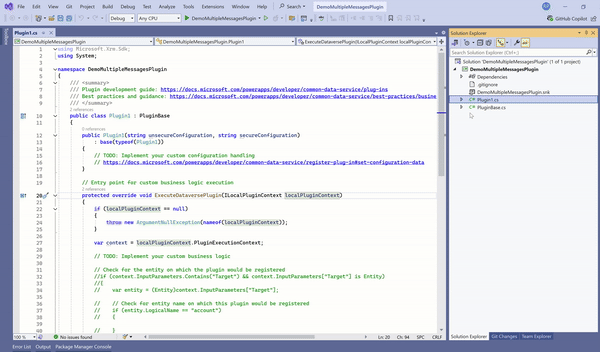
- Open the default PluginBase.cs file and replace IPluginExecutionContext with IPluginExecutionContext4. Save and build the solution again.

- Replace the ExecuteDataversePlugin method with the following code, where we will be adding a suffix to the ‘name’ field of ‘Account’.
protected override void ExecuteDataversePlugin(ILocalPluginContext localPluginContext)
{
    if (localPluginContext == null)
    {
        throw new ArgumentNullException(nameof(localPluginContext));
    }

    // Update default PluginBase.cs and replace IPluginExecutionContext with IPluginExecutionContext4.
    var context = localPluginContext.PluginExecutionContext;

    if (context.PrimaryEntityName == "account" && context.MessageName == "CreateMultiple" && context.Stage == 20)
    {
        if (context.InputParameters.Contains("Targets") && context.InputParameters["Targets"] is EntityCollection entityCollection)
        {
            if (entityCollection.EntityName == "account")
            {
                int count = 0;
                foreach (Entity entity in entityCollection.Entities)
                {
                    entity["name"] += " - added from PreCreateMultiple";
                    count++;
                }
                // One trace for all items
                localPluginContext.Trace($"Suffixed 'name' for {count} records.");
            }
            else
            {
                localPluginContext.Trace($"Expected EntityCollection.EntityName: 'account'. Actual: {entityCollection.EntityName}");
            }
        }
    }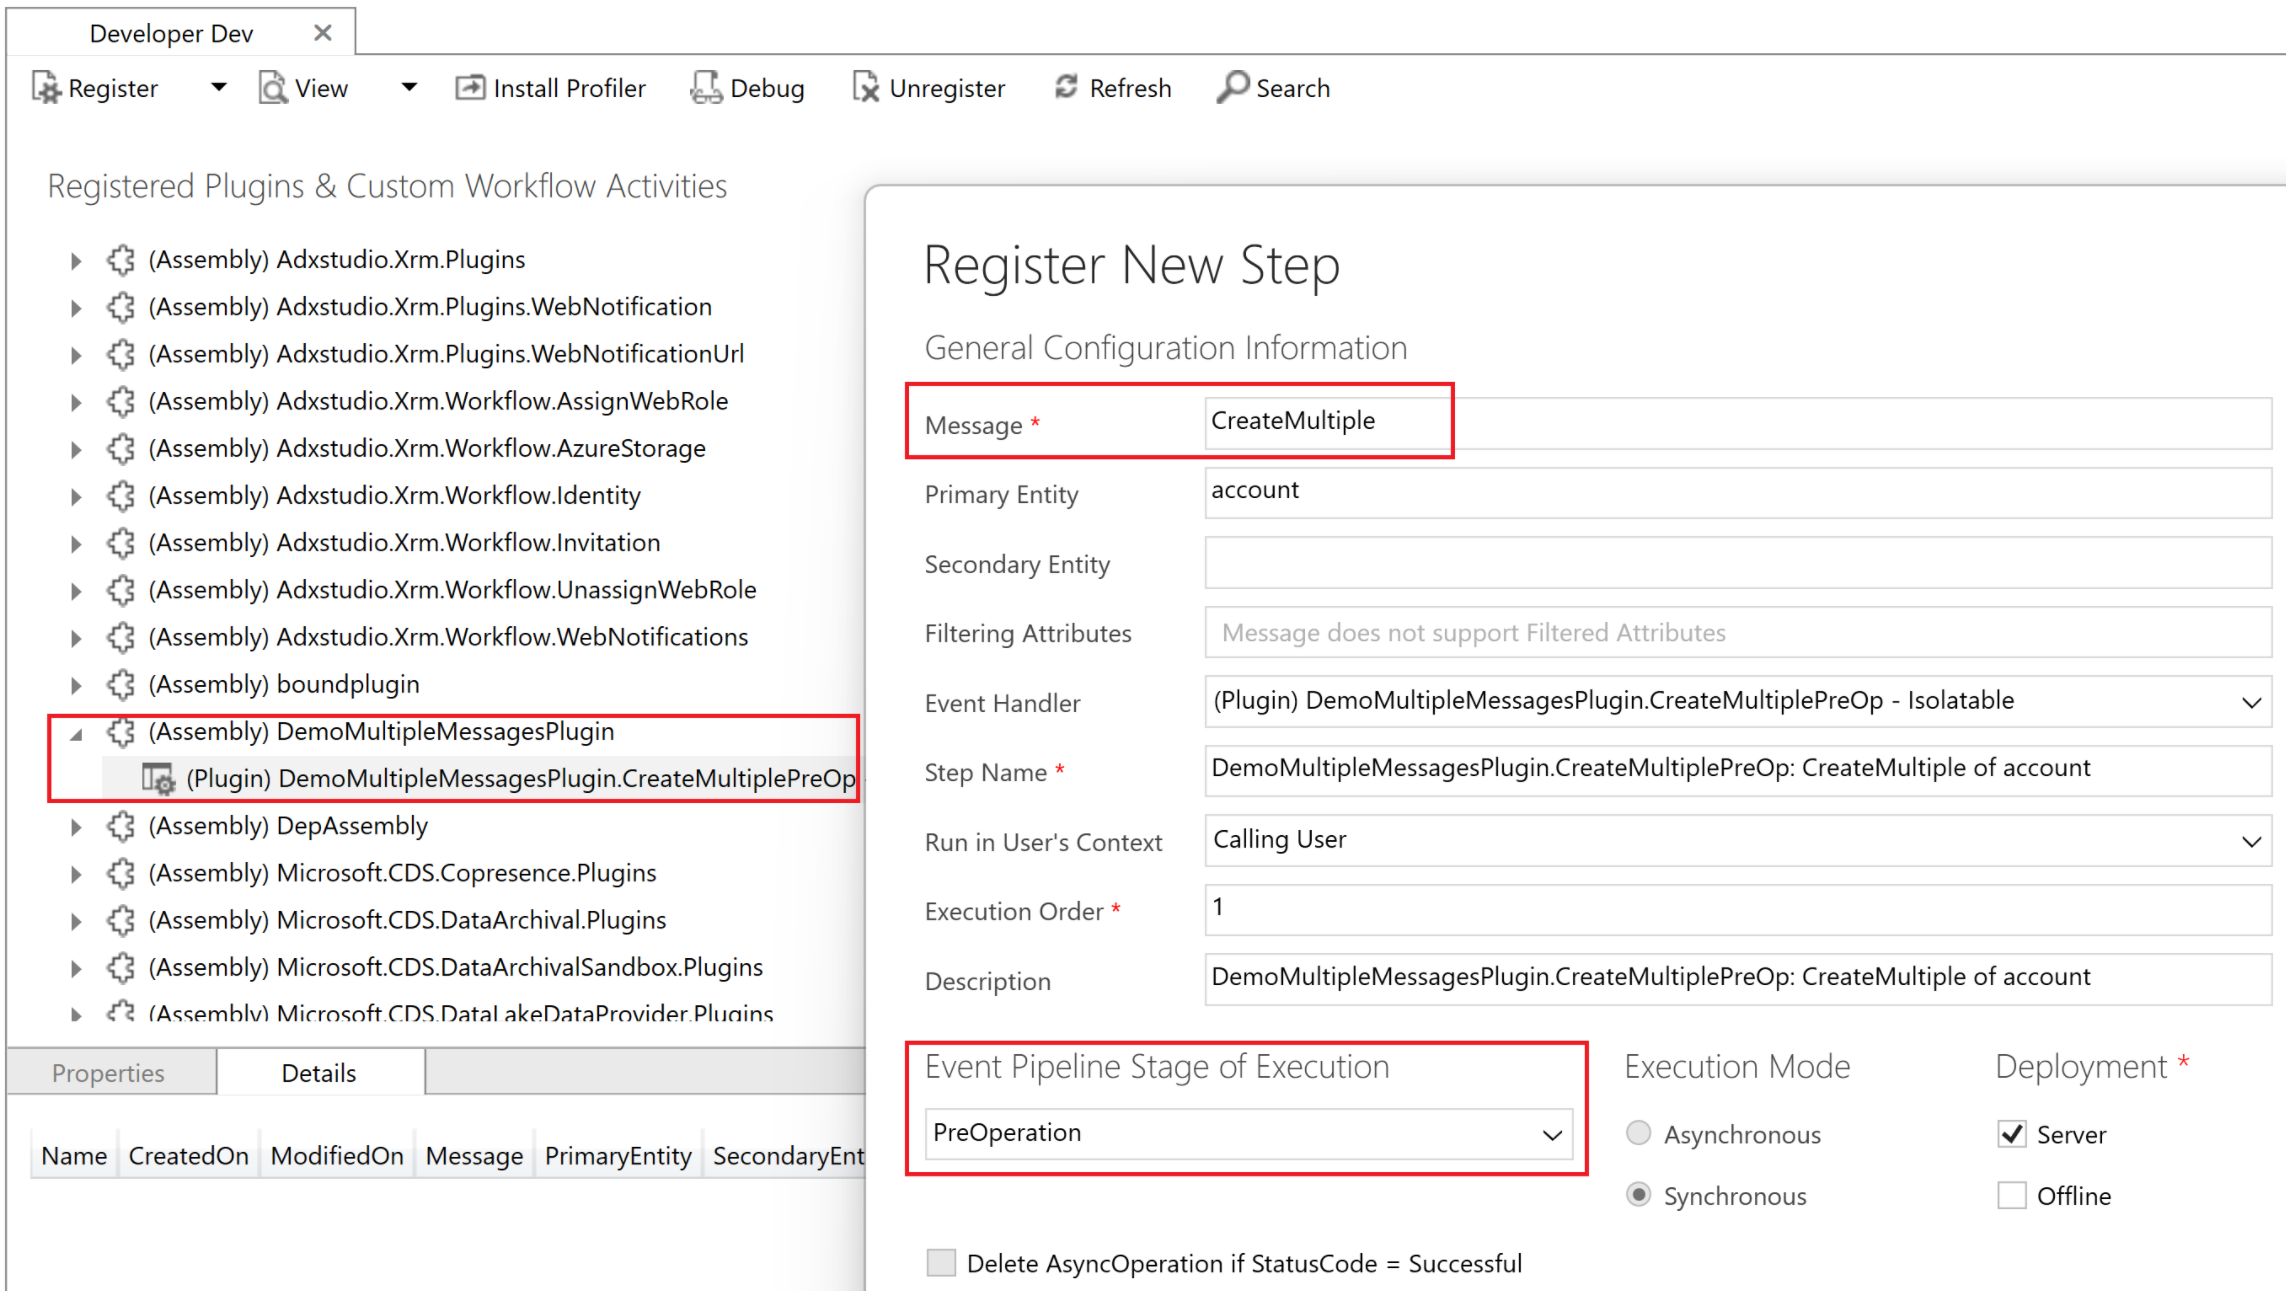
}- Build the solution and register the plug-in assembly using ‘Plugin Registration Tool’.
- Create a new plugin step on CreateMultiple message of account table as shown below.
Now that we have created and registered the CreateMultiple plug-in step. Let’s test it.
Create accounts in bulk and test the plugin:
- Prepare an Excel file with 20 account records data as shown below.

- Import the Excel file into Dataverse. I’ve used the Dataflow to complete the import.

- Once complete, check Dataverse and you will see the text “– added from PreCreateMultiple” suffixed to all the account names.

Now that we understand the basics of CreateMultiple, lets explore the UpdateMultiple with an example.
Steps to create a Plug-in for UpdateMultiple:
In this scenario, we will write a plug-in to check if the name of the Account changes. If it does, we will set a message in the Description field.
- A key point to note is, Entity images that are configured in the UpdateMultiple step registration for your plug-ins are an array of EntityImageCollection.
- Create a new class file UpdateMultiple.cs and override the ExecuteDataversePlugin method with following code.

        protected override void ExecuteDataversePlugin(ILocalPluginContext localPluginContext)
        {
            var context = localPluginContext.PluginExecutionContext;
            if (context.PrimaryEntityName == "account" && context.MessageName == "UpdateMultiple" && context.Stage == 20)
            {
                // Verify input parameters
                if (context.InputParameters.Contains("Targets") && context.InputParameters["Targets"] is EntityCollection entityCollection)
                {
                    // Verify expected entity images from step registration
                    if (context.PreEntityImagesCollection.Length == entityCollection.Entities.Count)
                    {
                        int count = 0;
                        foreach (var entity in entityCollection.Entities)
                        {
                            var entityImages = context.PreEntityImagesCollection[count];

                            // Verify expected entity image from step registration
                            if (entityImages.TryGetValue("accountPreImage", out Entity preImage))
                            {
                                bool entityContainsNameField = entity.Contains("name");
                                bool entityImageContainsNameField = preImage.Contains("name");

                                if (entityContainsNameField && entityImageContainsNameField)
                                {
                                    // Verify that the entity 'name' values are different
                                    if (entity["name"] != preImage["name"])
                                    {
                                        string oldName = (string)preImage["name"];
                                        string newName = (string)entity["name"];

                                        string message = $"\\r\\n - 'name' changed from '{oldName}' to '{newName}'.";

                                        // If the 'description' is included in the update, do not overwrite it, just append to it.
                                        if (entity.Contains("description"))
                                        {
                                            entity["description"] = entity["description"] += message;
                                        }
                                        else // The sample description is not included in the update, overwrite with current value + addition.
                                        {
                                            entity["description"] = preImage["description"] += message;
                                        }
                                    }
                                    else
                                    {
                                        localPluginContext.Trace($"Expected entity and preImage 'name' values to be different. Both are {entity["name"]} for item {count}");
                                    }
                                }
                            }
                            else
                            {
                                localPluginContext.Trace($"Expected PreEntityImage: 'accountPreImage' not found for item {count}.");
                            }

                            count++;
                        }
                    }
                    else
                    {
                        localPluginContext.Trace($"Expected PreEntityImagesCollection to contain Entity images for each Entity.");
                    }
                }
            }
        }
- Build the solution and update the plug-in assembly. Register a new a UpdateMultiple step as shown below.
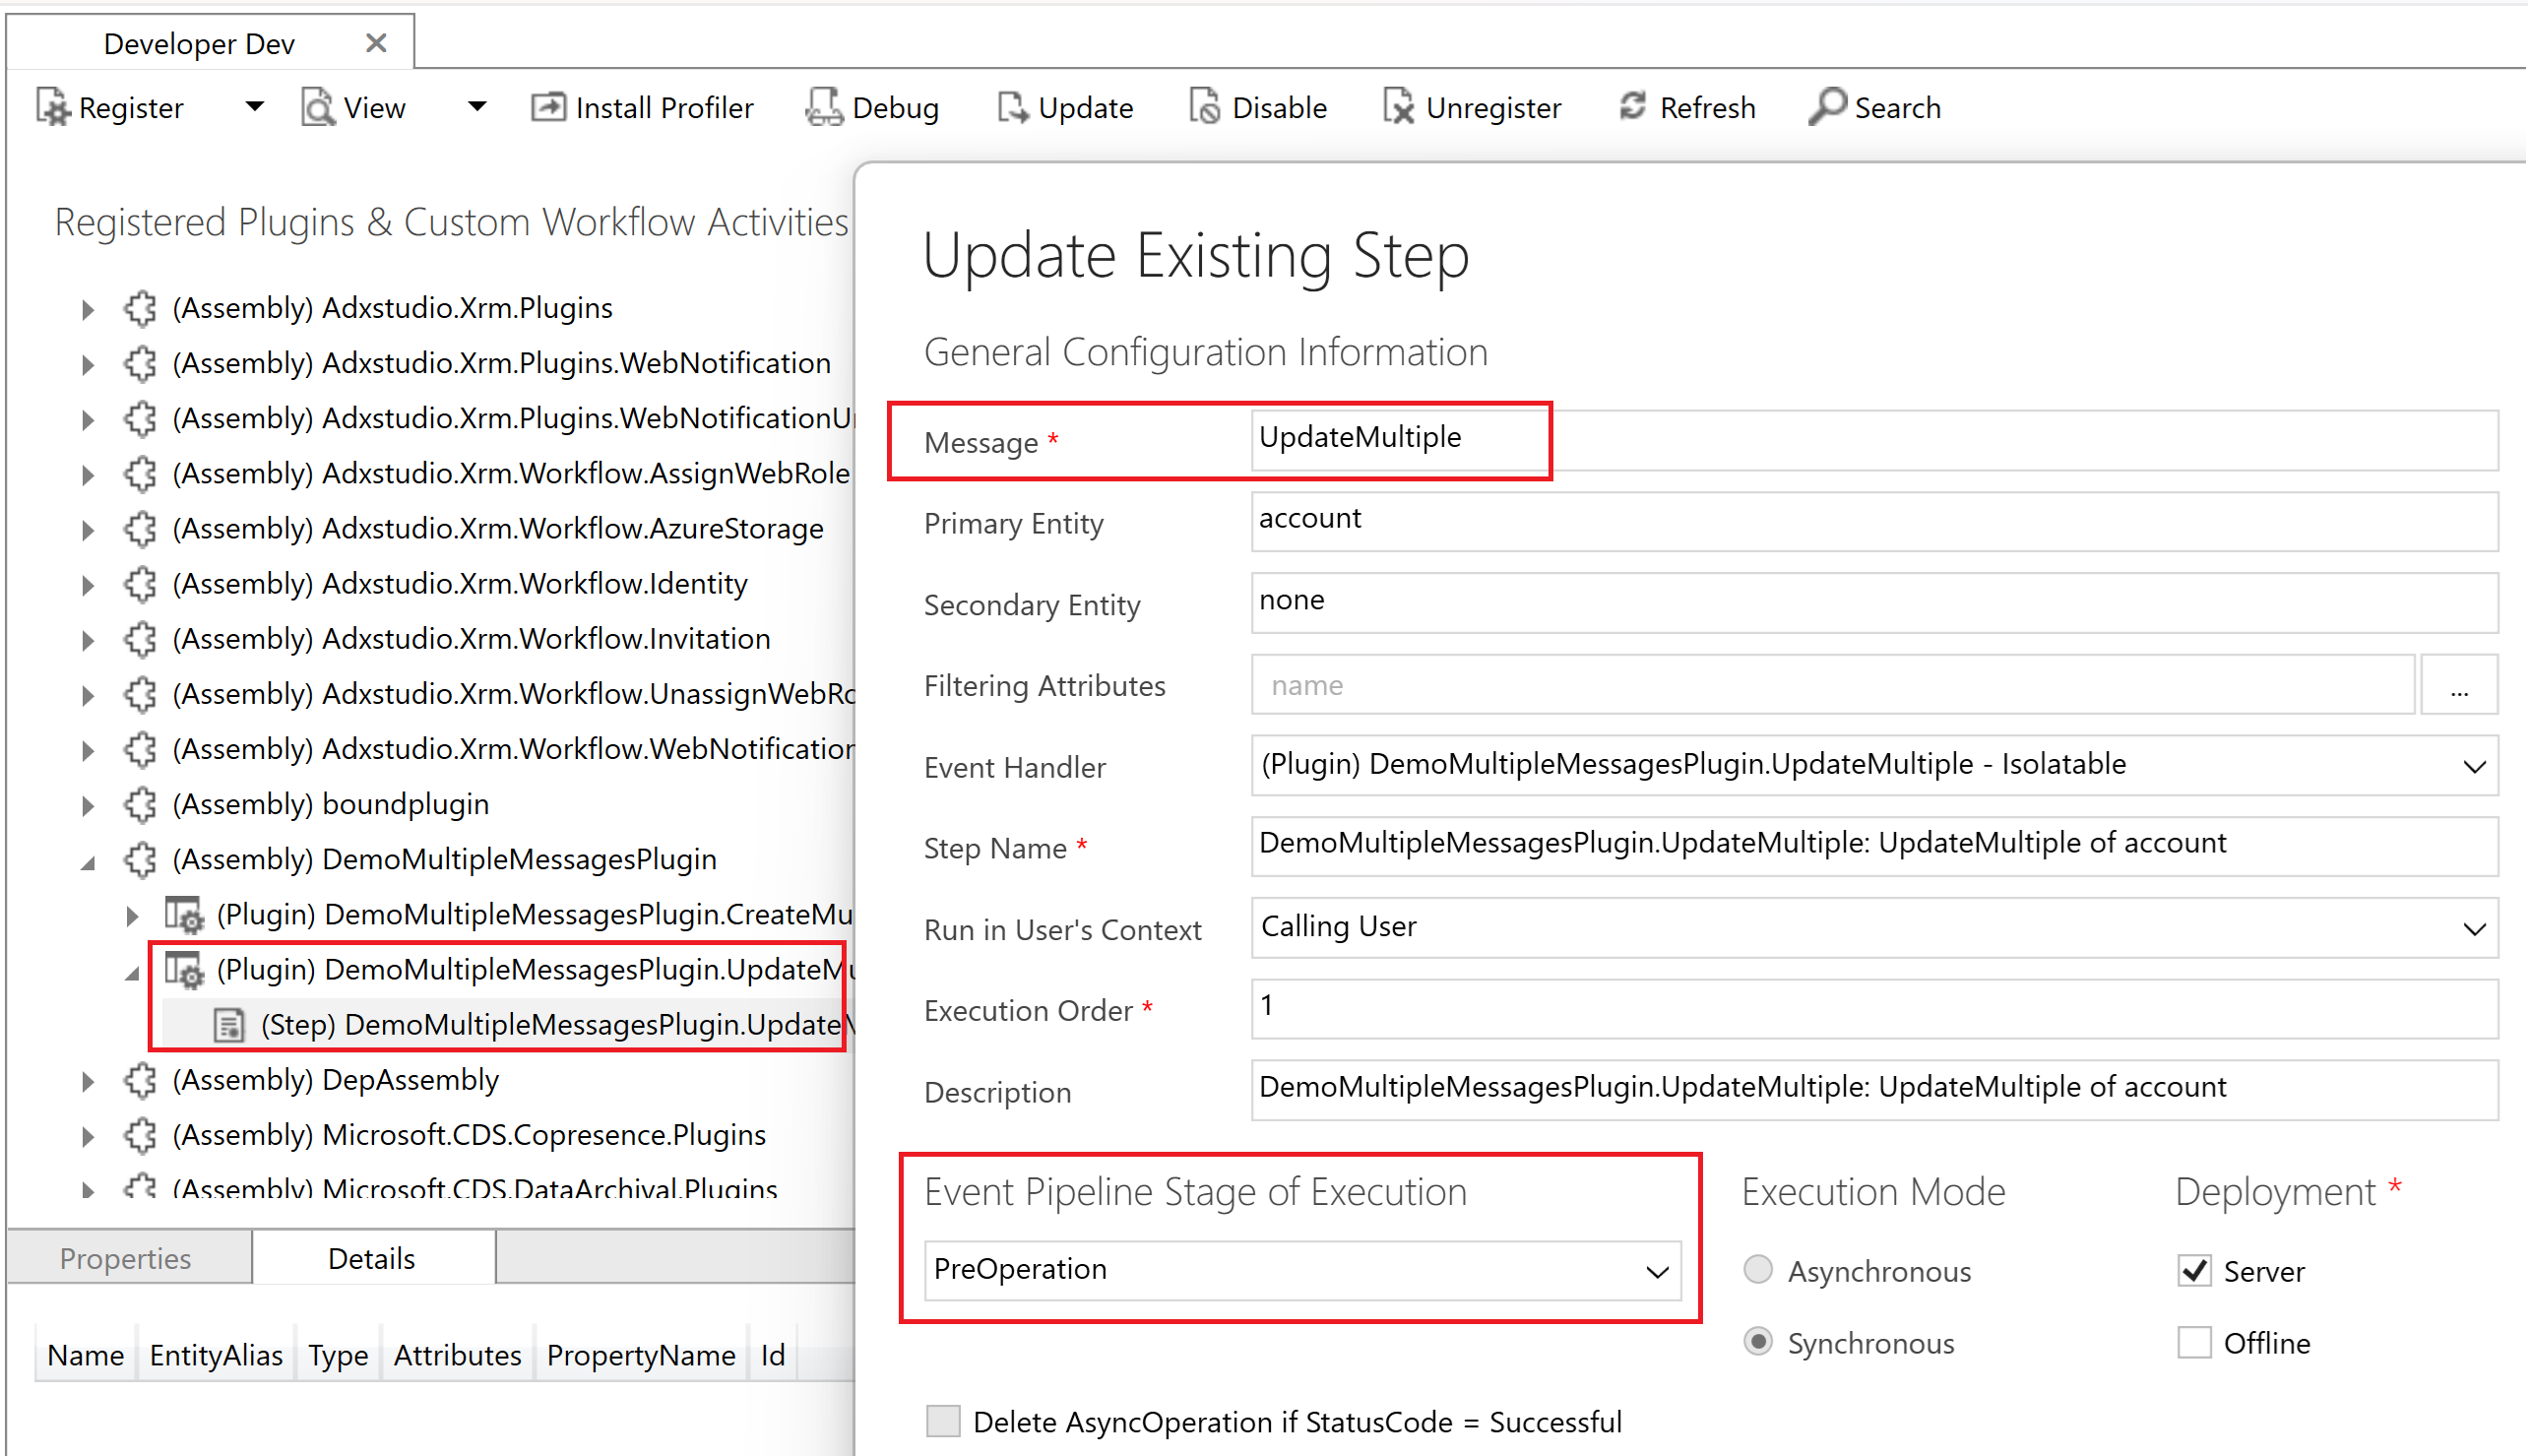
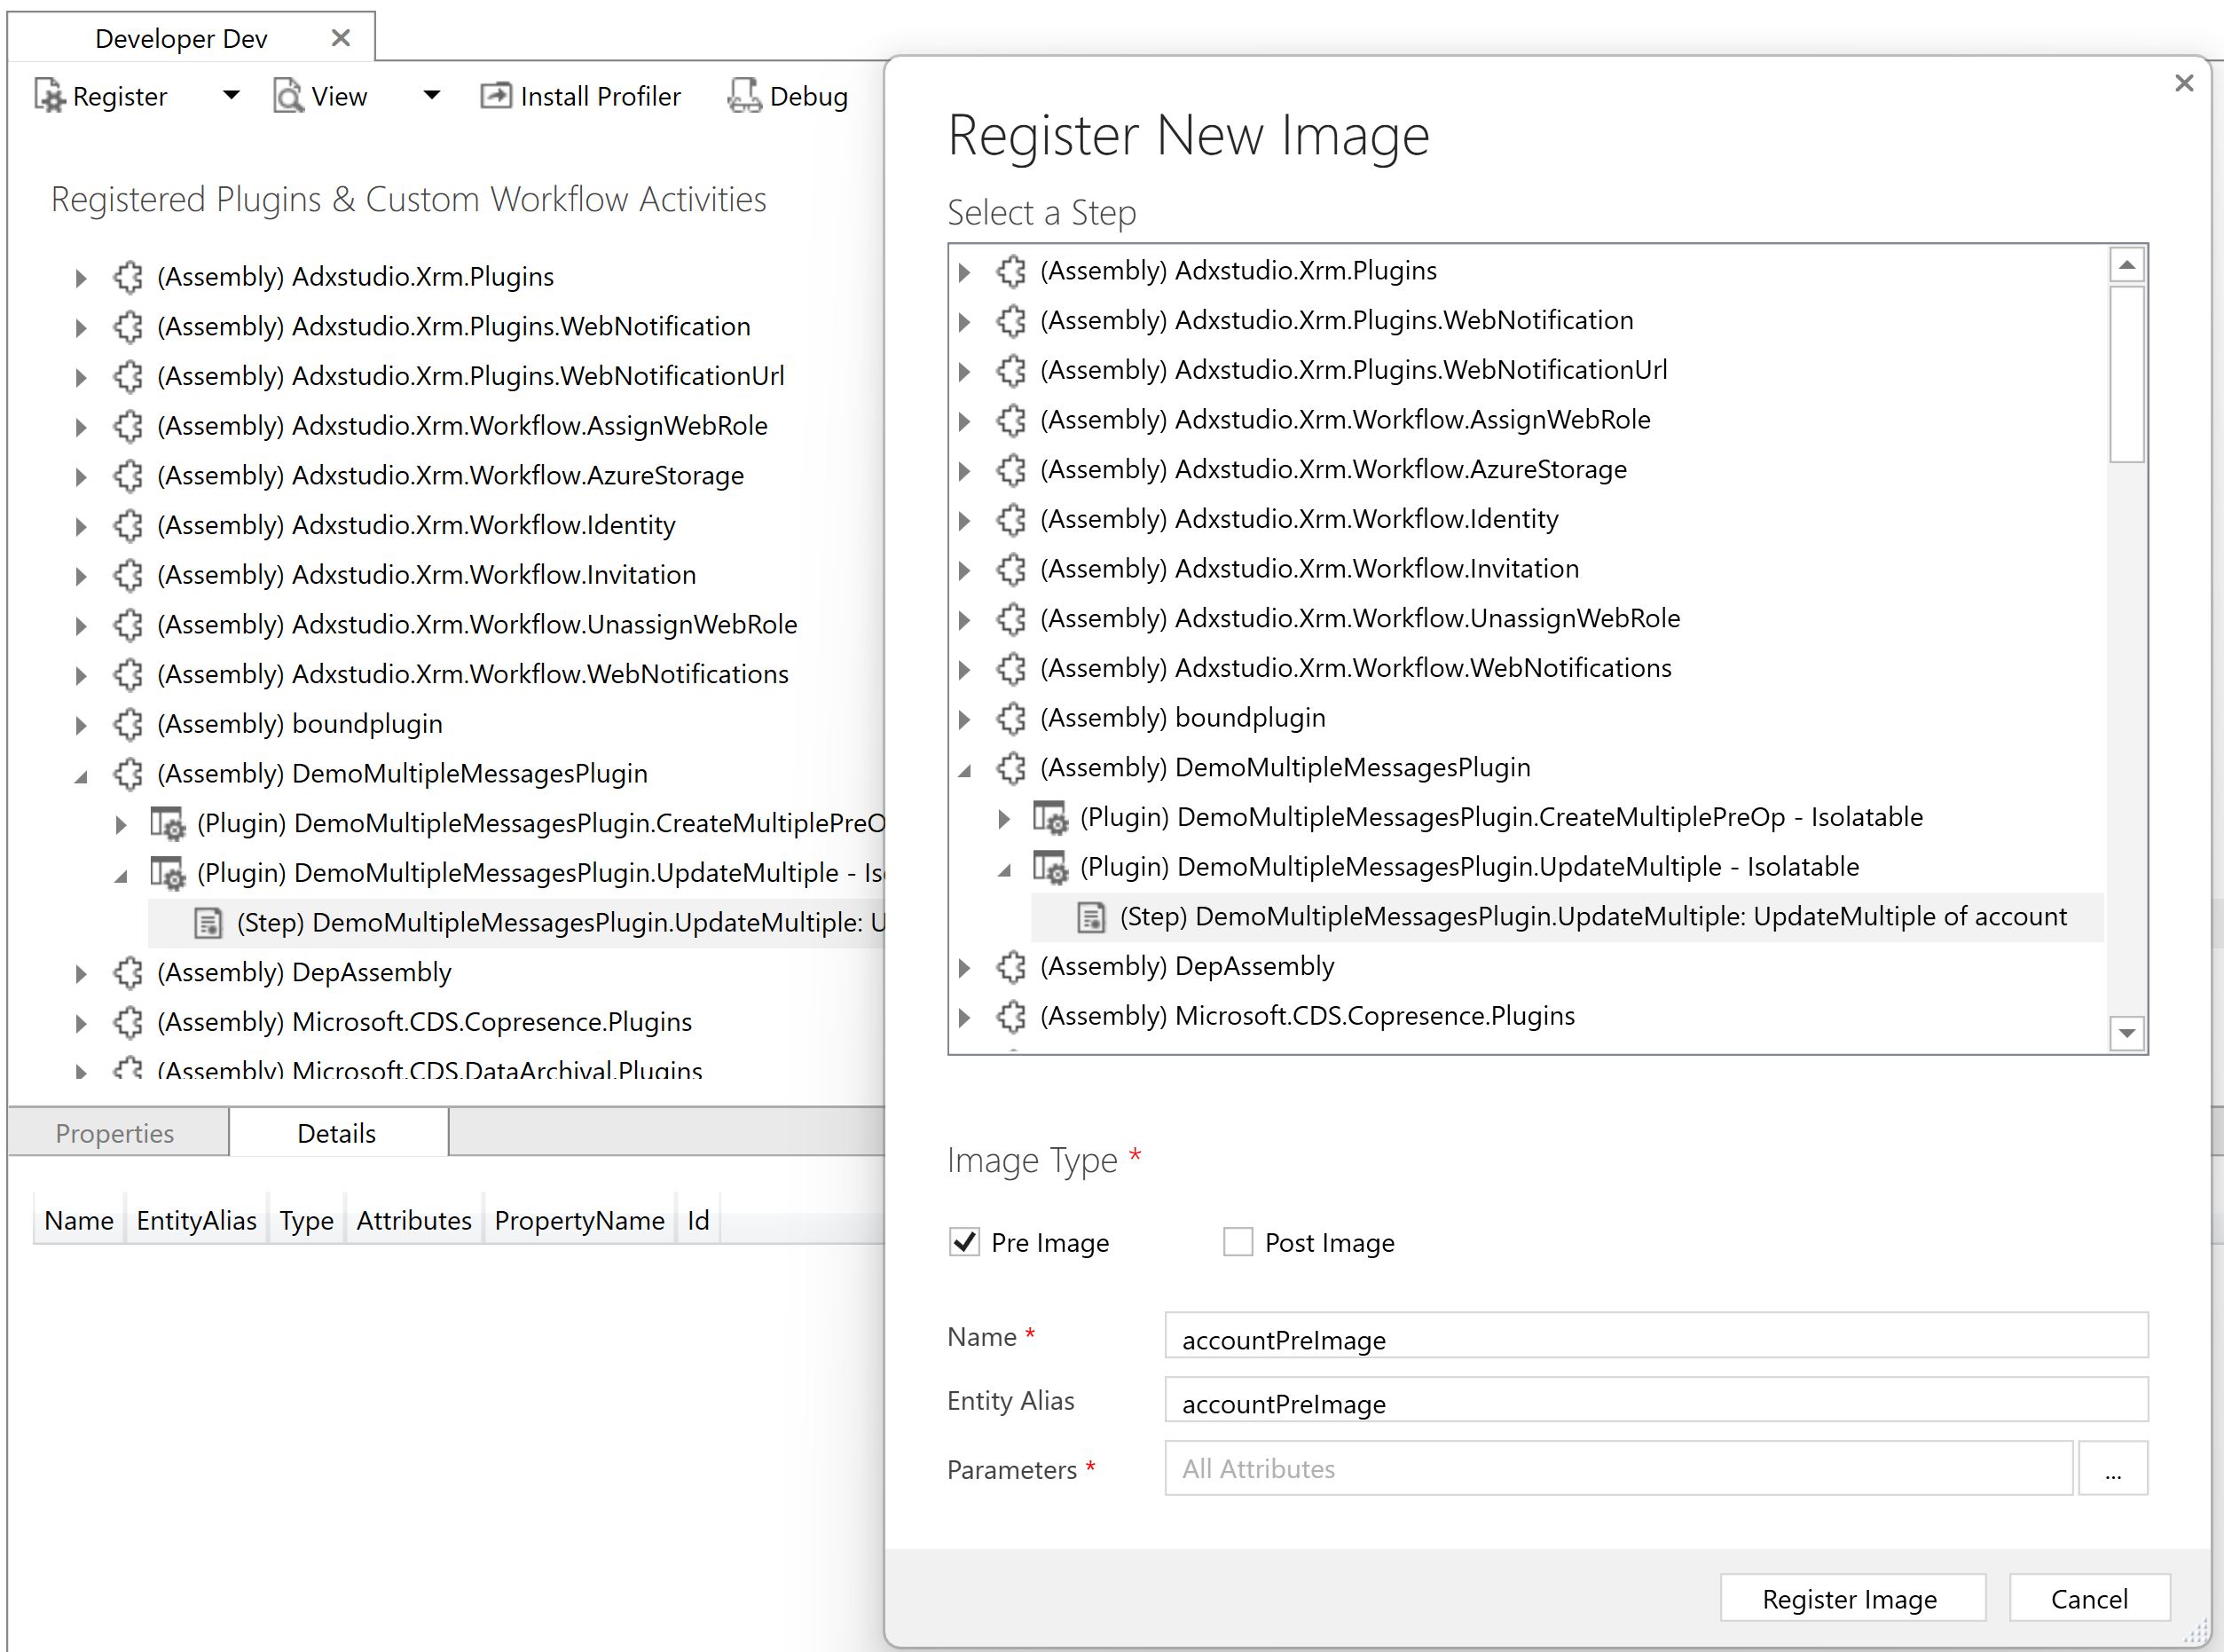
- Next, add a new pre image named accountPreImage to the UpdateMultiple plug-in step.
- Test the plug-in by updating few Account records Account Name field.

- You will notice the ‘Description’ of the ‘Account’ gets updated.

Please refer the Power Apps sample code here.
🙂


![[Step by Step] Beginner : Create a PCF control and add it to a custom page](https://rajeevpentyala.com/wp-content/uploads/2024/12/image-49.png)

Leave a comment